<?xml version="1.0" encoding="utf-8"?><?xml-stylesheet type="text/xsl" href="atom.xsl"?>
<feed xmlns="http://www.w3.org/2005/Atom">
    <id>https://learn.bitbybit.dev/blog</id>
    <title>Bitbybit Blog</title>
    <updated>2026-10-15T00:00:00.000Z</updated>
    <generator>https://github.com/jpmonette/feed</generator>
    <link rel="alternate" href="https://learn.bitbybit.dev/blog"/>
    <subtitle>Bitbybit Blog</subtitle>
    <icon>https://learn.bitbybit.dev/img/favicon-96x96.png</icon>
    <entry>
        <title type="html"><![CDATA[Introducing the Designer: Parametric CAD by Clicking, Built for People and Agents]]></title>
        <id>https://learn.bitbybit.dev/blog/introducing-the-designer</id>
        <link href="https://learn.bitbybit.dev/blog/introducing-the-designer"/>
        <updated>2026-10-15T00:00:00.000Z</updated>
        <summary type="html"><![CDATA[The Designer is Bitbybit's interactive CAD modeller. Sketch, extrude, round and drill parts, drive them with parameters, join them into assemblies that move, and export STEP, all in your browser on the Bitbybit OCCT Kernel. An AI agent can work in the same document while you keep or undo each of its changes. A desk robot arm, built step by step in a tutorial, shows it all.]]></summary>
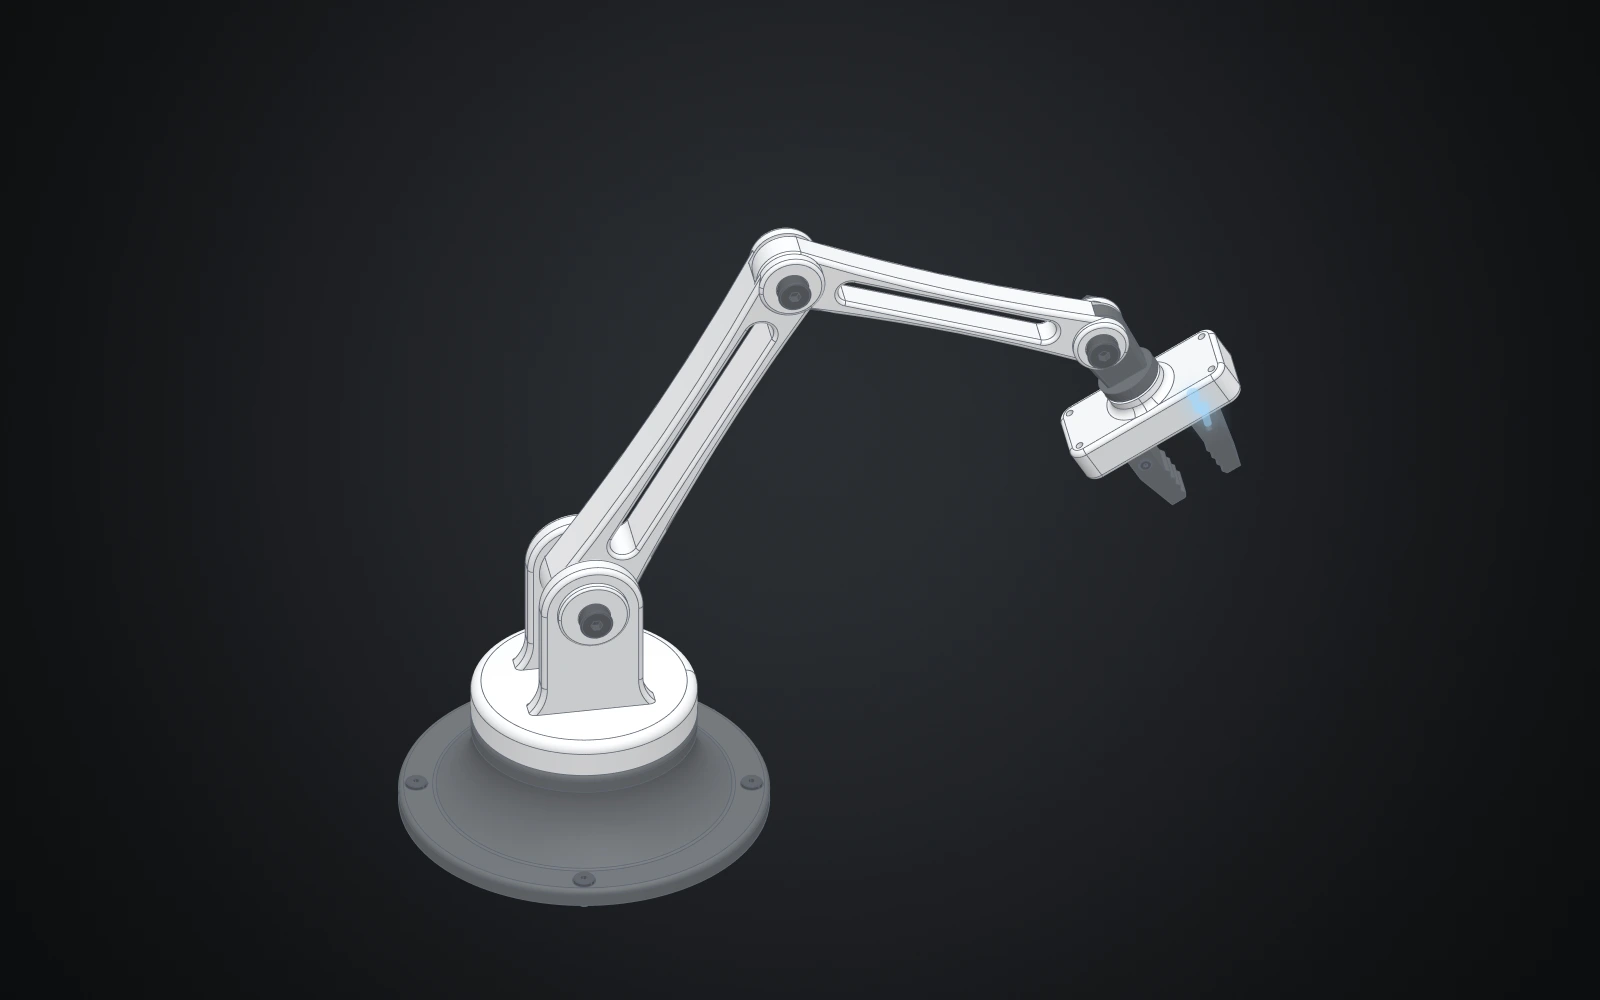
        <content type="html"><![CDATA[<img src="https://learn.bitbybit.dev/img/blog/introducing-the-designer/hero.webp" alt="The desk robot arm modelled in the Designer, in white and dark grey: a revolved base with four screws, a shoulder with a clevis, two links with lightening windows, a wrist and a gripper with two jaws" title="The desk robot arm, modelled in the Designer" style="max-width:100%">
<p>Until now, making geometry on Bitbybit meant writing it: wiring nodes in Rete, snapping blocks in Blockly or typing TypeScript. Those editors shine when a model is a program, a family of parts generated from a few numbers. But a lot of design isn't programming. You want to draw a profile, pull it into a solid, round an edge, drill four holes and see the result straight away.</p>
<p>The <strong>Designer</strong> is our answer: a parametric CAD modeller you use with the mouse, in your browser. Draw a sketch, extrude it, fillet it, drill it, then put parts together with joints and pose the assembly. Every step is kept, so changing a size later rebuilds everything that depends on it. The Bitbybit OCCT Kernel does the modelling on your own machine, so there is nothing to install. And because the Designer was built for AI agents as much as for people, an agent can work in the same document beside you, while you keep or undo each of its changes.</p>
<h2 class="anchor anchorTargetStickyNavbar_Vzrq" id="watch-a-desk-arm-built-from-a-blank-page">Watch a desk arm built from a blank page<a href="https://learn.bitbybit.dev/blog/introducing-the-designer#watch-a-desk-arm-built-from-a-blank-page" class="hash-link" aria-label="Direct link to Watch a desk arm built from a blank page" title="Direct link to Watch a desk arm built from a blank page" translate="no">​</a></h2>
<p>The film follows a desk robot arm from its first sketch to a moving assembly: a profile drawn and revolved into the base, a shoulder extruded, rounded and mirrored, a link driven by five parameters, the parts joined, posed and cut open, and finally a change made by a browser agent and kept in review. Every build runs at its real speed and the time it took is on screen; the stretches that are sped up are marked as a time-lapse.</p>
<div class="responsive-video-container"><iframe width="560" height="315" src="https://www.youtube.com/embed/NMRsm74vqSU" title="A desk robot arm modelled in the Bitbybit Designer, from a blank page to a moving assembly" frameborder="0" allow="accelerometer; autoplay; clipboard-write; encrypted-media; gyroscope; picture-in-picture; web-share; fullscreen" allowfullscreen=""></iframe></div>
<h2 class="anchor anchorTargetStickyNavbar_Vzrq" id="a-cad-program-in-a-browser-tab">A CAD program in a browser tab<a href="https://learn.bitbybit.dev/blog/introducing-the-designer#a-cad-program-in-a-browser-tab" class="hash-link" aria-label="Direct link to A CAD program in a browser tab" title="Direct link to A CAD program in a browser tab" translate="no">​</a></h2>
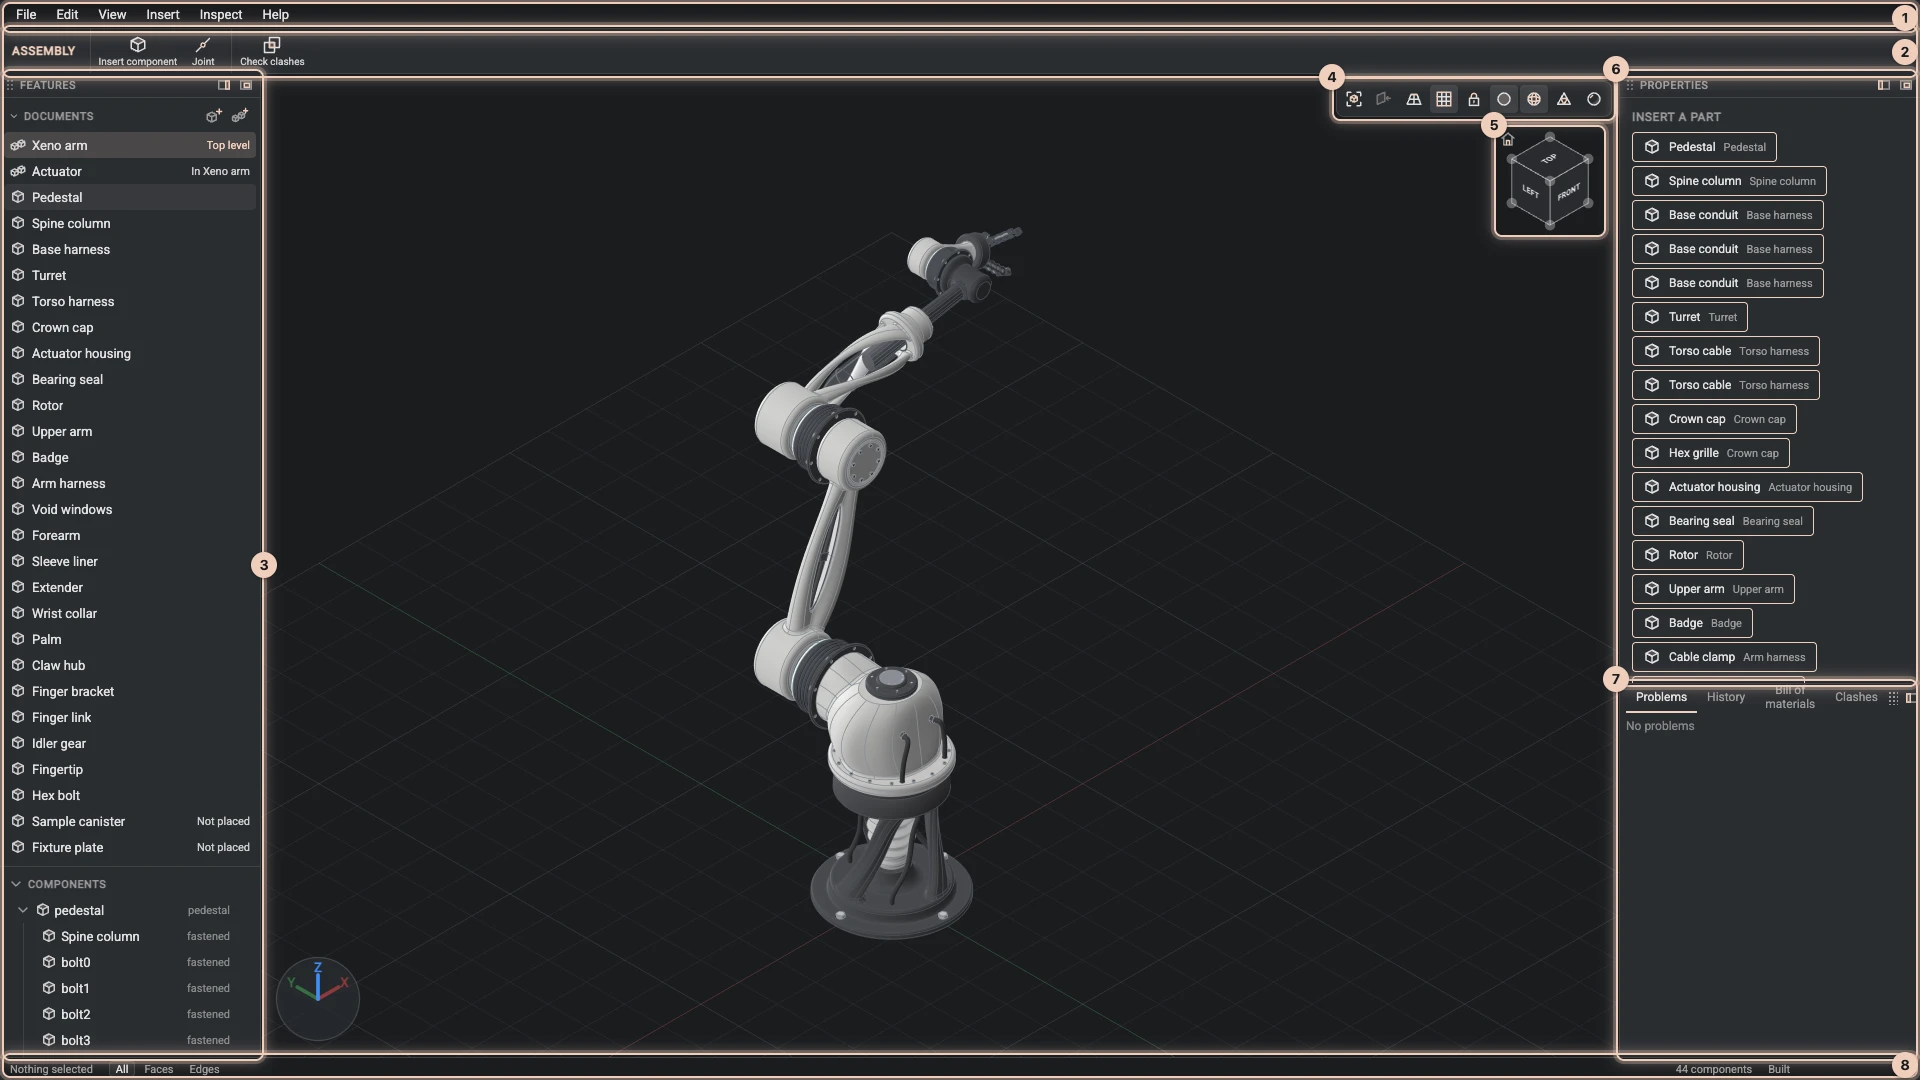
<div class="grid_hCdv" style="grid-template-columns:repeat(1, 1fr);gap:1rem"><img src="https://bitbybit.dev/files/site/learn/designer/designer.tour/window.b896623c.webp" alt="The Designer with the robot arm open: menus and toolbar along the top, the Features panel on the left, the view in the middle with its view bar and cube, Properties and the dock on the right, the status bar along the bottom" width="1920" height="1080" loading="lazy" decoding="async" class="thumbnail_bKFe"></div>
<p>The Designer looks and works like a desktop CAD program. Menus and a toolbar run along the top. The <strong>Features</strong> panel on the left lists the project's documents and the history of the one you have open. The view sits in the middle, with a view cube and a bar of display switches, and <strong>Properties</strong> and the dock fill the right. Each panel docks left, right or at the bottom, or floats. Press <kbd>Ctrl+K</kbd> (<kbd>⌘K</kbd> on macOS) to find any command by name.</p>
<p>A Designer project lives on bitbybit.dev like any other: it saves as you work and keeps versions you can go back to. The geometry a build makes is kept beside the project, so even a large model usually opens in seconds.</p>
<h2 class="anchor anchorTargetStickyNavbar_Vzrq" id="sketch-then-build-features-on-it">Sketch, then build features on it<a href="https://learn.bitbybit.dev/blog/introducing-the-designer#sketch-then-build-features-on-it" class="hash-link" aria-label="Direct link to Sketch, then build features on it" title="Direct link to Sketch, then build features on it" translate="no">​</a></h2>
<div class="grid_hCdv" style="grid-template-columns:repeat(2, 1fr);gap:1rem"><img src="https://bitbybit.dev/files/site/learn/designer/designer.modelling.sketches/pen.8fb6a952.webp" alt="The link's side sketch open: its outline in the view, the sketch bar above it, and its pen commands, arcs written in the link's parameters" width="1920" height="1080" loading="lazy" decoding="async" class="thumbnail_bKFe"><img src="https://bitbybit.dev/files/site/learn/designer/designer.modelling.features/extrude.45db7a09.webp" alt="The link's extrude open in its dialog: the sketch it uses, its distance written as the width parameter, a new body, and OK" width="1920" height="1080" loading="lazy" decoding="async" class="thumbnail_bKFe"></div>
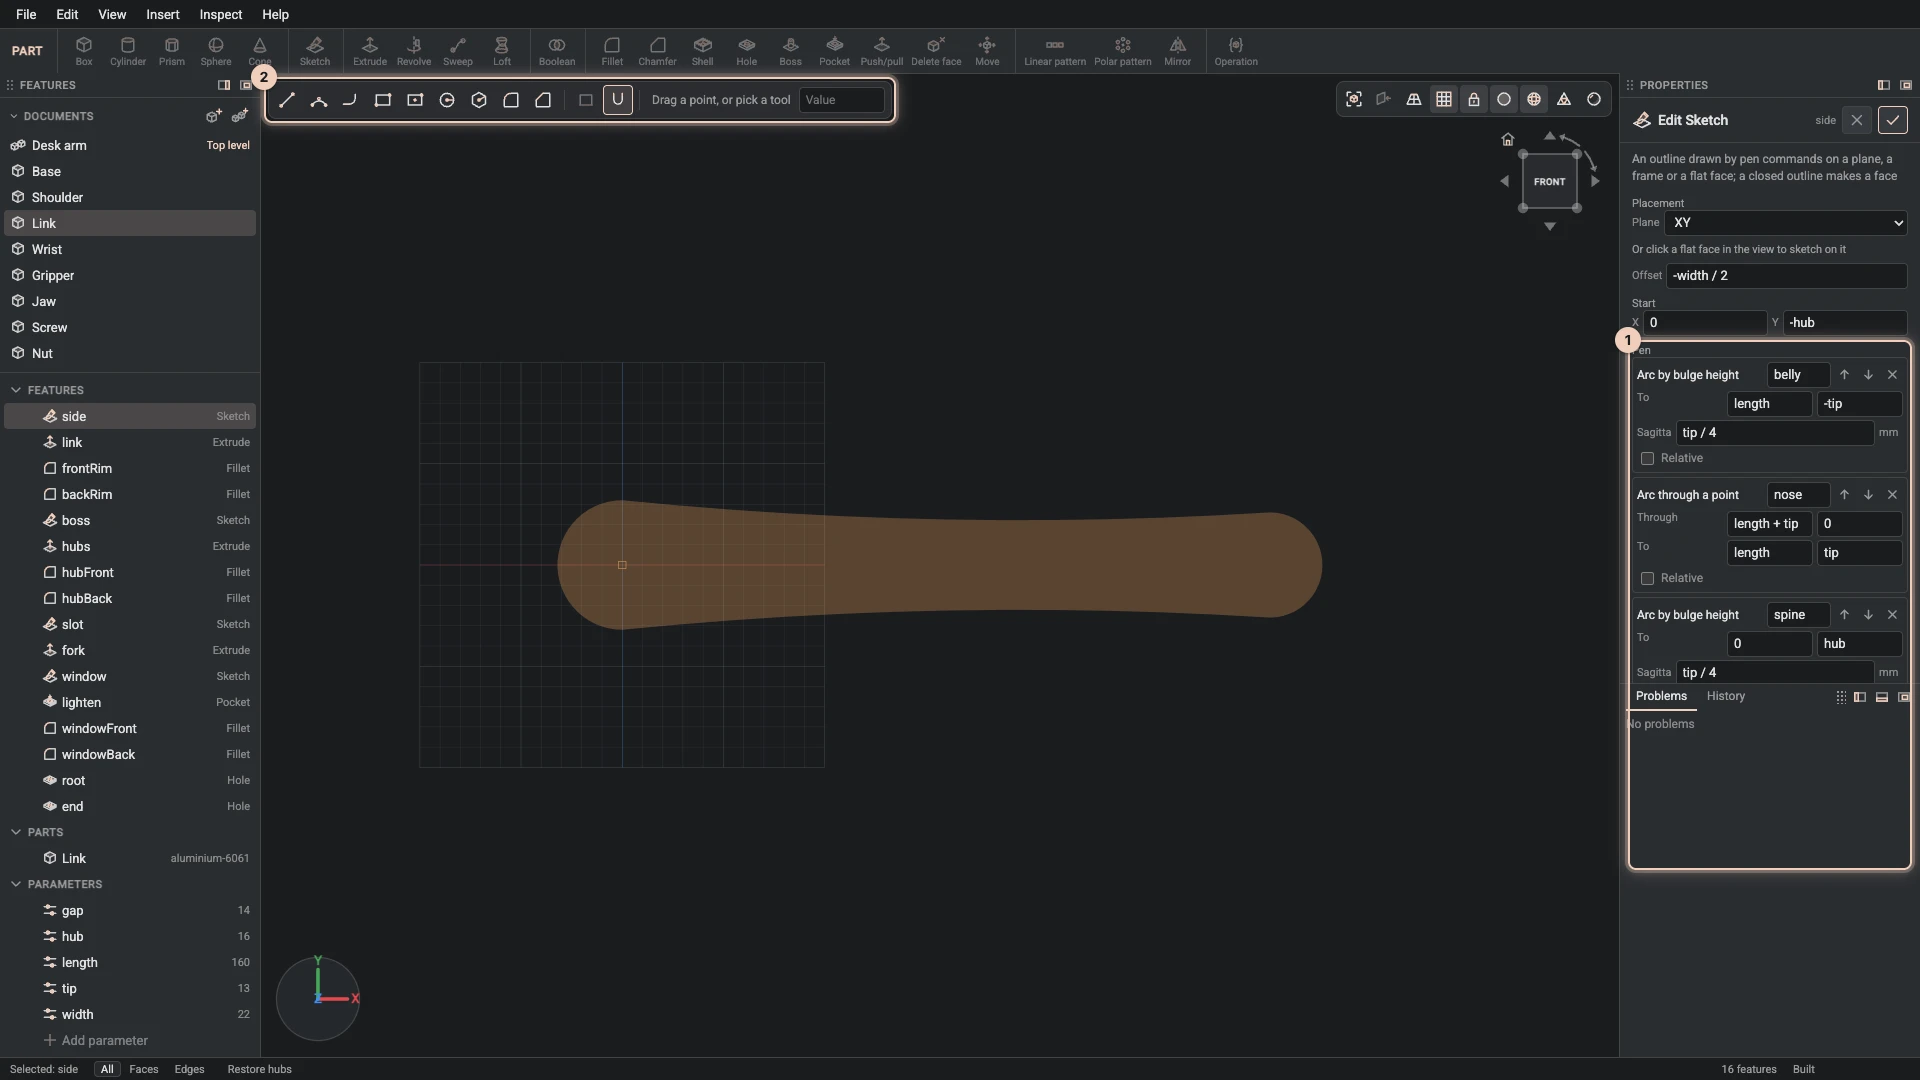
<p>A part starts with a sketch: lines, arcs and rounded corners drawn on a plane or on a face of the part, with snapping, a grid and typed values. Every segment has a name, so the features that follow refer to the faces it makes by name rather than by a fragile number.</p>
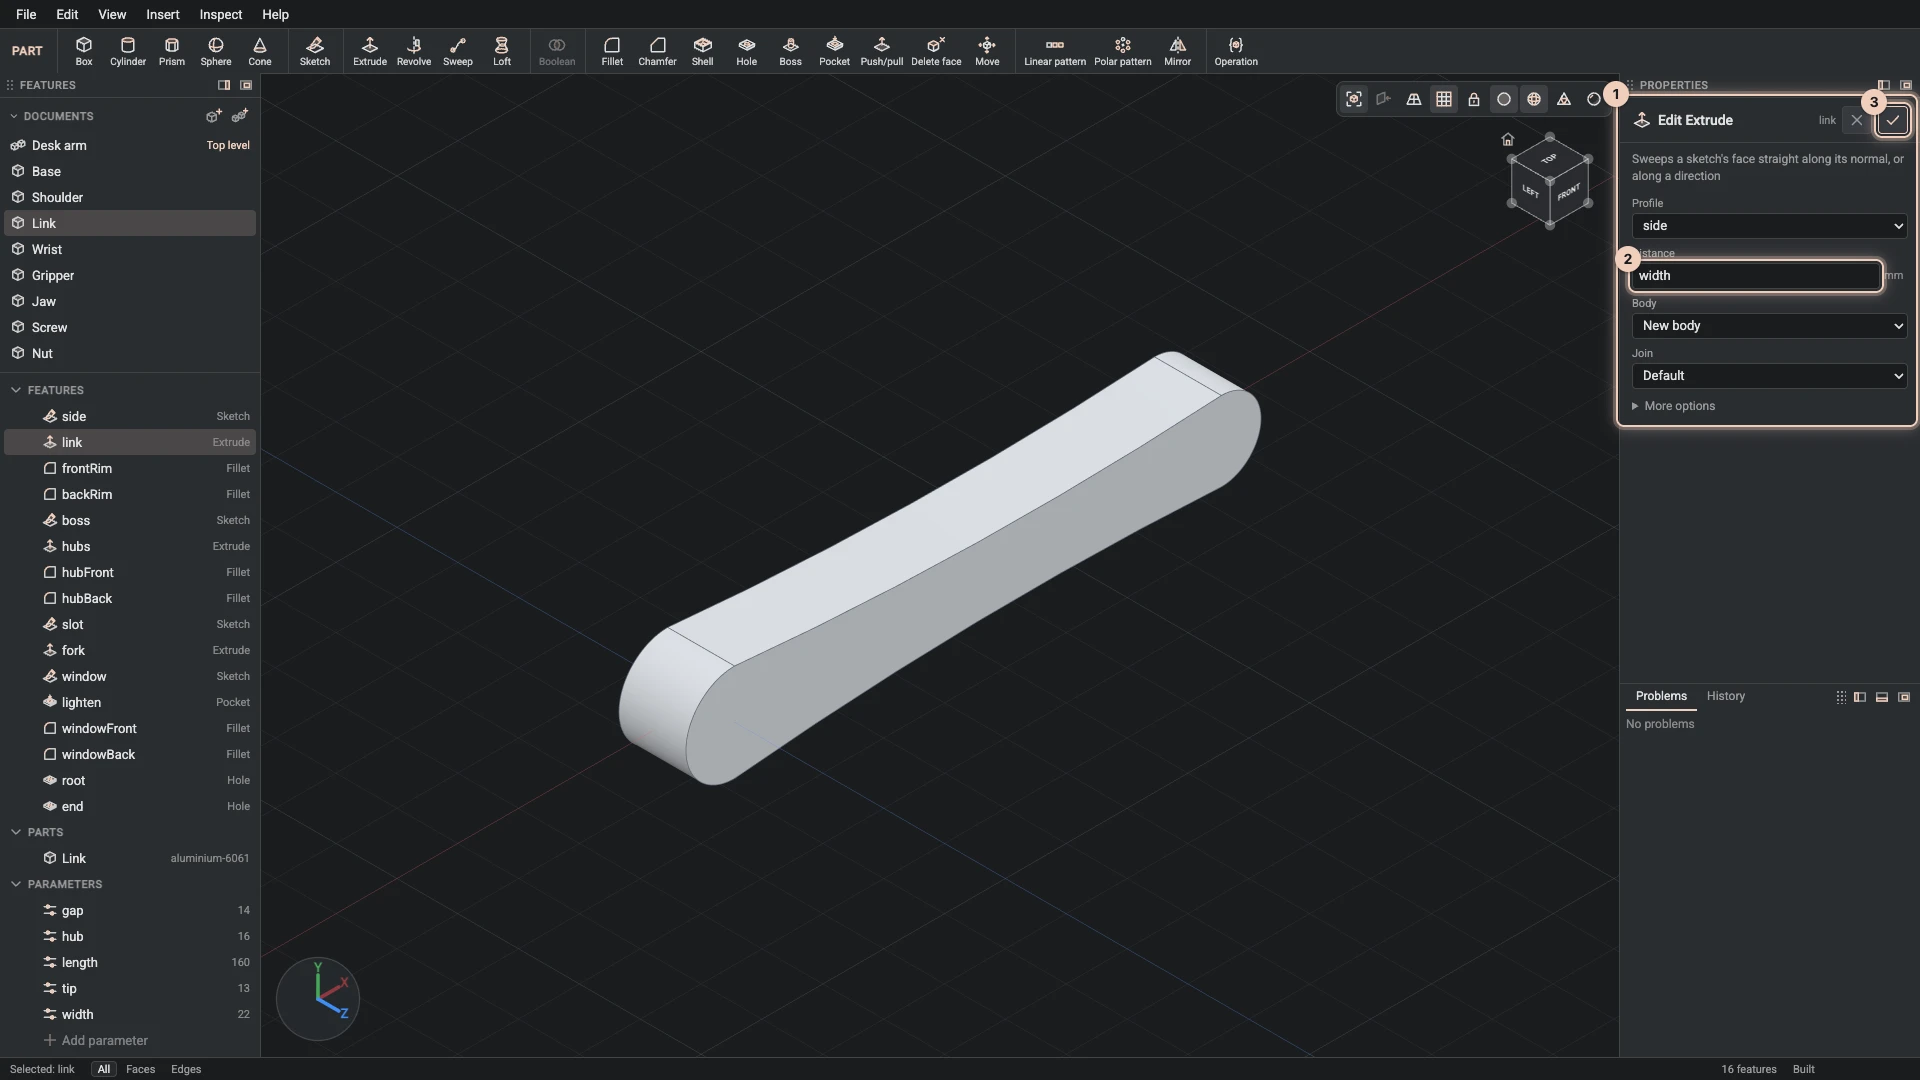
<p>From a sketch you build features: <strong>extrude</strong> and <strong>revolve</strong>, <strong>loft</strong> and <strong>sweep</strong>, a <strong>boss</strong> or a <strong>pocket</strong> on a face, <strong>push/pull</strong> of any face, <strong>fillets</strong> and <strong>chamfers</strong>, a <strong>shell</strong>, <strong>holes</strong> with counterbores, <strong>linear and polar patterns</strong>, <strong>mirror</strong>, <strong>booleans</strong> and <strong>move</strong>. When those are not enough, an <strong>operation</strong> feature runs a modelling operation of the Bitbybit API as a step of the history.</p>
<p>Each feature opens a dialog with a live preview and handles in the view. Drag a handle and a light proxy follows the pointer at once, while the kernel builds the real preview behind it.</p>
<h2 class="anchor anchorTargetStickyNavbar_Vzrq" id="every-step-is-kept">Every step is kept<a href="https://learn.bitbybit.dev/blog/introducing-the-designer#every-step-is-kept" class="hash-link" aria-label="Direct link to Every step is kept" title="Direct link to Every step is kept" translate="no">​</a></h2>
<div class="grid_hCdv" style="grid-template-columns:repeat(1, 1fr);gap:1rem"><img src="https://bitbybit.dev/files/site/learn/designer/designer.modelling.history/rolled-back.ae94245b.webp" alt="The link rolled back to its lighten pocket: the marker under it, the later fillets and holes greyed and left out of the build" width="1920" height="1080" loading="lazy" decoding="async" class="thumbnail_bKFe"></div>
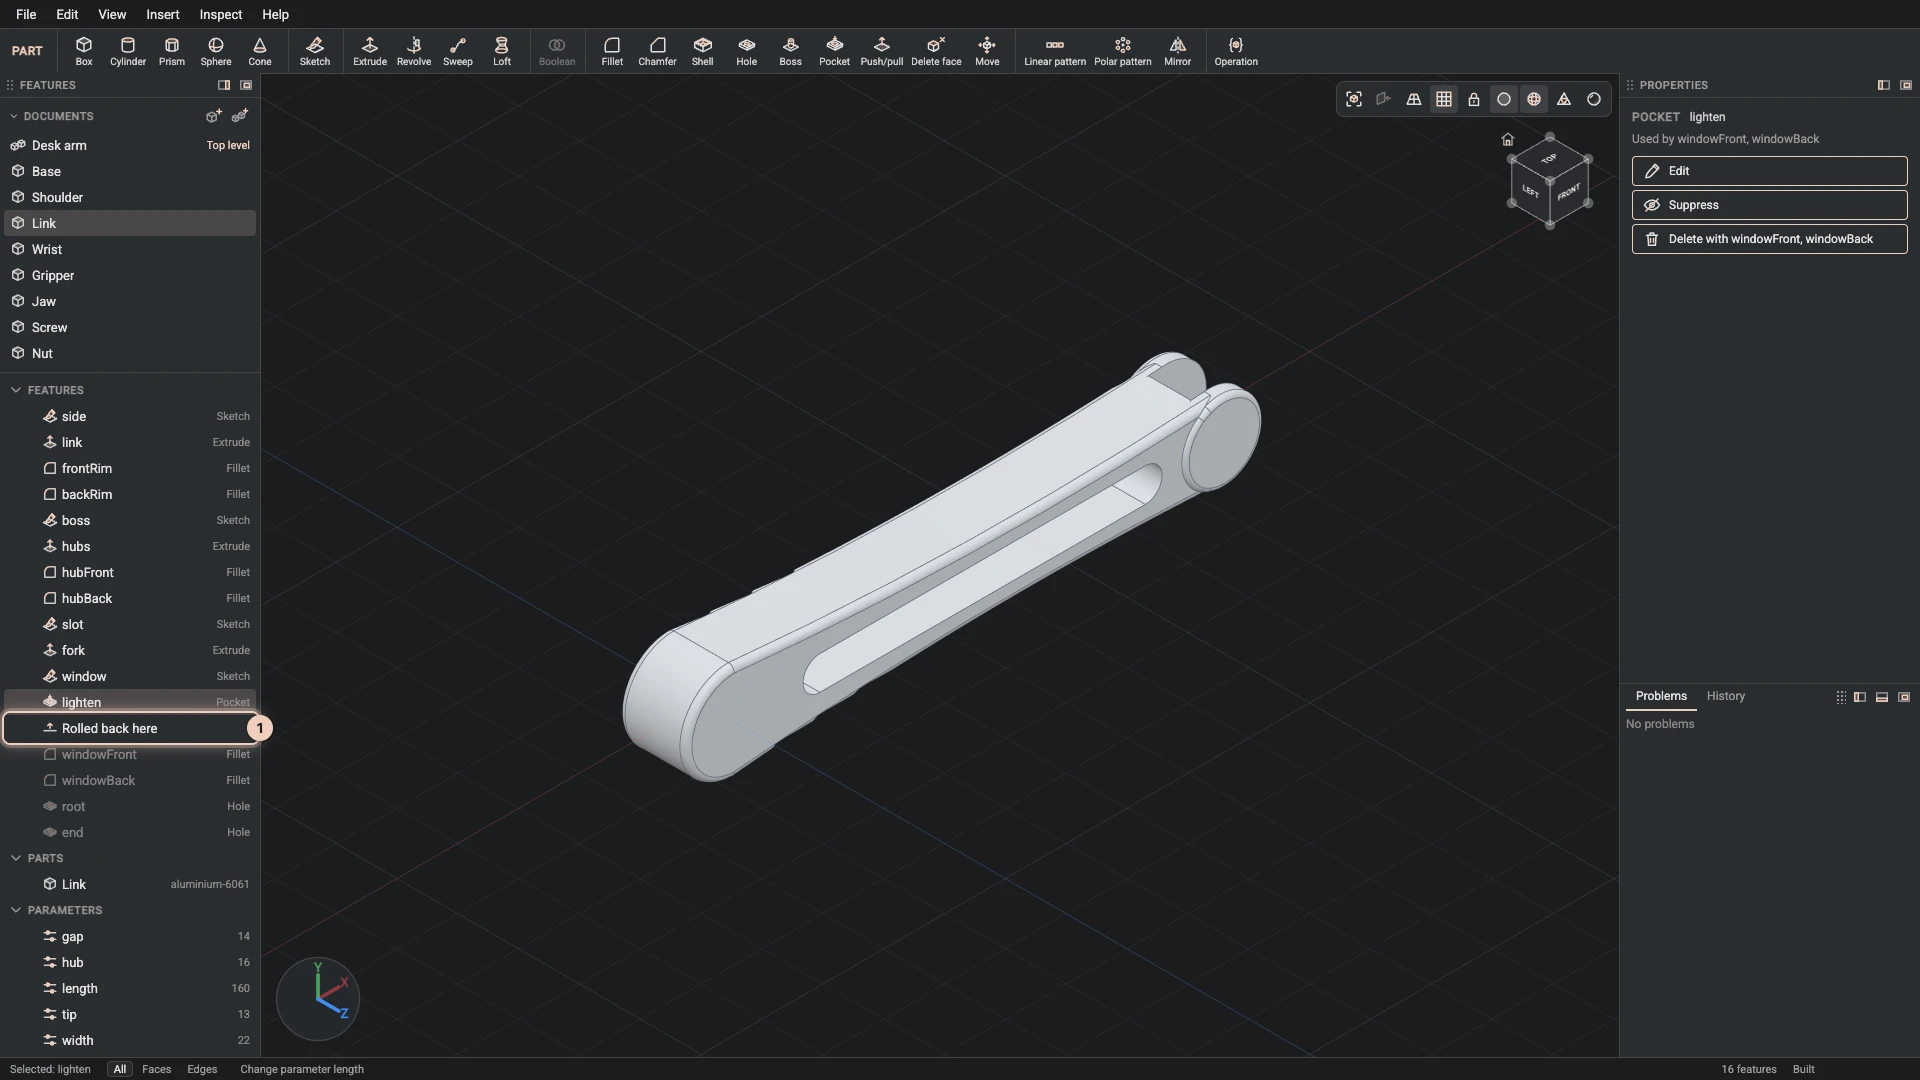
<p>The <strong>Features</strong> panel is the part's history. Double-click any feature to edit it in its dialog, drag it to a new place in the order, or roll the part back to see it as it was at any step. References follow faces by the names the document gives them, so an edit early in the history doesn't quietly break a fillet that comes later. When a reference does get lost, the feature turns red, the <strong>Problems</strong> tab says why, and a repair view offers the faces that fit.</p>
<h2 class="anchor anchorTargetStickyNavbar_Vzrq" id="parameters-drive-the-design">Parameters drive the design<a href="https://learn.bitbybit.dev/blog/introducing-the-designer#parameters-drive-the-design" class="hash-link" aria-label="Direct link to Parameters drive the design" title="Direct link to Parameters drive the design" translate="no">​</a></h2>
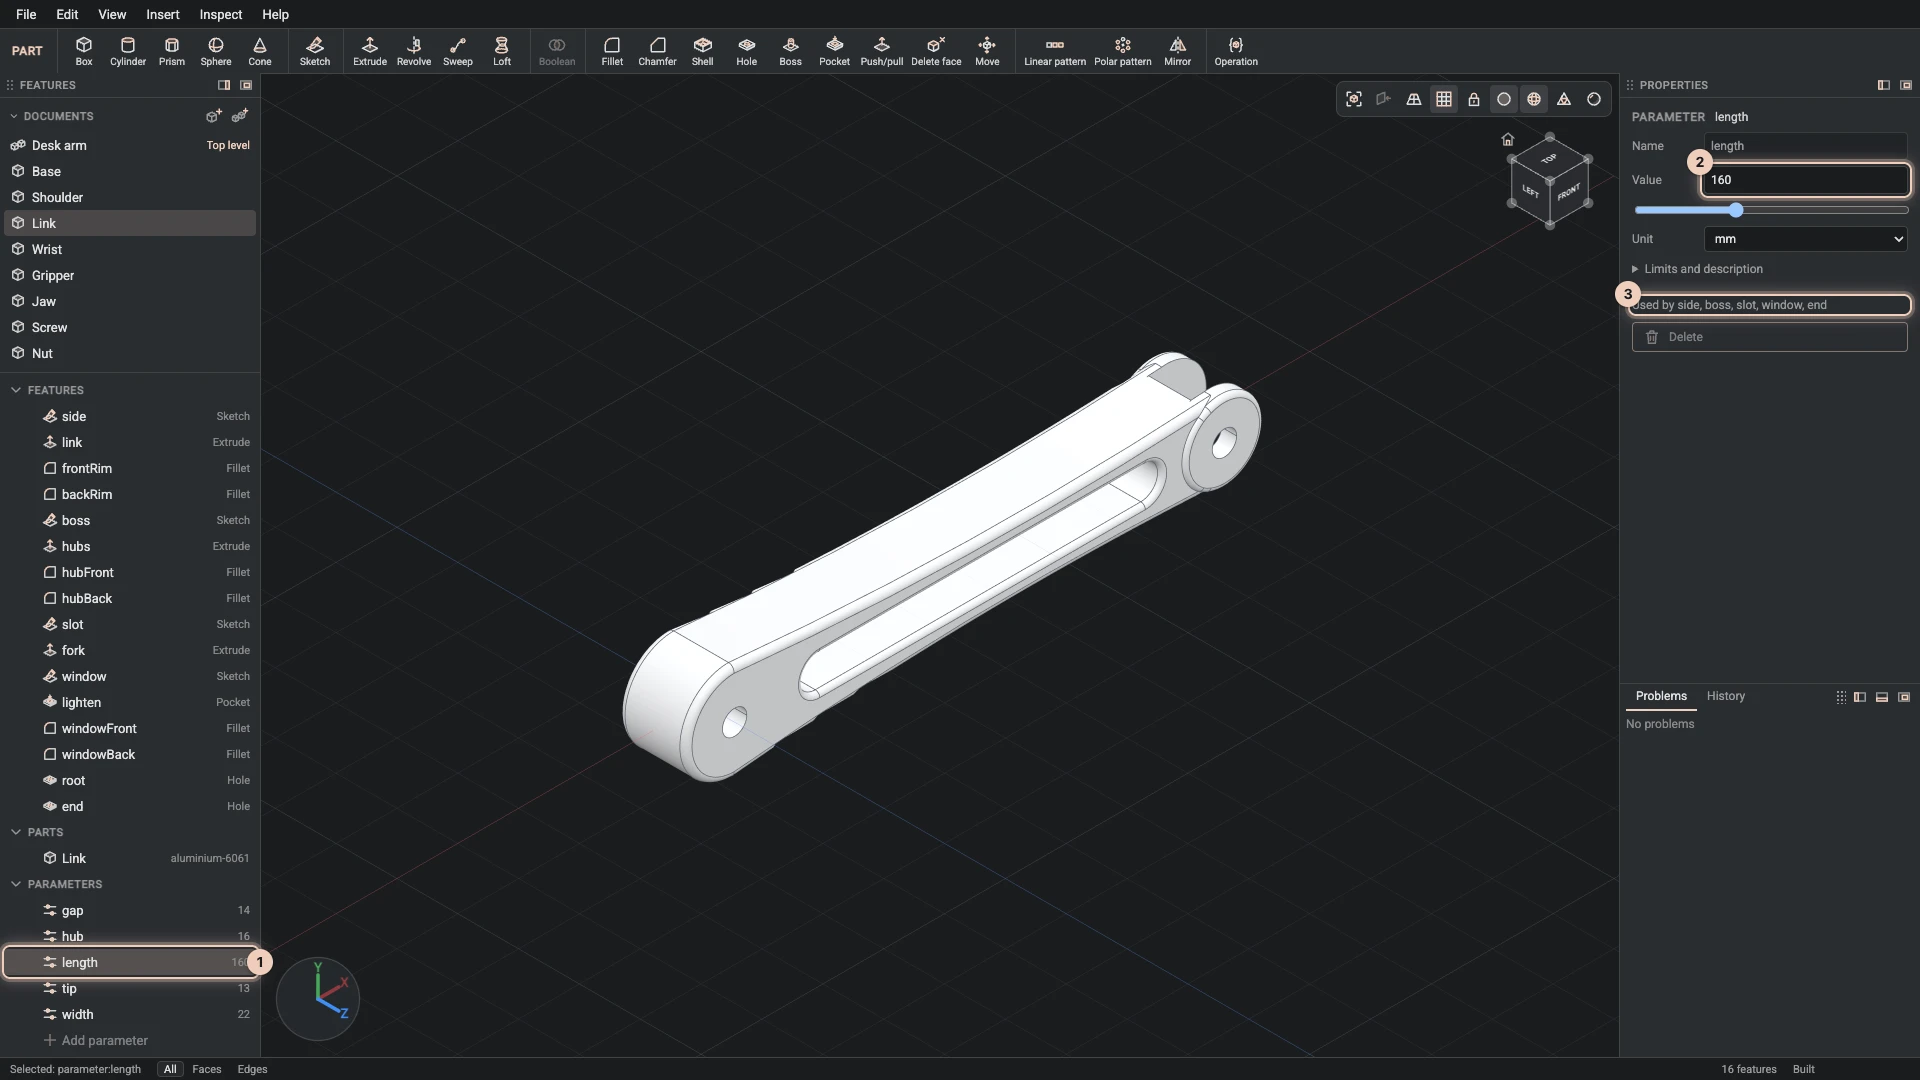
<div class="grid_hCdv" style="grid-template-columns:repeat(1, 1fr);gap:1rem"><img src="https://bitbybit.dev/files/site/learn/designer/designer.modelling.parameters/parameter.c9ef65b6.webp" alt="The link's length parameter selected: its name, value, slider and unit in Properties, and the features that use it" width="1920" height="1080" loading="lazy" decoding="async" class="thumbnail_bKFe"></div>
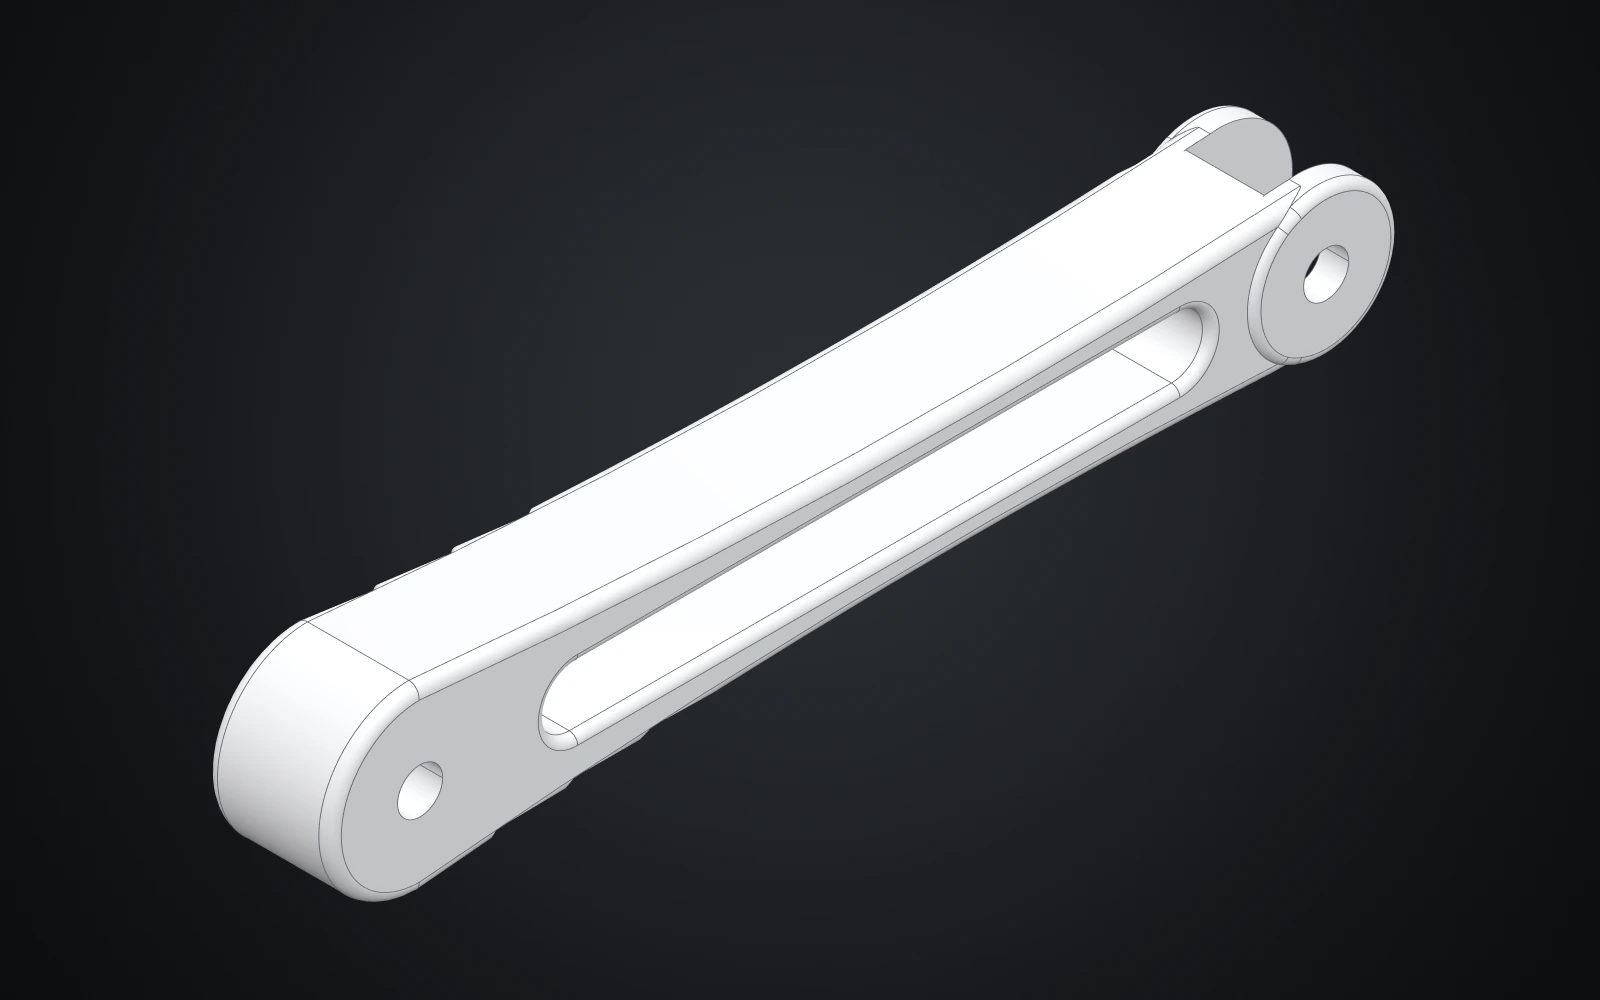
<p>Name the sizes that matter and write the others as expressions of them. The desk arm's link is one document with five parameters (length, width, gap, hub and tip), and its waisted outline, the fork at its far end, the lightening window and both pivot holes are all expressions of them. Change the length and the whole link follows.</p>
<p>A <strong>configuration</strong> keeps a set of values under a name, so one model can have a <em>Rest</em> and a <em>Reach</em> pose, or a short and a long version. And one document can serve many times: the desk arm's upper arm and forearm are the same link, inserted twice with values of their own.</p>
<h2 class="anchor anchorTargetStickyNavbar_Vzrq" id="parts-with-materials-and-a-realistic-look">Parts with materials, and a realistic look<a href="https://learn.bitbybit.dev/blog/introducing-the-designer#parts-with-materials-and-a-realistic-look" class="hash-link" aria-label="Direct link to Parts with materials, and a realistic look" title="Direct link to Parts with materials, and a realistic look" translate="no">​</a></h2>
<div class="grid_hCdv" style="grid-template-columns:repeat(1, 1fr);gap:1rem"><img src="https://bitbybit.dev/files/site/learn/designer/designer.modelling.parts/realistic.b182cdb5.webp" alt="The link drawn realistically: brushed aluminium with reflections and a soft shadow" width="1920" height="1080" loading="lazy" decoding="async" class="thumbnail_bKFe"></div>
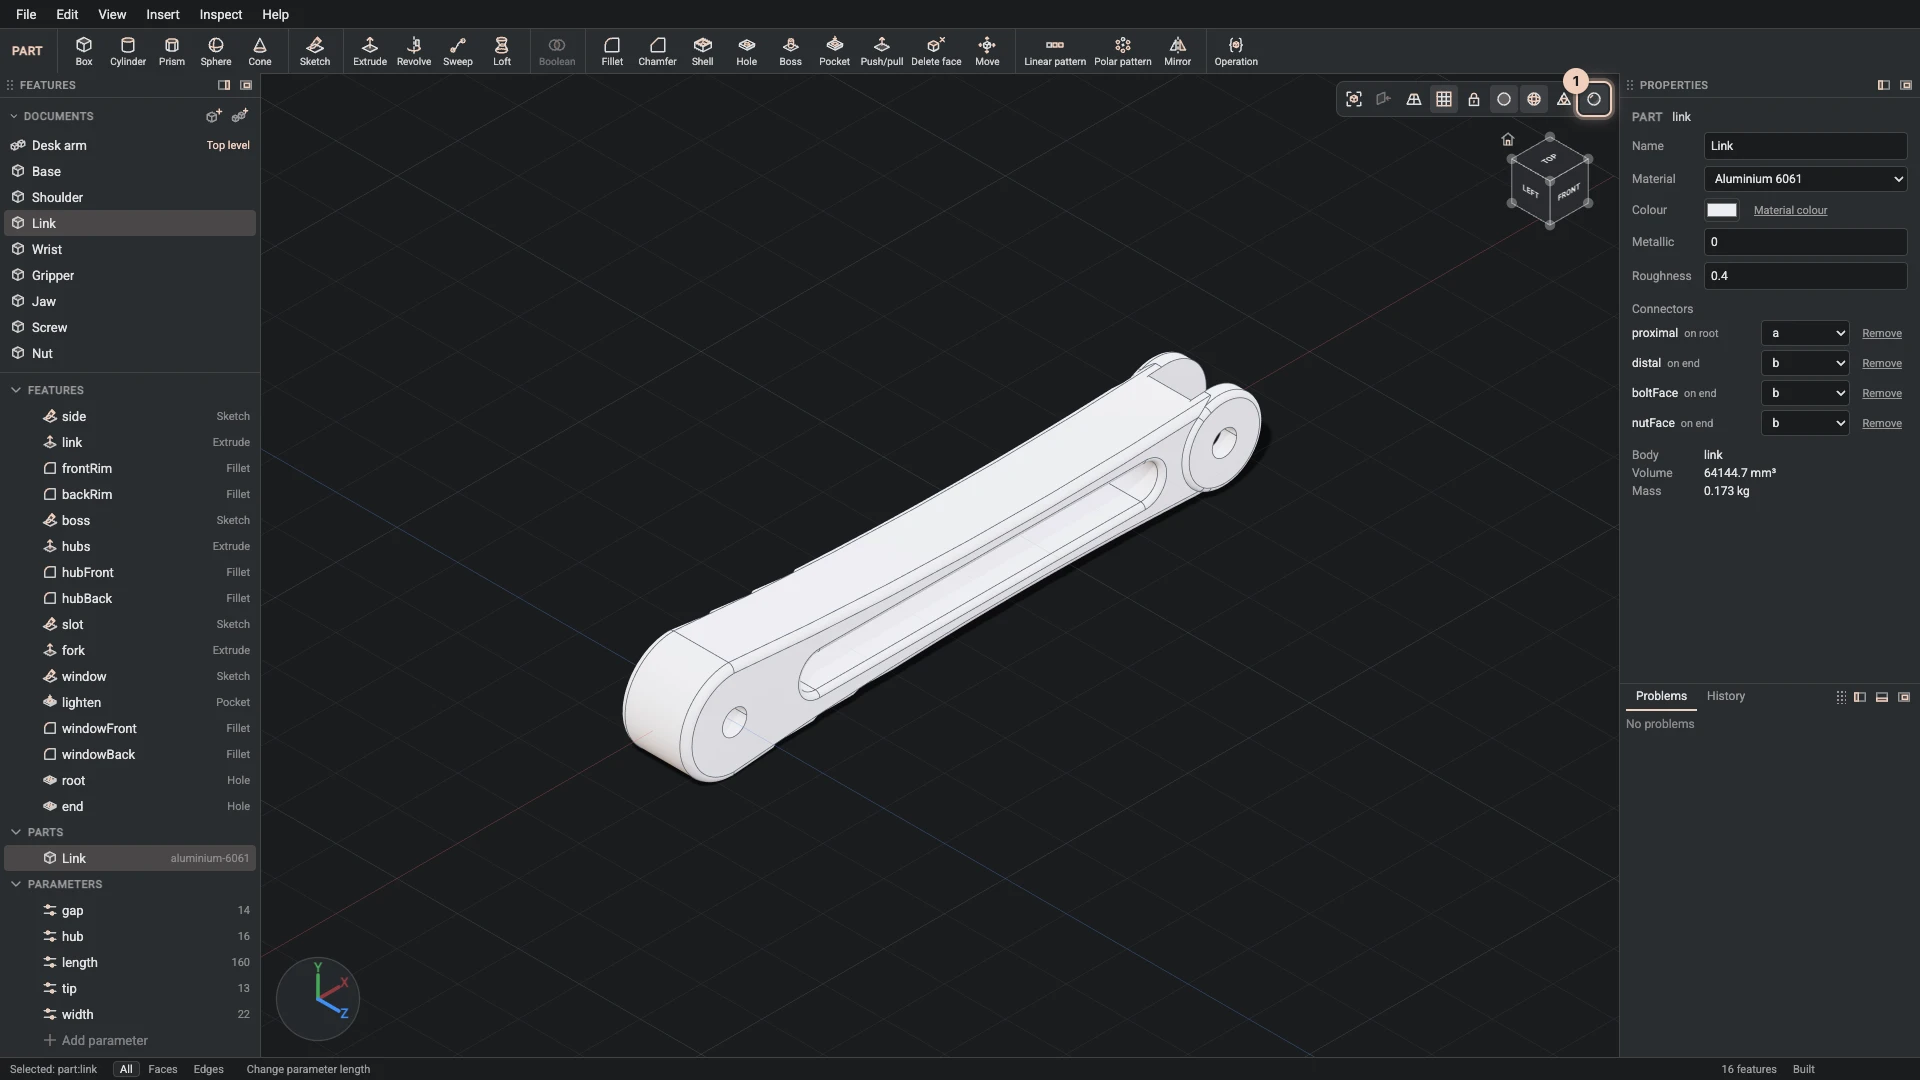
<p>A part has a name, a material, a colour and a finish, and the Designer works out its volume and mass from the material's density. Switch on the realistic look to see the materials with reflections and soft shadows, or show only edges, or the triangles the view draws.</p>
<h2 class="anchor anchorTargetStickyNavbar_Vzrq" id="assemblies-that-move">Assemblies that move<a href="https://learn.bitbybit.dev/blog/introducing-the-designer#assemblies-that-move" class="hash-link" aria-label="Direct link to Assemblies that move" title="Direct link to Assemblies that move" translate="no">​</a></h2>
<div class="grid_hCdv" style="grid-template-columns:repeat(3, 1fr);gap:1rem"><img src="https://bitbybit.dev/files/site/learn/designer/designer.assemblies.joints/joint.ceb450bf.webp" alt="The desk arm's elbow joint: the forearm moved at its proximal connector onto the upper arm's distal one, revolute, its angle driven by the elbow parameter, limited to 150 degrees each way" width="1920" height="1080" loading="lazy" decoding="async" class="thumbnail_bKFe"><img src="https://bitbybit.dev/files/site/learn/designer/designer.assemblies.replicate/set.b009bd38.webp" alt="The desk arm's base screws selected: one screw component replicated onto the four holes of the base's bolts set, all four glowing in the view" width="1920" height="1080" loading="lazy" decoding="async" class="thumbnail_bKFe"><img src="https://bitbybit.dev/files/site/learn/designer/designer.assemblies.patterns/fan.777124f7.webp" alt="The jet engine's fan rotor: one fan blade component patterned twenty-two times about the engine's axis, every blade glowing, and the pattern's fields in Properties" width="1920" height="1080" loading="lazy" decoding="async" class="thumbnail_bKFe"></div>
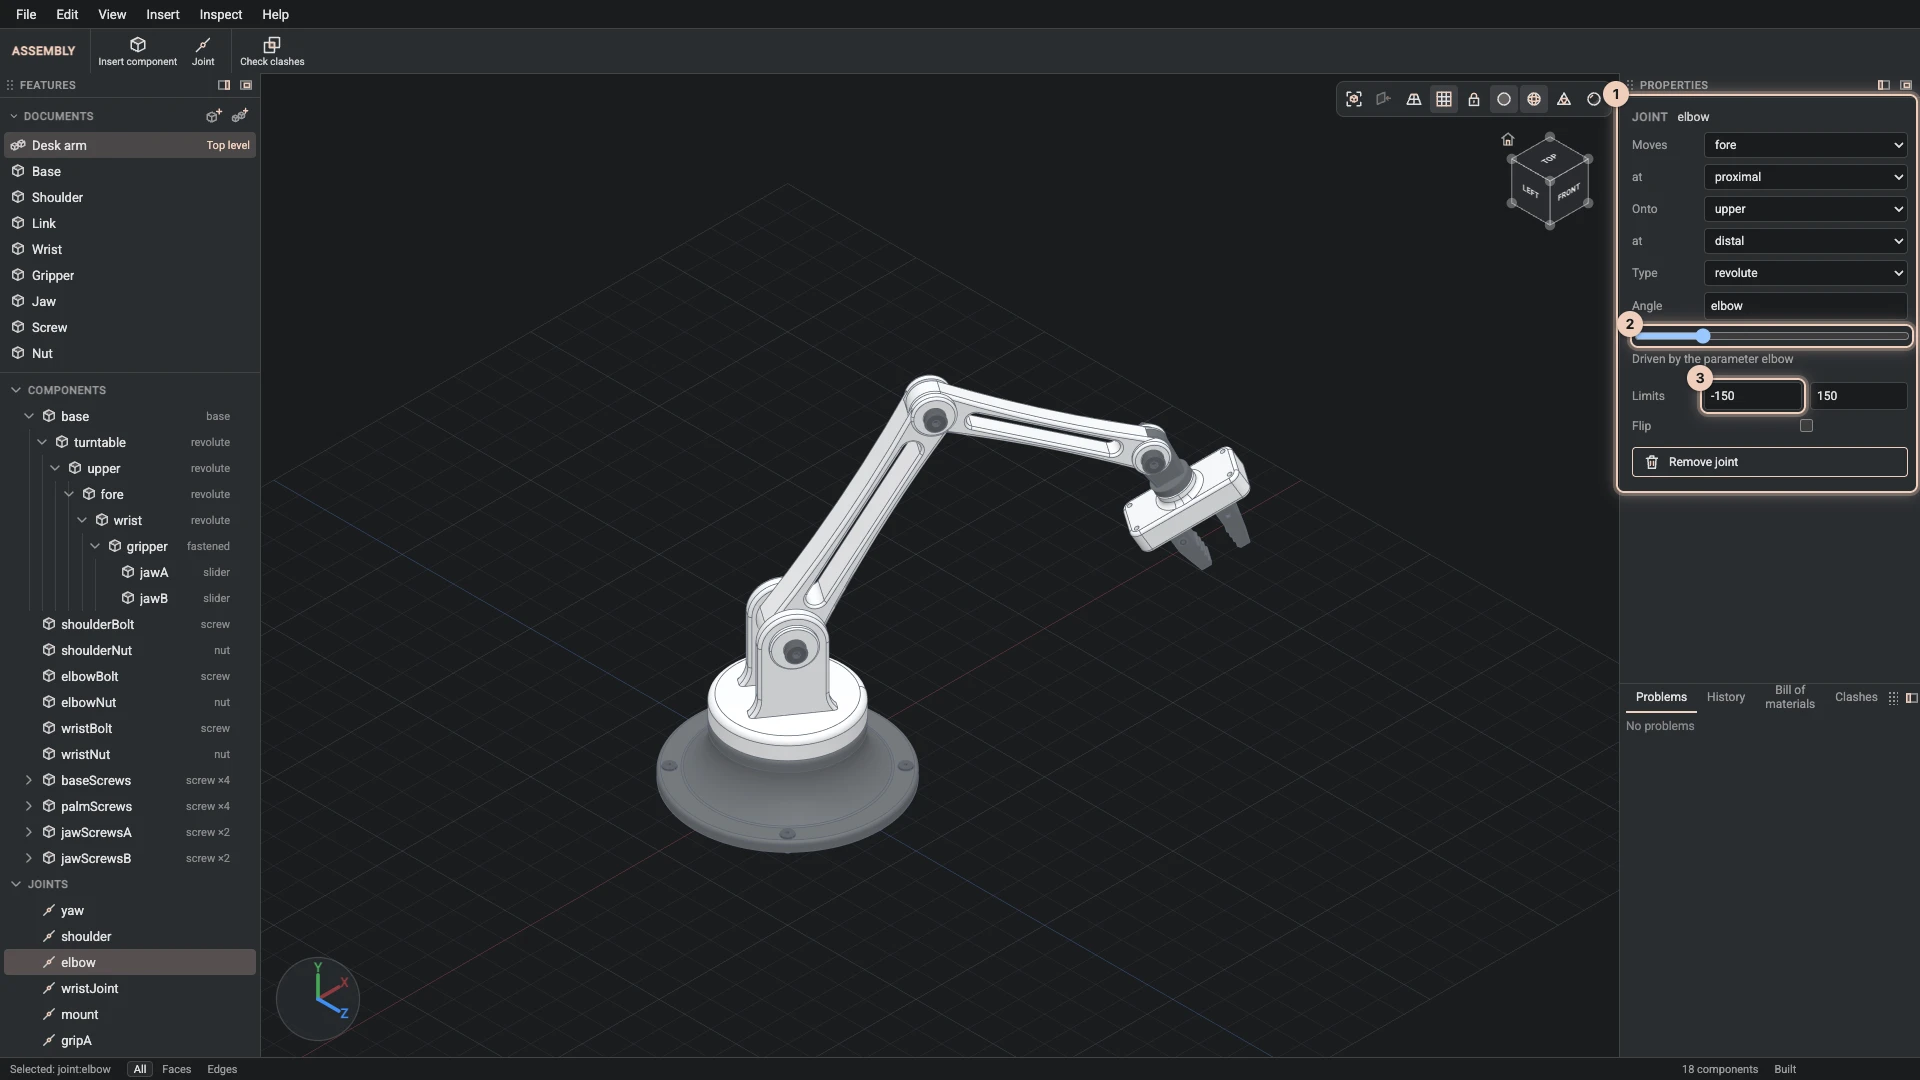
<p>An assembly places parts as <strong>components</strong> and joins them at <strong>connectors</strong>: a flat face, a hole's wall, a cylinder or a circular edge. <strong>Joints</strong> turn or slide within limits you set, or hold a part fast, and parameters or configurations drive them. Drag a joint's value and the assembly poses straight away, while the kernel's build follows behind.</p>
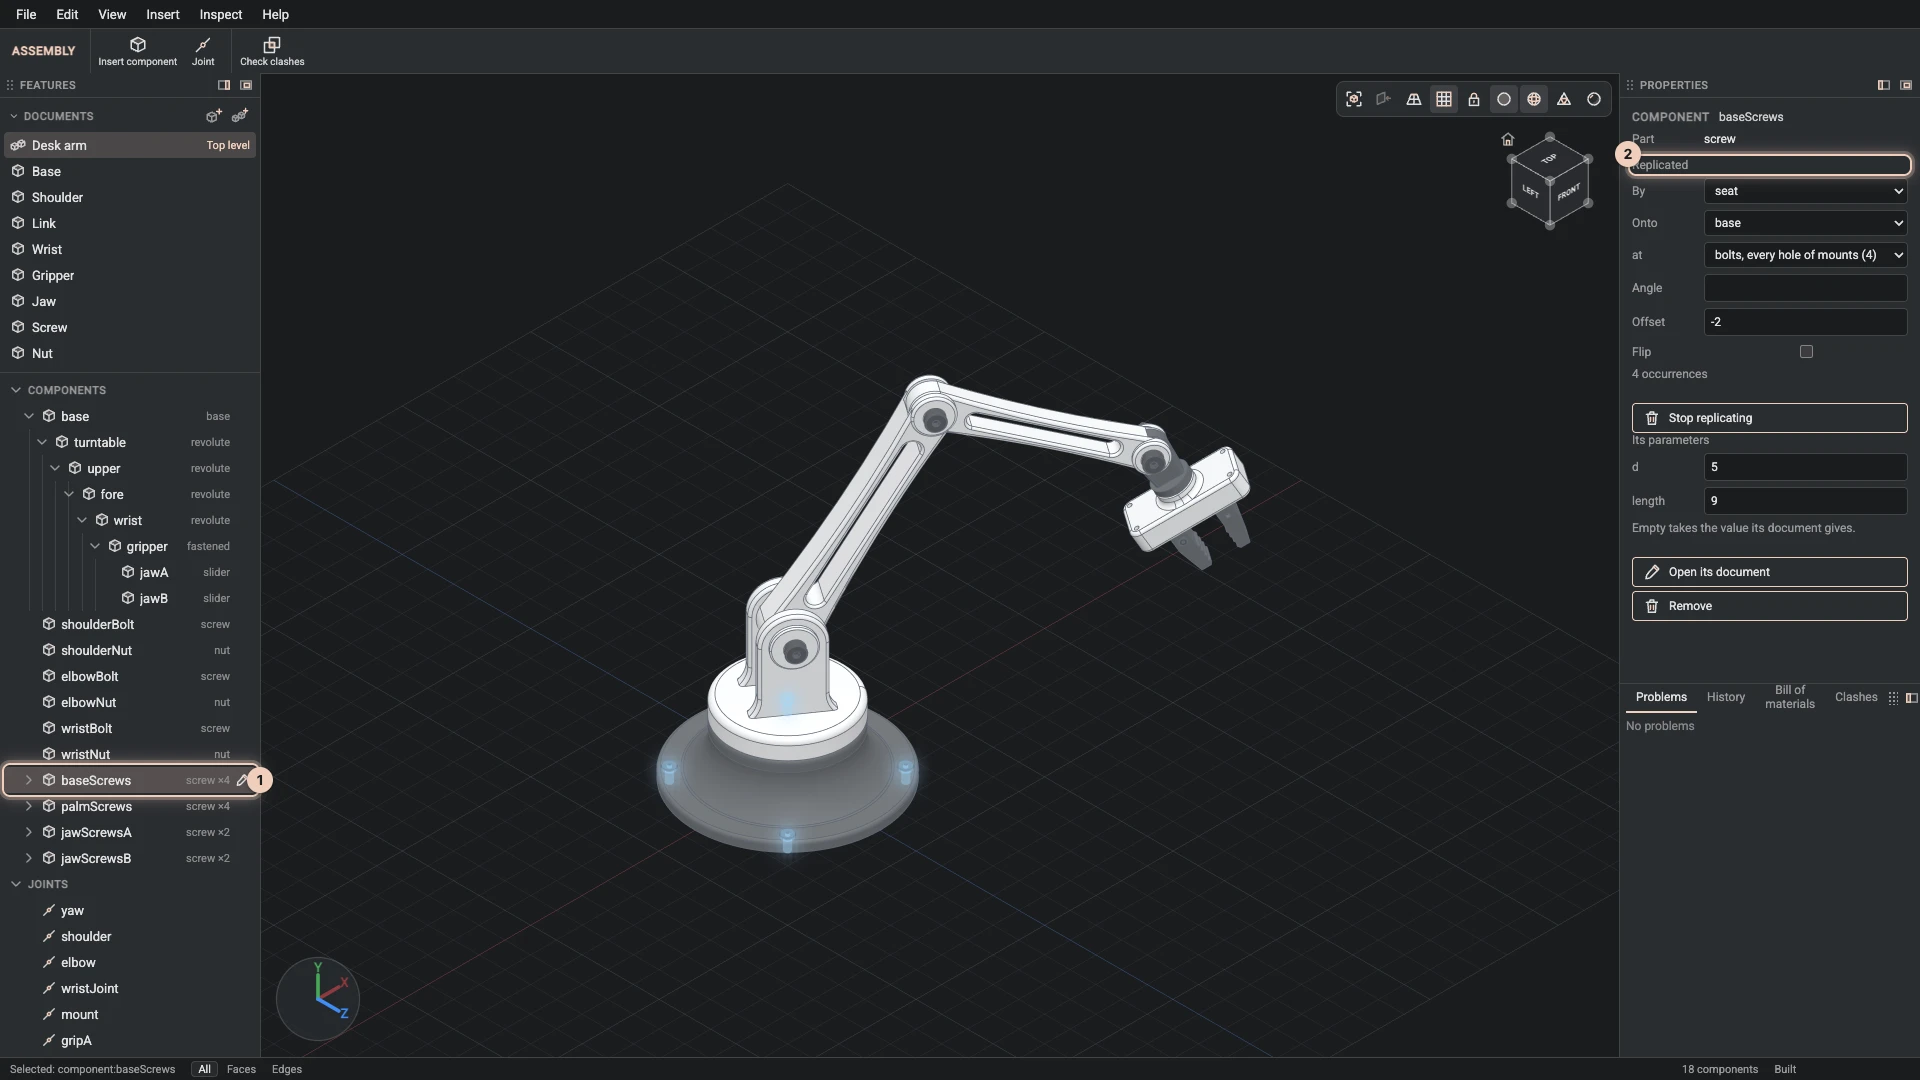
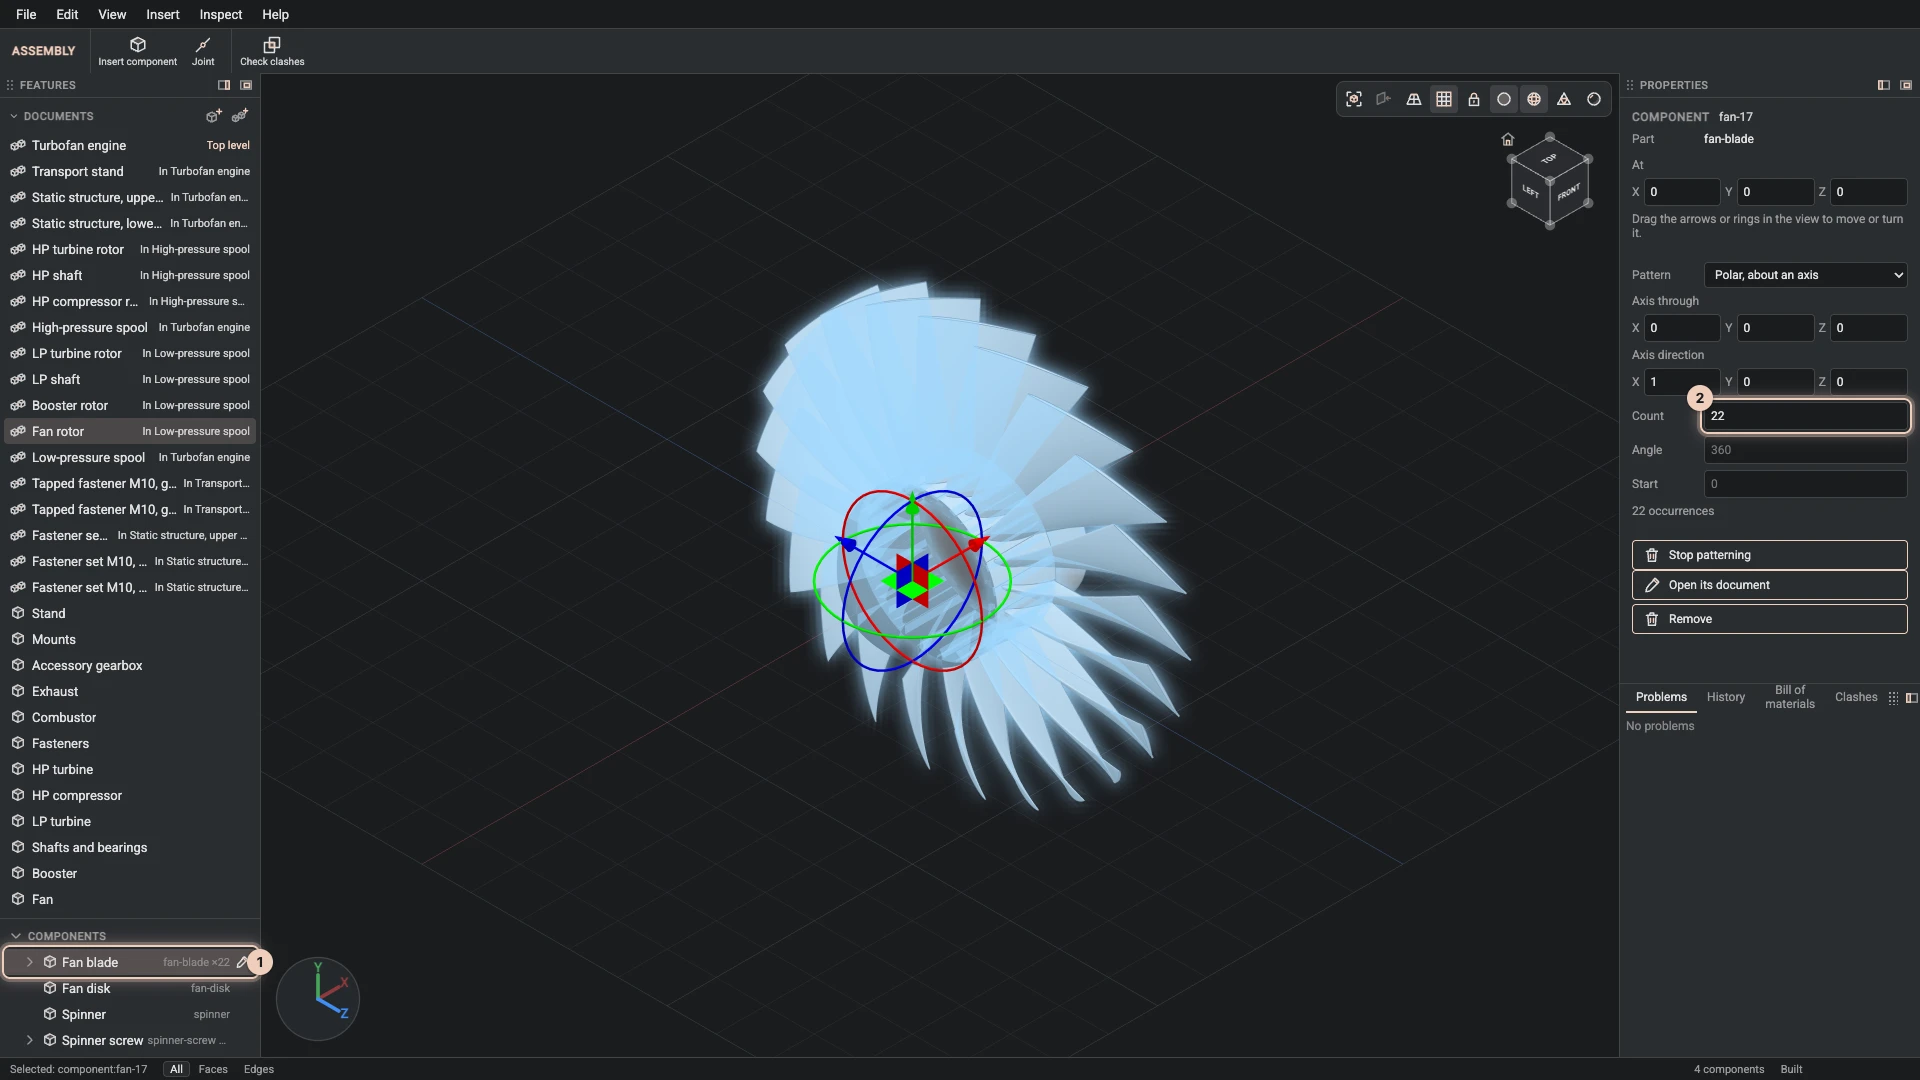
<p>Fasteners take one step each. <strong>Replicate</strong> puts one screw on every hole of a hole pattern, and a <strong>pattern</strong> repeats a component around an axis or along a line. That is how all 22 blades of the jet engine's fan are one component.</p>
<p>Then inspect what you made. The <strong>bill of materials</strong> counts every part through every level. The <strong>clash check</strong> lists parts that overlap or come too close. <strong>Measure</strong> gives the lengths, areas, radii, distances and angles of what you pick. The <strong>section view</strong> cuts the model with a plane so you can look inside, with the cut filled in by the kernel.</p>
<h2 class="anchor anchorTargetStickyNavbar_Vzrq" id="work-beside-an-agent">Work beside an agent<a href="https://learn.bitbybit.dev/blog/introducing-the-designer#work-beside-an-agent" class="hash-link" aria-label="Direct link to Work beside an agent" title="Direct link to Work beside an agent" translate="no">​</a></h2>
<div class="grid_hCdv" style="grid-template-columns:repeat(2, 1fr);gap:1rem"><img src="https://bitbybit.dev/files/site/learn/designer/designer.agents/working.db969d0a.webp" alt="An agent at work: while its clash check runs, the status bar names the agent that is working" width="1920" height="1080" loading="lazy" decoding="async" class="thumbnail_bKFe"><img src="https://bitbybit.dev/files/site/learn/designer/designer.agents/review.ba75c69d.webp" alt="The desk arm after an agent changed its elbow parameter from -80 to 40: the arm already posed, and the Review tab with the change to keep or undo" width="1920" height="1080" loading="lazy" decoding="async" class="thumbnail_bKFe"></div>
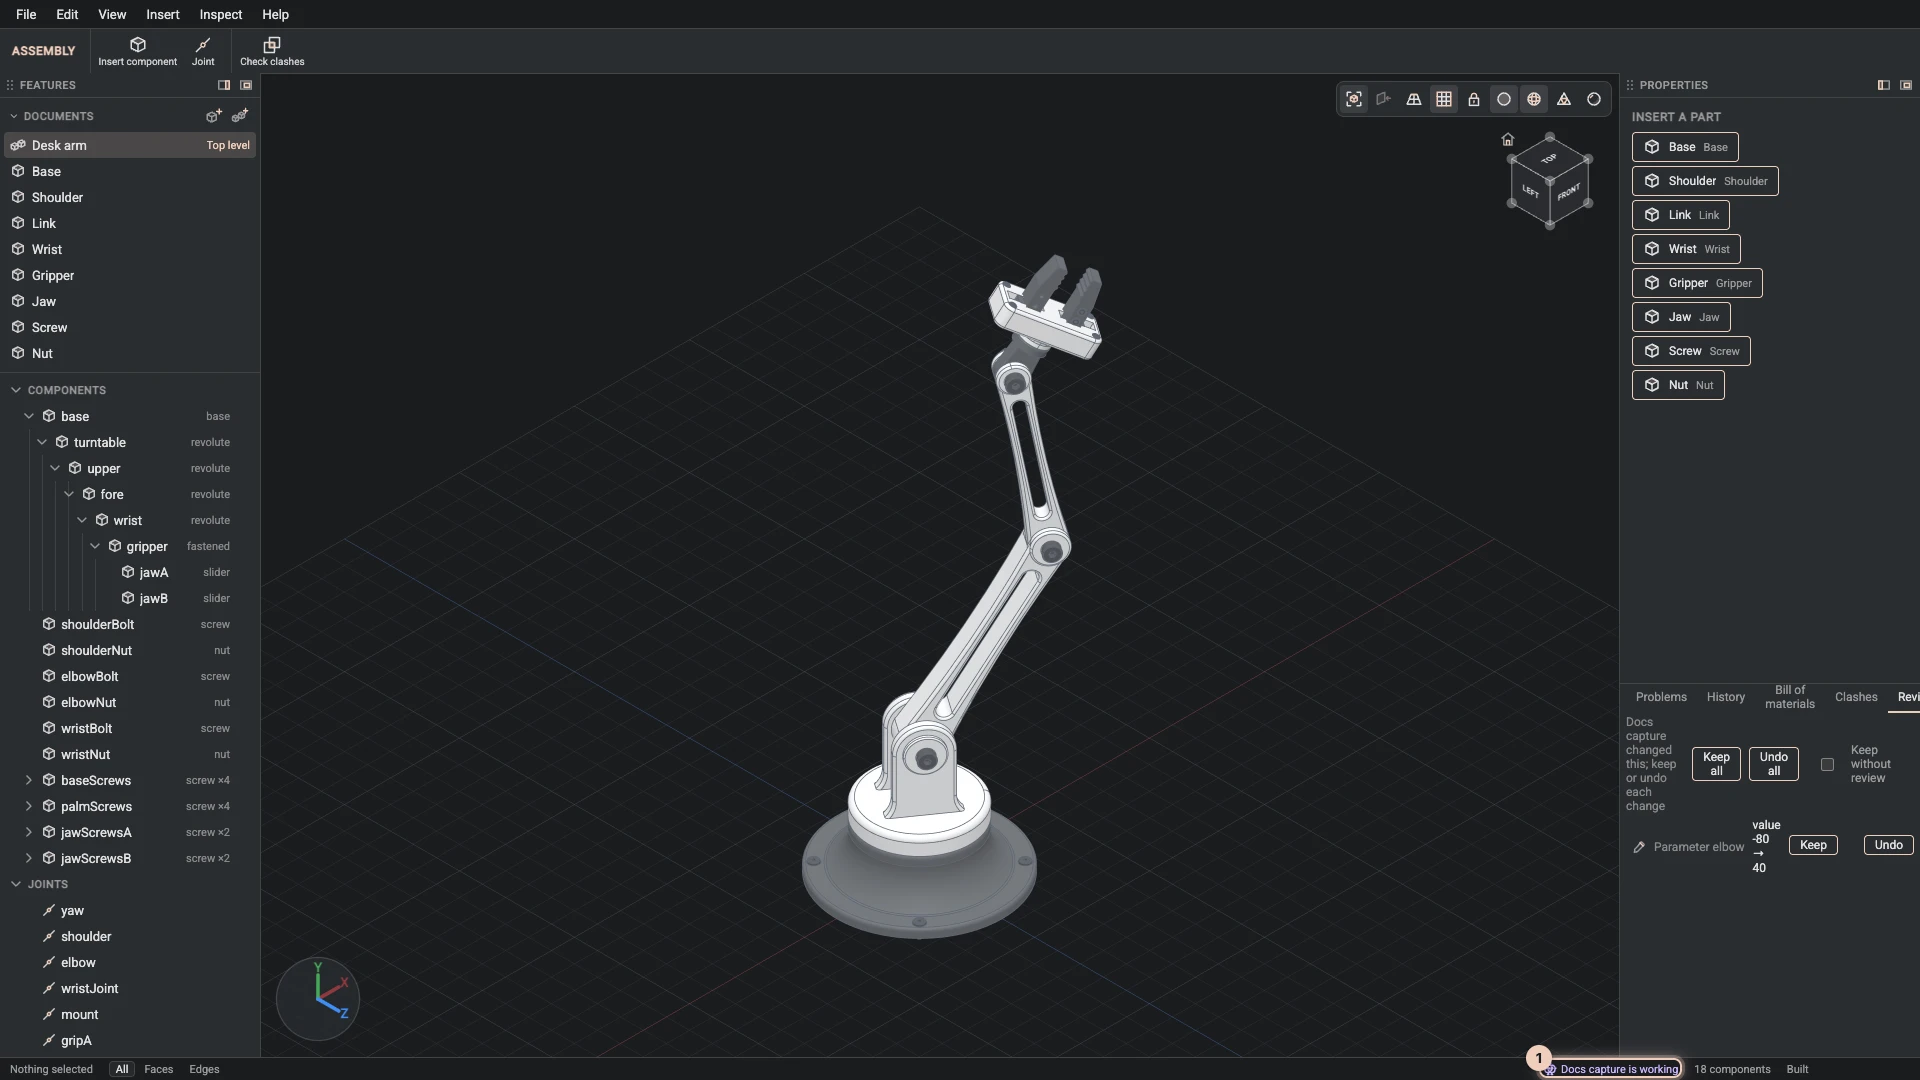
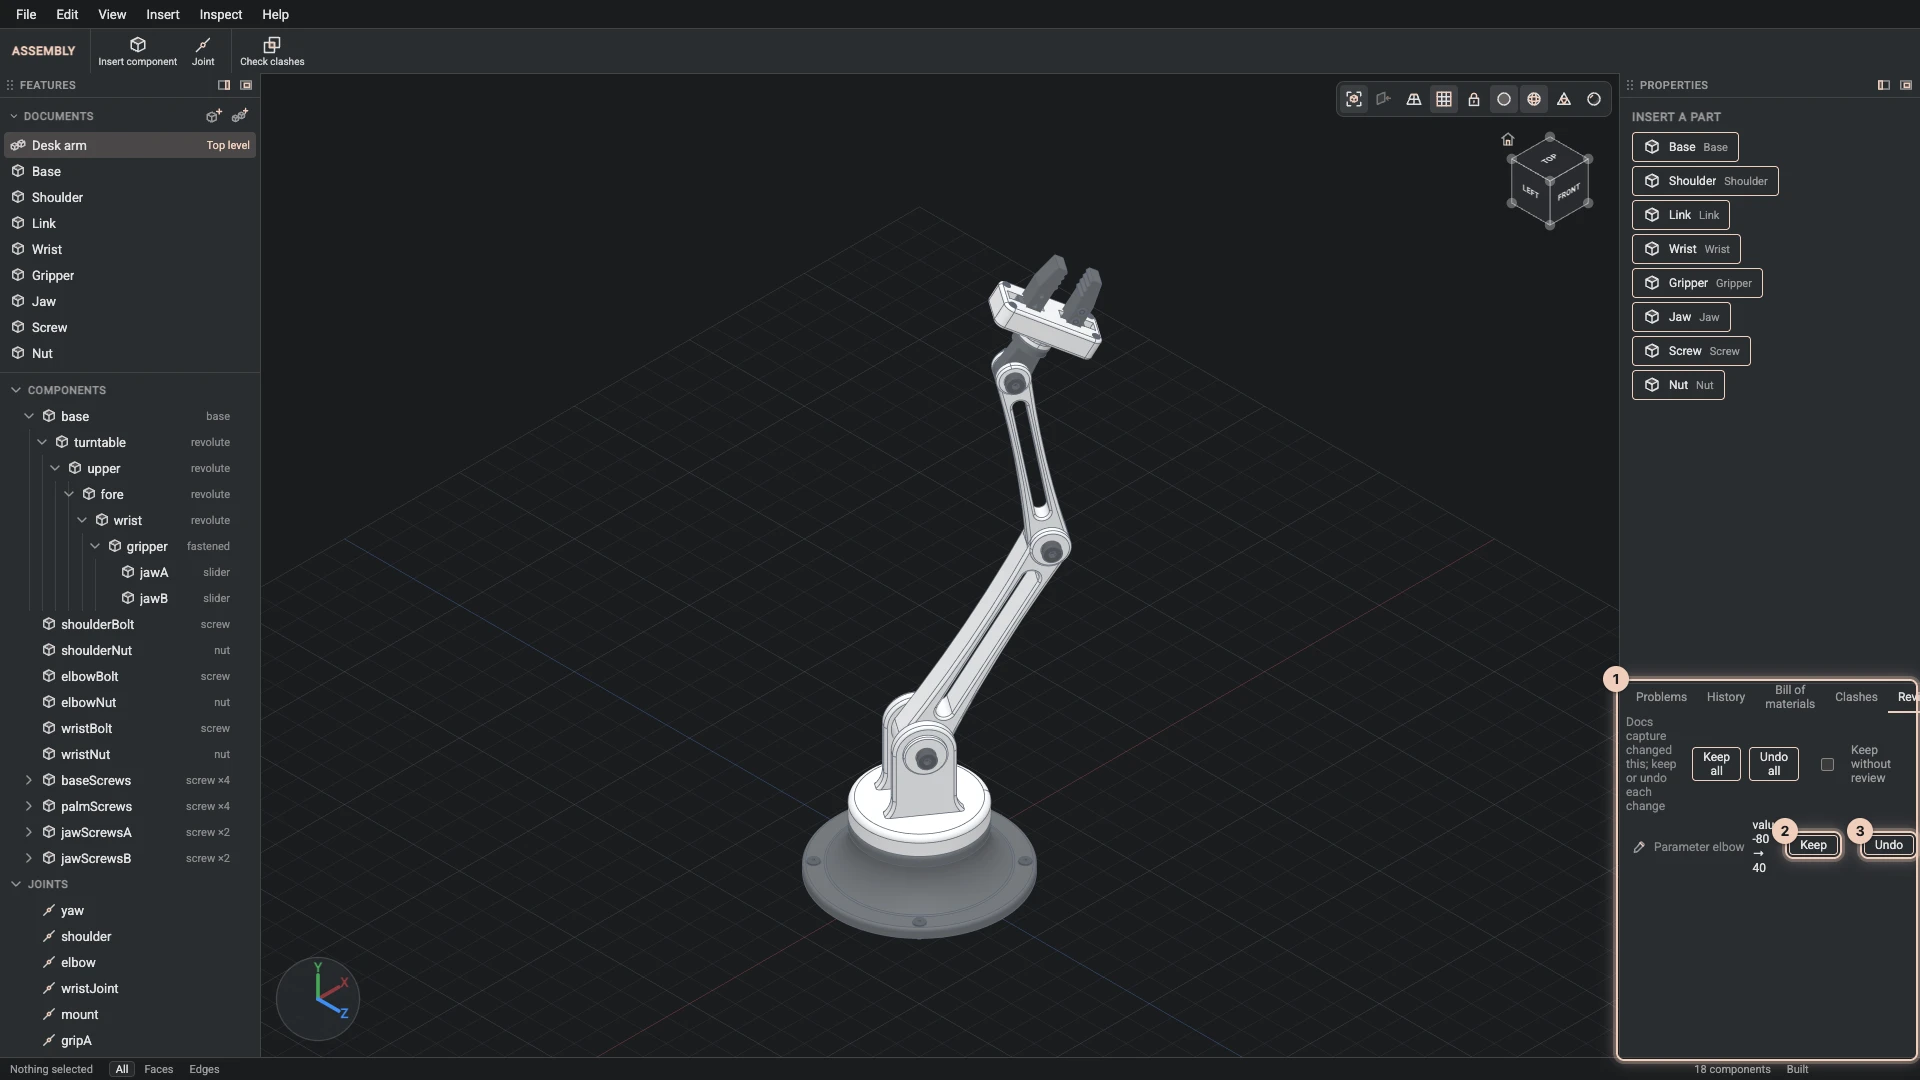
<p>The Designer was built for two authors at once. While it is open, it offers its tools to AI agents: to the browser's own agent through WebMCP, in browsers that support it, and to scripts on the page as <code>window.bitbybitDesigner</code>. An agent runs the same commands you do. It can read the build, pick faces by their names, sketch, add features and joints, change parameters and capture the view. (In the film, the agent's part is a scripted run of these same WebMCP tools.)</p>
<p>You stay in charge. The status bar names the agent that is working, its picks are drawn in a colour of their own, and every change it makes waits in the <strong>Review</strong> tab for you to keep or undo. <strong>Follow agent</strong> decides whether the agent's views move your camera. Deleting documents, imports, exports and reviewing stay with you.</p>
<p>Everything you do is recorded as steps, too. <strong>Save the steps</strong> gives you a file that rebuilds the project command by command. The Designer's own tutorials are written in that format, and an agent can read the steps of a session to learn how a model was made.</p>
<h2 class="anchor anchorTargetStickyNavbar_Vzrq" id="learn-it-inside-the-app">Learn it inside the app<a href="https://learn.bitbybit.dev/blog/introducing-the-designer#learn-it-inside-the-app" class="hash-link" aria-label="Direct link to Learn it inside the app" title="Direct link to Learn it inside the app" translate="no">​</a></h2>
<div class="grid_hCdv" style="grid-template-columns:repeat(1, 1fr);gap:1rem"><img src="https://bitbybit.dev/files/site/learn/designer/designer.tour/tutorials.ae2e9464.webp" alt="Help > Tutorials: the tutorials the Designer plays, each with Start" width="1920" height="1080" loading="lazy" decoding="async" class="thumbnail_bKFe"></div>
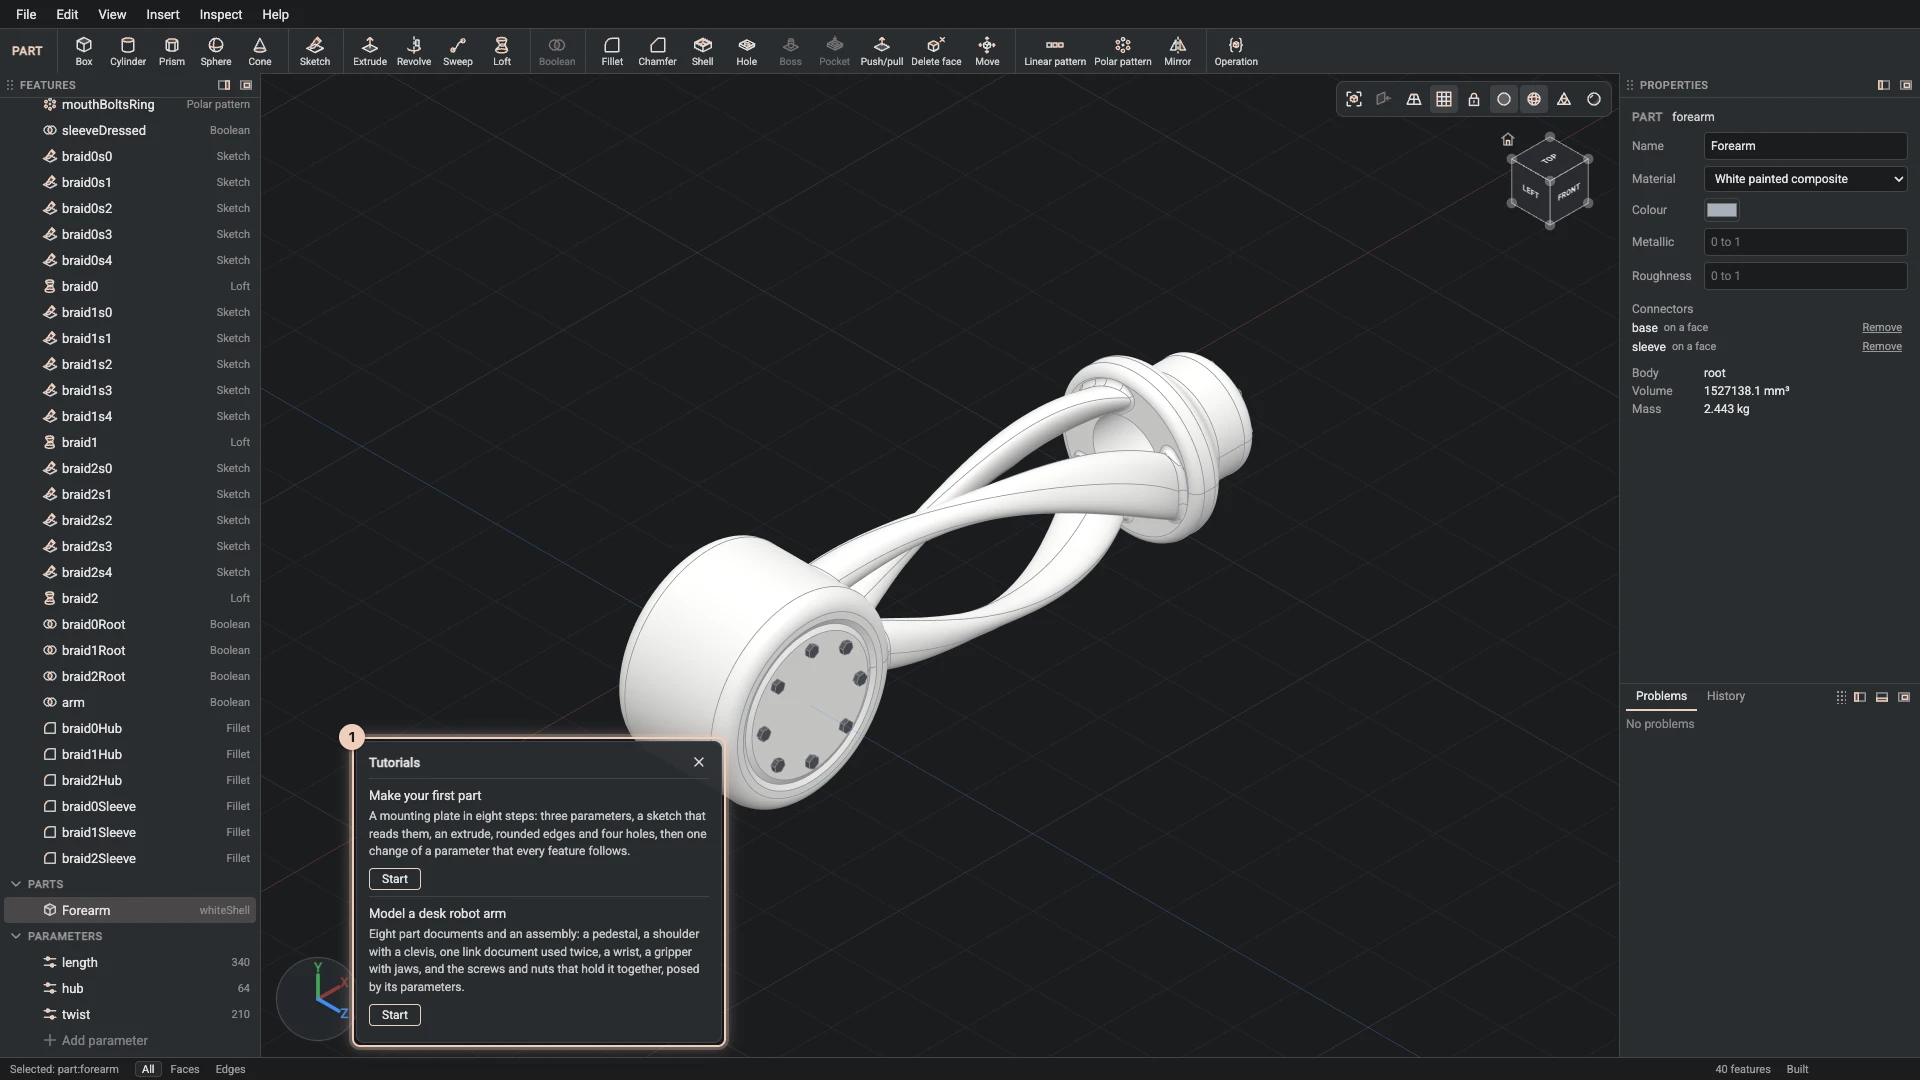
<p><strong>Help</strong> &gt; <strong>Tutorials</strong> plays a tutorial right in the Designer. A card shows each step, explains it and rings the control to use. Make the step yourself, or press <strong>Do it</strong>.</p>
<ul>
<li class=""><strong><a class="" href="https://learn.bitbybit.dev/learn/designer/tutorials/first-part">Make your first part</a></strong>: a plate with rounded edges and holes, driven by parameters. Start here.</li>
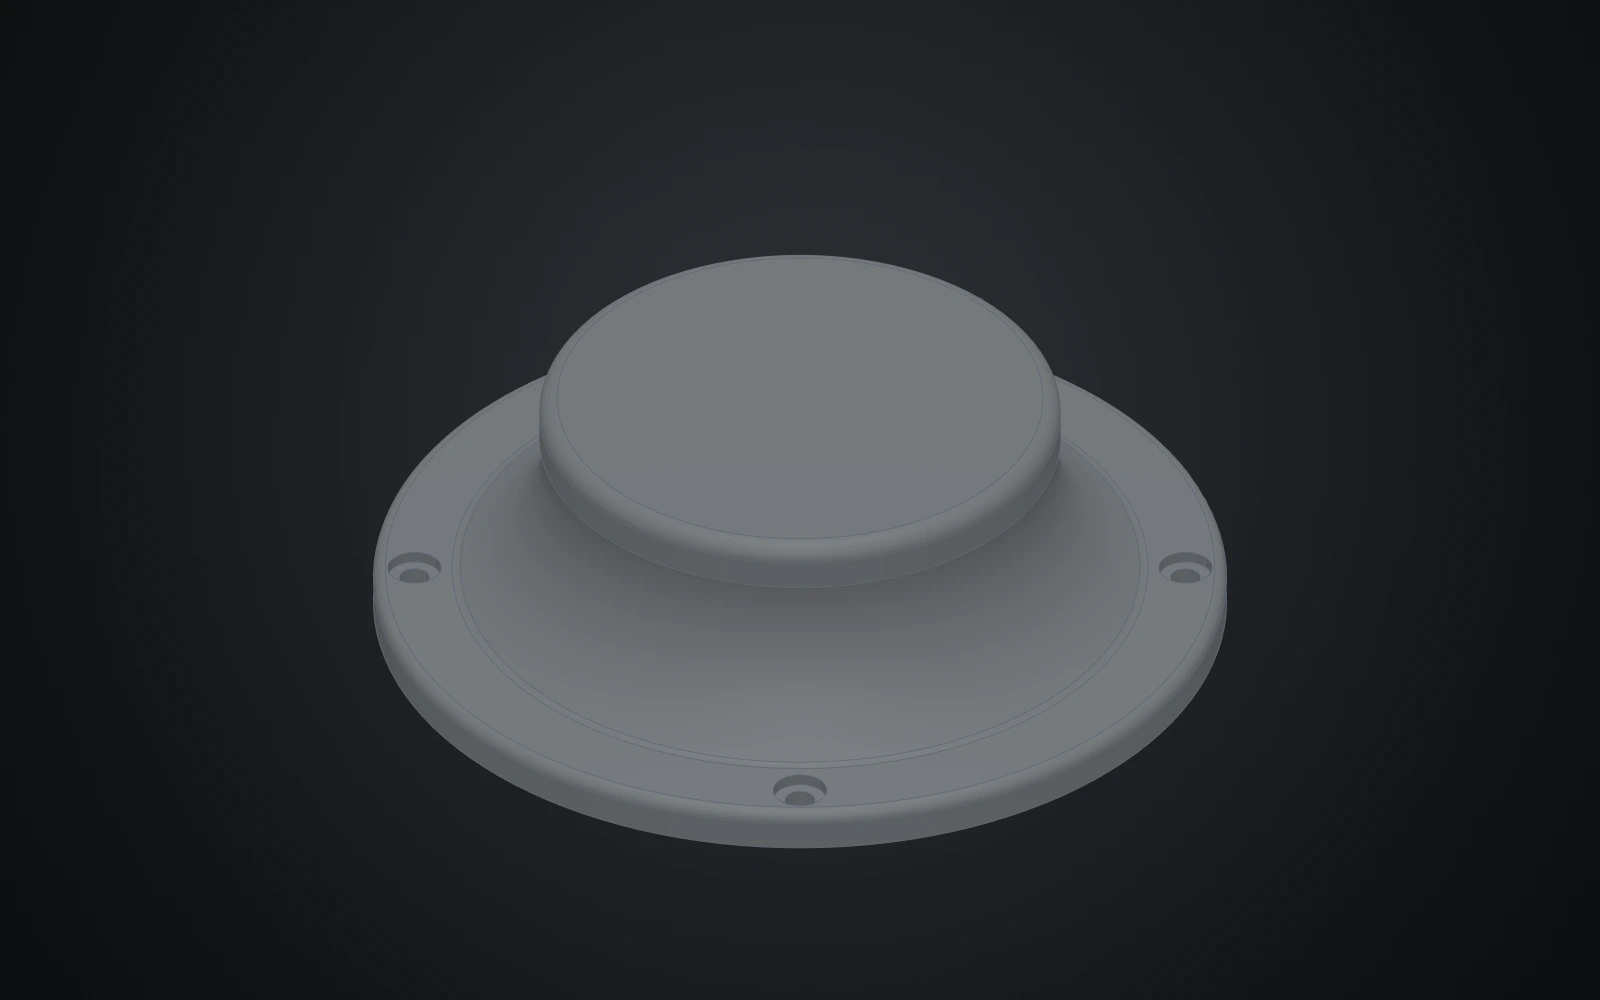
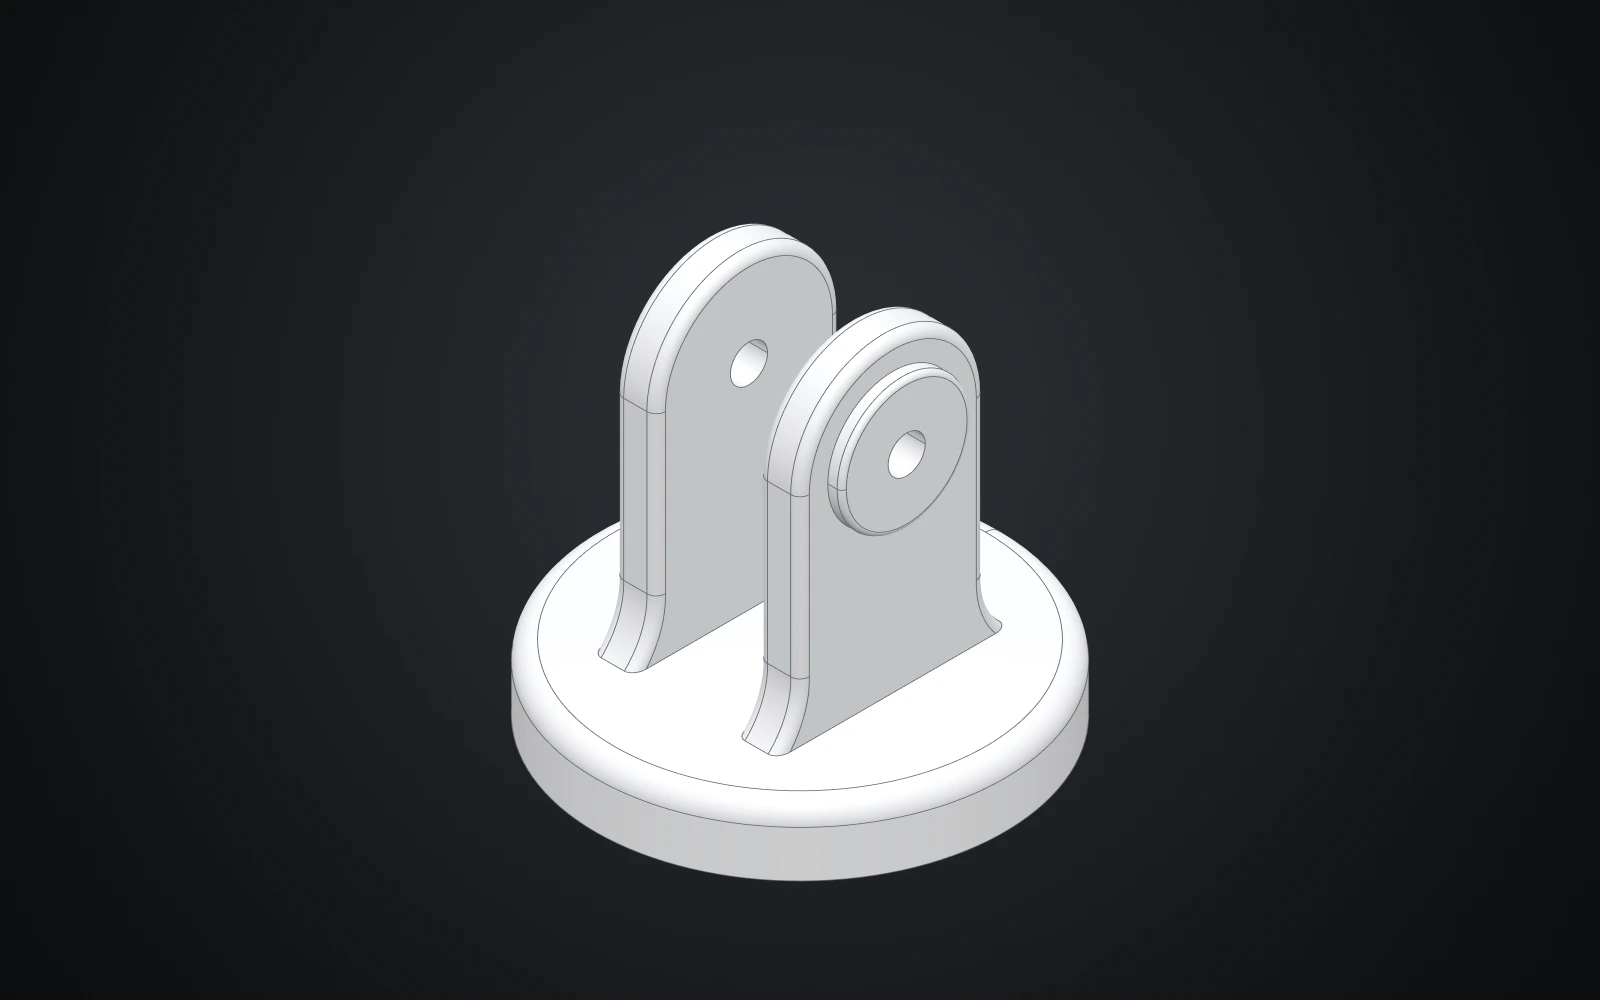
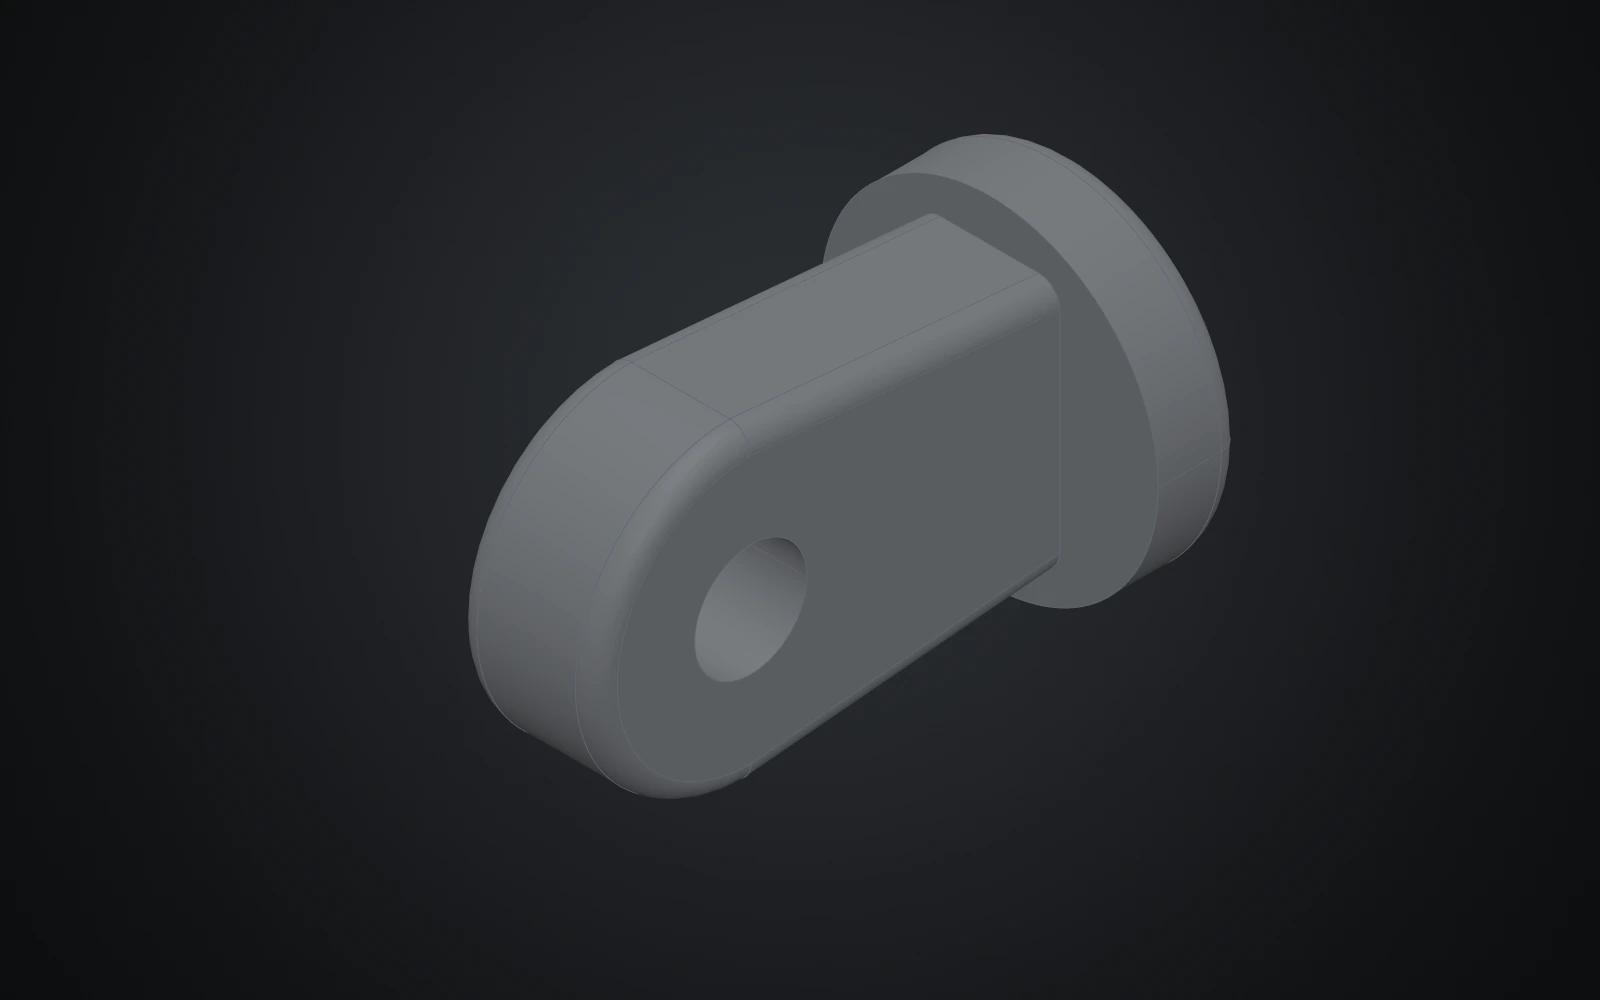
<li class=""><strong><a class="" href="https://learn.bitbybit.dev/learn/designer/tutorials/desk-arm">Model a desk robot arm</a></strong>: nine chapters and 167 steps that make eight parts and an assembly: a revolved base, a shoulder with a clevis, one link used twice, a wrist, a gripper with sliding jaws, and the screws and nuts that hold it together. On learn.bitbybit.dev every step has its own picture.</li>
</ul>
<div class="grid_hCdv" style="grid-template-columns:repeat(3, 1fr);gap:1rem"><img src="https://bitbybit.dev/files/site/learn/designer/designer.tutorials.desk-arm/base.a06fd22f.webp" alt="Model a desk robot arm, after step 7" width="1600" height="1000" loading="lazy" decoding="async" class="thumbnail_bKFe"><img src="https://bitbybit.dev/files/site/learn/designer/designer.tutorials.desk-arm/turntable.ad30eecc.webp" alt="Model a desk robot arm, after step 25" width="1600" height="1000" loading="lazy" decoding="async" class="thumbnail_bKFe"><img src="https://bitbybit.dev/files/site/learn/designer/designer.tutorials.desk-arm/link.a893fe94.webp" alt="Model a desk robot arm, after step 57" width="1600" height="1000" loading="lazy" decoding="async" class="thumbnail_bKFe"><img src="https://bitbybit.dev/files/site/learn/designer/designer.tutorials.desk-arm/wrist.c414810d.webp" alt="Model a desk robot arm, after step 69" width="1600" height="1000" loading="lazy" decoding="async" class="thumbnail_bKFe"><img src="https://bitbybit.dev/files/site/learn/designer/designer.tutorials.desk-arm/gripper.def5618a.webp" alt="Model a desk robot arm, after step 87" width="1600" height="1000" loading="lazy" decoding="async" class="thumbnail_bKFe"><img src="https://bitbybit.dev/files/site/learn/designer/designer.tutorials.desk-arm/jaw.f90c846f.webp" alt="Model a desk robot arm, after step 96" width="1600" height="1000" loading="lazy" decoding="async" class="thumbnail_bKFe"><img src="https://bitbybit.dev/files/site/learn/designer/designer.tutorials.desk-arm/screw.578ef295.webp" alt="Model a desk robot arm, after step 111" width="1600" height="1000" loading="lazy" decoding="async" class="thumbnail_bKFe"><img src="https://bitbybit.dev/files/site/learn/designer/designer.tutorials.desk-arm/nut.f7219486.webp" alt="Model a desk robot arm, after step 121" width="1600" height="1000" loading="lazy" decoding="async" class="thumbnail_bKFe"><img src="https://bitbybit.dev/files/site/learn/designer/designer.tutorials.desk-arm/arm.706fe230.webp" alt="Model a desk robot arm, after step 167" width="1600" height="1000" loading="lazy" decoding="async" class="thumbnail_bKFe"></div>
<h2 class="anchor anchorTargetStickyNavbar_Vzrq" id="three-showcases">Three showcases<a href="https://learn.bitbybit.dev/blog/introducing-the-designer#three-showcases" class="hash-link" aria-label="Direct link to Three showcases" title="Direct link to Three showcases" translate="no">​</a></h2>
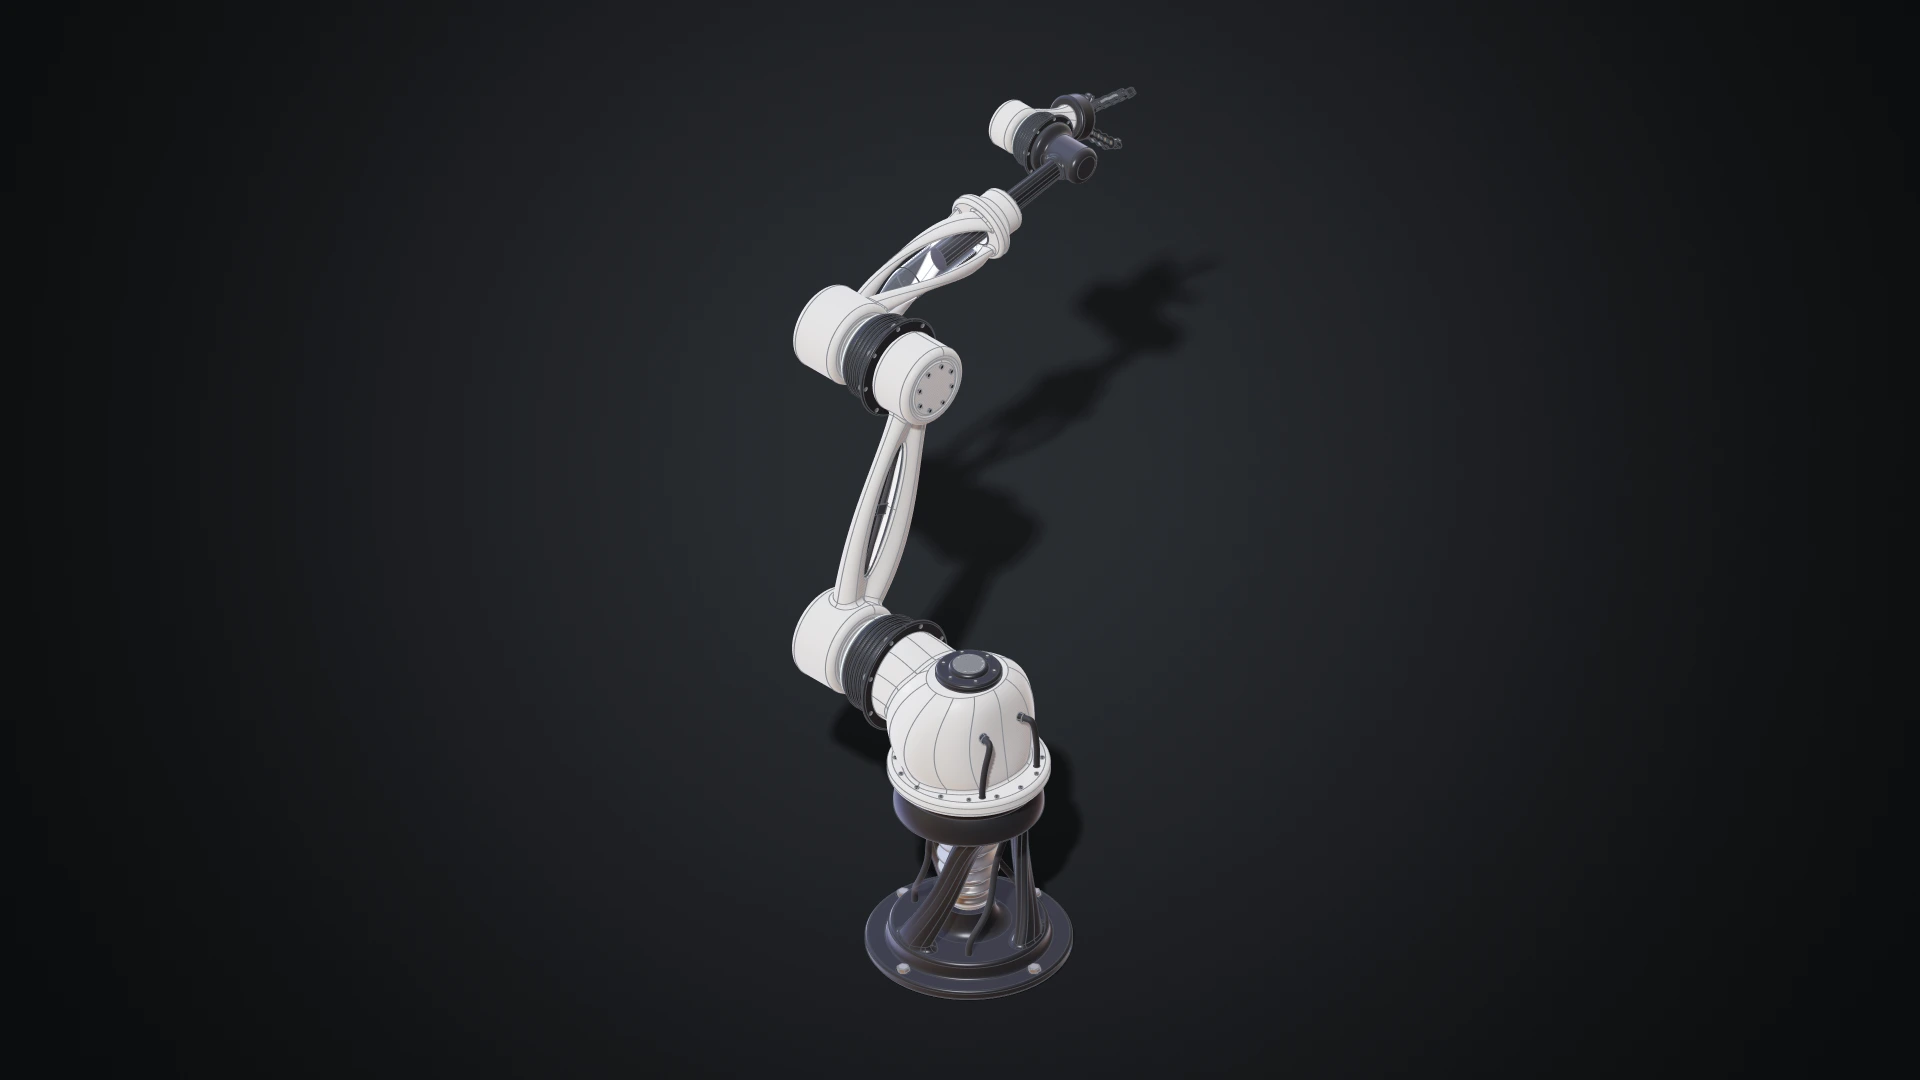
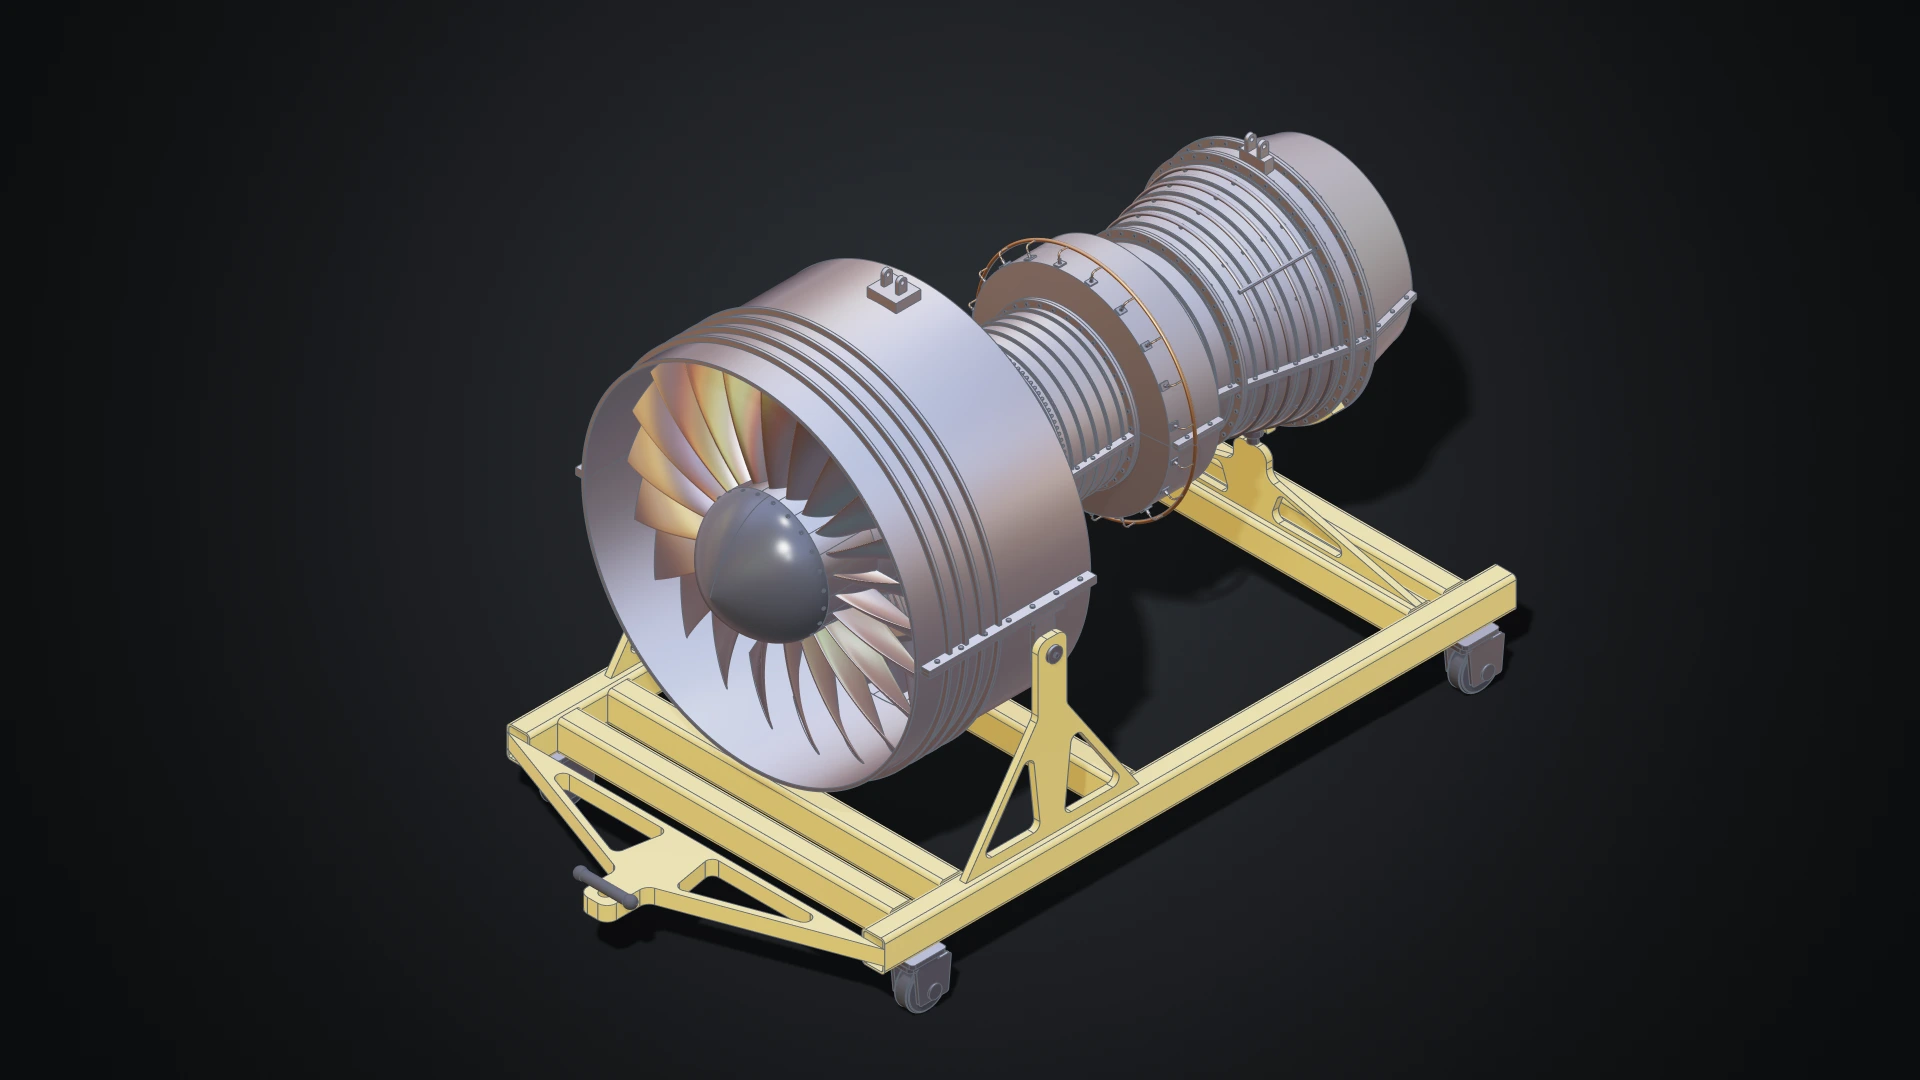
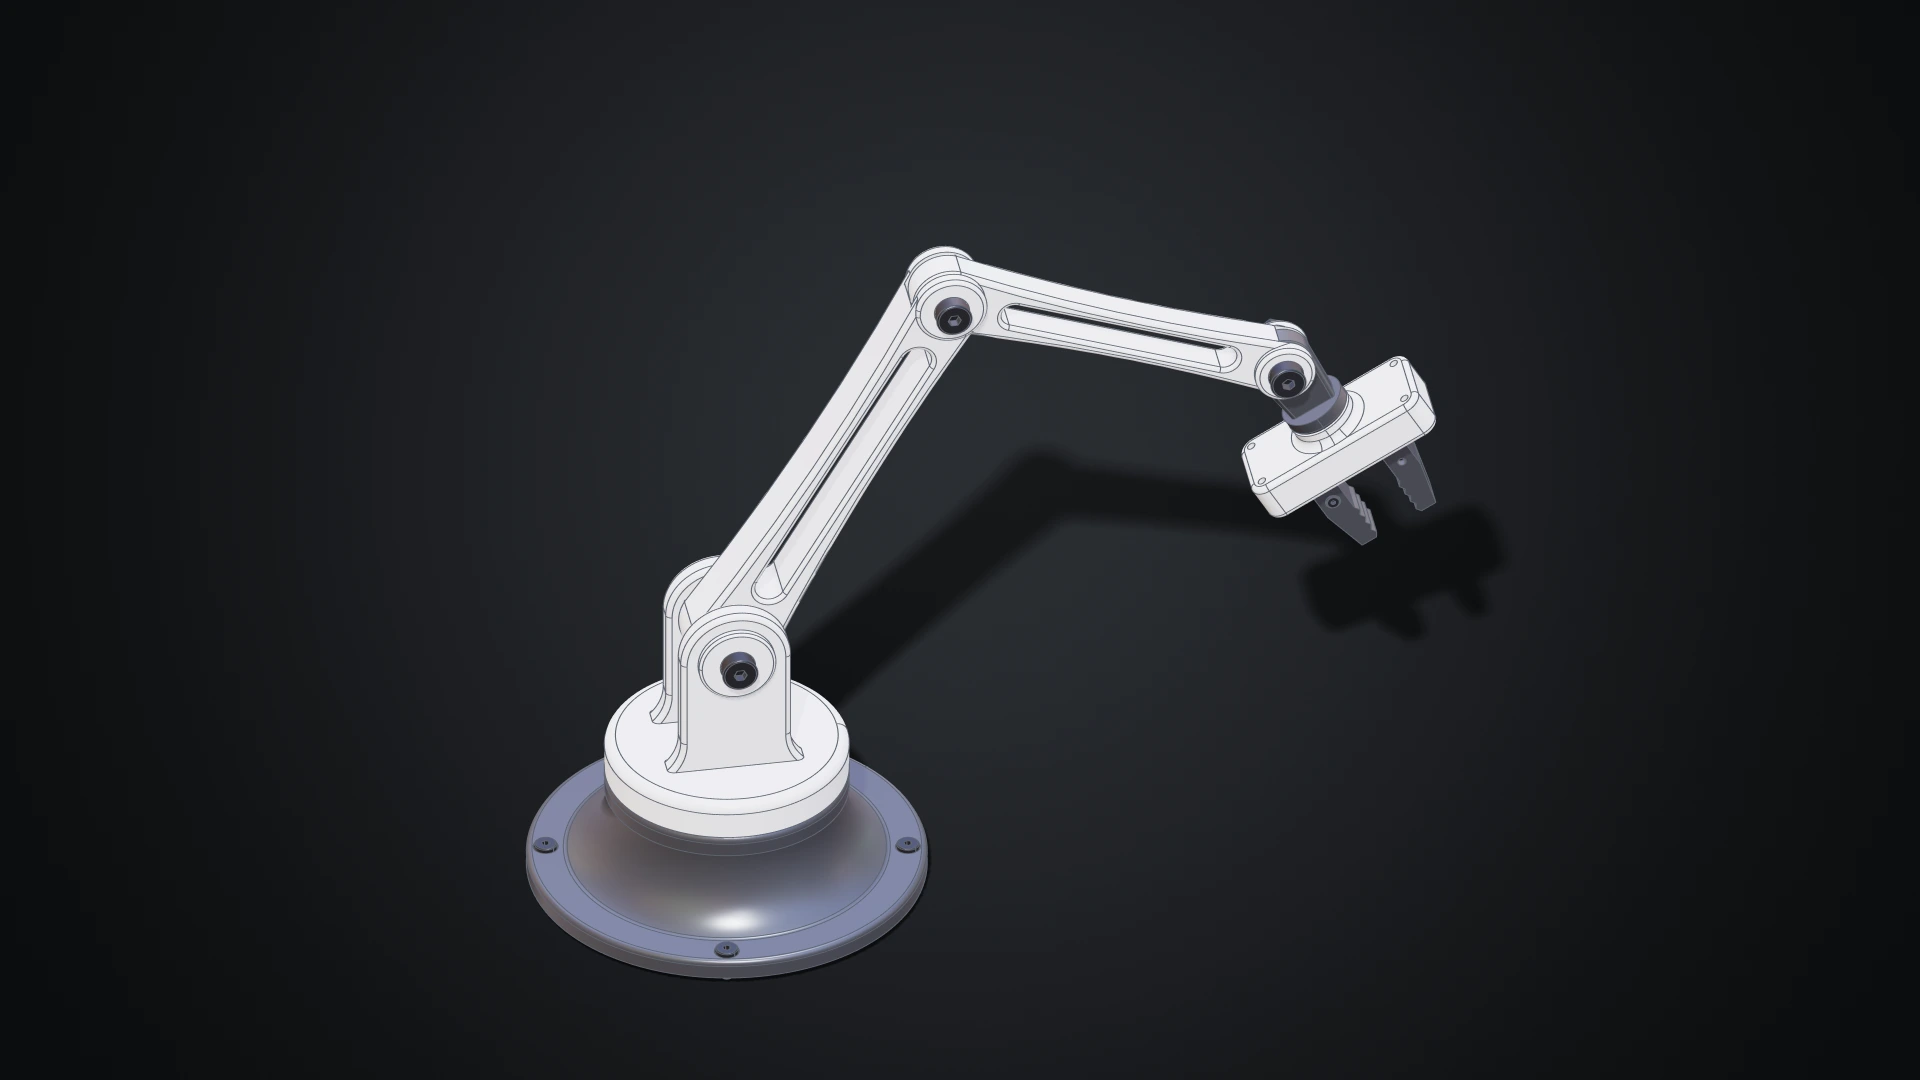
<div class="grid_hCdv" style="grid-template-columns:repeat(3, 1fr);gap:1rem"><img src="https://bitbybit.dev/files/site/learn/designer/designer.showcases/robot-arm-cover.ec22c1e3.webp" alt="The robot arm modelled in the Designer: a six-axis arm on a pedestal with cable harnesses and a three-finger gripper" width="1920" height="1080" loading="lazy" decoding="async" class="thumbnail_bKFe"><img src="https://bitbybit.dev/files/site/learn/designer/designer.showcases/jet-engine-cover.65eb00d2.webp" alt="The turbofan engine modelled in the Designer: fan, compressor and turbine stages, casing halves and externals on a stand" width="1920" height="1080" loading="lazy" decoding="async" class="thumbnail_bKFe"><img src="https://bitbybit.dev/files/site/learn/designer/designer.showcases/desk-arm-cover.62db942f.webp" alt="The desk arm the tutorial builds: a weighted base, two links, a wrist and a gripper with a lead screw" width="1920" height="1080" loading="lazy" decoding="async" class="thumbnail_bKFe"></div>
<ul>
<li class=""><strong>A robot arm</strong>: a six-axis industrial arm with cable harnesses and a three-finger gripper. 28 documents and 77 components, with joints and limits at every axis and finger, posed by four configurations.</li>
<li class=""><strong>A jet engine</strong>: a turbofan with 4,853 parts placed from 130 different ones. Each blade and vane row is one patterned component, and the engine can be shown closed, with its casing open, or exploded.</li>
<li class=""><strong>The desk arm</strong> of the tutorial.</li>
</ul>
<p>Open any of them in the Designer from <a class="" href="https://learn.bitbybit.dev/learn/designer/showcases">the showcases page</a>, or download its design documents.</p>
<h2 class="anchor anchorTargetStickyNavbar_Vzrq" id="open-documents-standard-files">Open documents, standard files<a href="https://learn.bitbybit.dev/blog/introducing-the-designer#open-documents-standard-files" class="hash-link" aria-label="Direct link to Open documents, standard files" title="Direct link to Open documents, standard files" translate="no">​</a></h2>
<p>A Designer project is a set of <strong>design documents</strong>: plain JSON that describes the features, parts and assemblies. The same documents build in code with the free <code>@bitbybit-dev/occt</code> package, so a model made in the Designer can be rebuilt, with other parameter values, in your own app. It works the other way round too: an agent outside the browser can write design documents with the help of the <a class="" href="https://learn.bitbybit.dev/learn/using-ai-with-bitbybit/mcp/bitbybit-mcp">Bitbybit CAD MCP</a>, and you bring them in with <strong>Import design documents</strong>. <a class="" href="https://learn.bitbybit.dev/learn/using-ai-with-bitbybit/design-documents">Design documents</a> explains the format.</p>
<p>For other programs, export <strong>STEP</strong> with the assembly tree, names and colours, or <strong>GLB</strong>, <strong>STL</strong> and <strong>BREP</strong>, and bring <strong>STEP</strong>, <strong>IGES</strong> and <strong>BREP</strong> files in.</p>
<h2 class="anchor anchorTargetStickyNavbar_Vzrq" id="who-can-use-it">Who can use it<a href="https://learn.bitbybit.dev/blog/introducing-the-designer#who-can-use-it" class="hash-link" aria-label="Direct link to Who can use it" title="Direct link to Who can use it" translate="no">​</a></h2>
<p>Making and changing designs is part of the Gold plan. Anyone can open a design that is shared with them: turn it, inspect it, measure it, cut it with a section, switch its configurations, try the parameters its author offers, and download what its author allows.</p>
<h2 class="anchor anchorTargetStickyNavbar_Vzrq" id="try-it">Try it<a href="https://learn.bitbybit.dev/blog/introducing-the-designer#try-it" class="hash-link" aria-label="Direct link to Try it" title="Direct link to Try it" translate="no">​</a></h2>
<p>Open the <a href="https://bitbybit.dev/app?editor=designer" target="_blank" rel="noopener noreferrer" class="">Designer</a>, play <a class="" href="https://learn.bitbybit.dev/learn/designer/tutorials/first-part">your first part</a>, then build <a class="" href="https://learn.bitbybit.dev/learn/designer/tutorials/desk-arm">the desk arm</a>. The <a class="" href="https://learn.bitbybit.dev/learn/designer/intro">introduction</a> and <a class="" href="https://learn.bitbybit.dev/learn/designer/tour">the tour</a> cover the rest. We'd love to see what you make.</p>]]></content>
        <author>
            <name>Matas Ubarevičius</name>
            <uri>https://www.linkedin.com/in/matas-ubarevicius/</uri>
        </author>
        <category label="Bitbybit" term="Bitbybit"/>
        <category label="Designer" term="Designer"/>
        <category label="CAD" term="CAD"/>
        <category label="Assembly" term="Assembly"/>
        <category label="OCCT" term="OCCT"/>
        <category label="STEP" term="STEP"/>
        <category label="AI" term="AI"/>
    </entry>
    <entry>
        <title type="html"><![CDATA[The Coding Editors, Rebuilt: Readable Rete Graphs, Async Blockly Functions and a Drone Built Three Ways]]></title>
        <id>https://learn.bitbybit.dev/blog/coding-editors-revamp-2026</id>
        <link href="https://learn.bitbybit.dev/blog/coding-editors-revamp-2026"/>
        <updated>2026-10-10T00:00:00.000Z</updated>
        <summary type="html"><![CDATA[We rebuilt the Bitbybit coding editors. Rete gets a typed, colour-coded graph, modules, wires that stay readable in large scripts, groups that arrange themselves, socket coaching and search across the canvas. Blockly functions can now await, TypeScript scripts span many files, and agents can drive all three. A drone, built step by step in each editor, shows it all.]]></summary>
        <content type="html"><![CDATA[<img src="https://learn.bitbybit.dev/img/blog/coding-editors-revamp/hero.webp" alt="The drone the coding-editor tutorials build, finished in white with orange accents: a carbon frame with hexagon vents, four arms with motors and two-blade propellers, a honeycombed canopy with the bitbybit logo, sprung legs and a camera on its gimbal" title="The drone, built in the TypeScript editor" style="max-width:100%">
<p>Bitbybit has three coding editors: <strong>Rete</strong>, where you wire nodes together; <strong>Blockly</strong>, where you snap blocks; and <strong>TypeScript</strong>, where you write code against the same API. This release rebuilds a large part of all three. Most of the work went into Rete, which now stays readable when a script grows to hundreds of nodes. Blockly functions can await geometry, TypeScript scripts can span many files, and an AI agent can drive any of the three editors.</p>
<p>To show what that adds up to, we built one drone in all three editors: a quadcopter with a carbon frame, motors with cooling slots, propellers that alternate their spin, a canopy traced with a honeycomb and the bitbybit logo on its hatch, sprung landing legs and a camera on a gimbal. Each build is a tutorial with a picture after every step.</p>
<p>Watch the drone's Rete script at work, from the whole graph down to a single wire, then the same drone in TypeScript and Blockly:</p>
<div class="responsive-video-container"><iframe width="560" height="315" src="https://www.youtube.com/embed/b-qy3tJXbvI" title="A drone built in the Rete node editor, then in TypeScript and Blockly" frameborder="0" allow="accelerometer; autoplay; clipboard-write; encrypted-media; gyroscope; picture-in-picture; web-share; fullscreen" allowfullscreen=""></iframe></div>
<h2 class="anchor anchorTargetStickyNavbar_Vzrq" id="a-drone-built-three-ways">A drone, built three ways<a href="https://learn.bitbybit.dev/blog/coding-editors-revamp-2026#a-drone-built-three-ways" class="hash-link" aria-label="Direct link to A drone, built three ways" title="Direct link to A drone, built three ways" translate="no">​</a></h2>
<div class="grid_hCdv" style="grid-template-columns:repeat(1, 1fr);gap:1rem"><img src="https://bitbybit.dev/files/site/learn/rete/rete.start.showcases/drone.b012f2f3.webp" alt="The drone in the Rete editor: the groups that repeat its arms, alternate its propellers and colour its lights, each with a comment, beside the drone they build" width="1920" height="1080" loading="lazy" decoding="async" class="thumbnail_bKFe"></div>
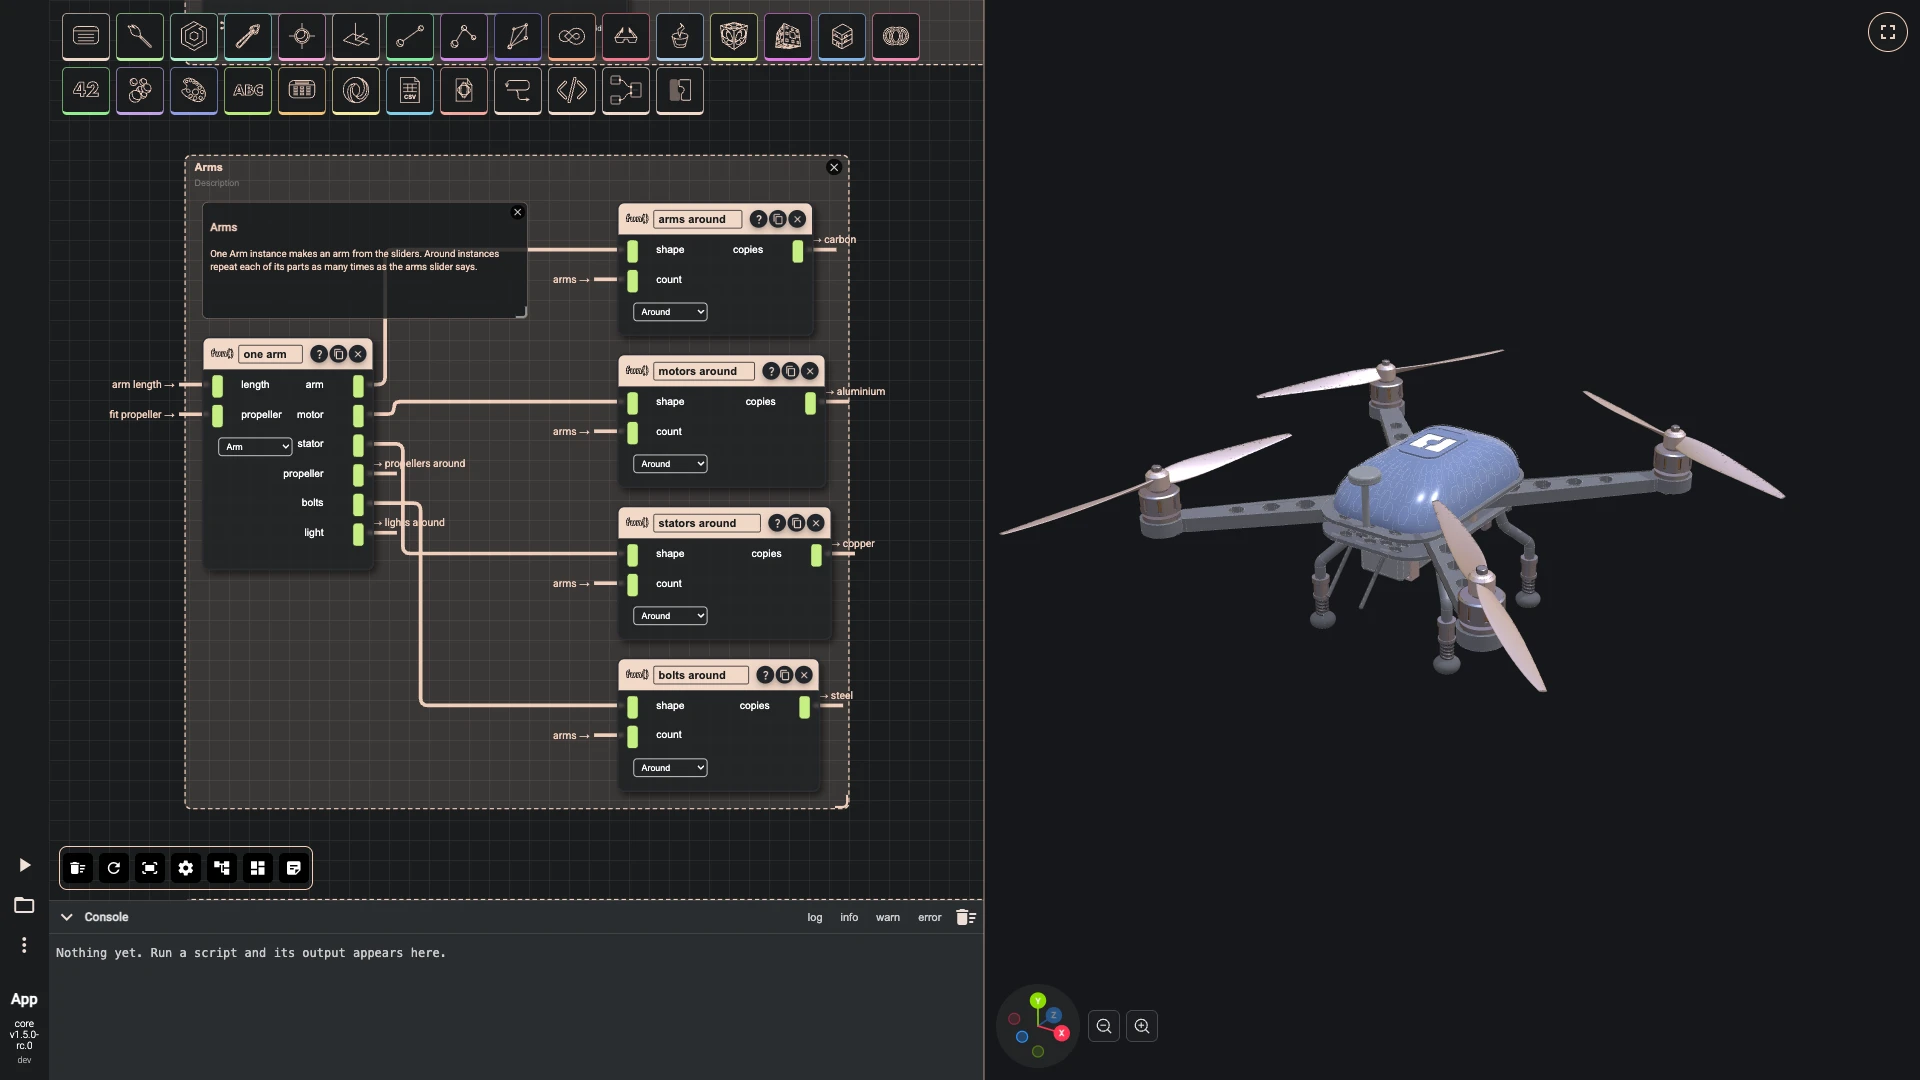
<p>The drone is the showcase of each editor, and the tutorials build it in seven chapters: sizes and the frame, a way to repeat a part around the drone, one arm, arms around the frame, the canopy, the landing gear and the payload. Every chapter has a picture of the editor after every step.</p>
<ul>
<li class=""><strong><a class="" href="https://learn.bitbybit.dev/learn/getting-started/rete/tutorials/drone/frame">In Rete</a></strong>: 202 components in commented groups, two modules (one repeats a part around the drone, one makes an arm with its motor, propeller, bolts and light), and code components where a few lines say more than a dozen nodes.</li>
<li class=""><strong><a class="" href="https://learn.bitbybit.dev/learn/getting-started/blockly/tutorials/drone/frame">In Blockly</a></strong>: variables for the sizes, a function for every part, loops that repeat parts and cut their holes, and async functions for the parts that measure geometry. The functions are collapsed, so the stacks that call them read like a list of parts.</li>
<li class=""><strong><a class="" href="https://learn.bitbybit.dev/learn/getting-started/typescript/tutorials/drone/frame">In TypeScript</a></strong>: a script of nineteen files, one function per part and a folder for the arm, put together in <code>main.ts</code>.</li>
</ul>
<p>Change the number of arms to six and the drone rebuilds, and the propeller shrinks to fit between its neighbours.</p>
<h2 class="anchor anchorTargetStickyNavbar_Vzrq" id="rete-wires-you-can-read">Rete: wires you can read<a href="https://learn.bitbybit.dev/blog/coding-editors-revamp-2026#rete-wires-you-can-read" class="hash-link" aria-label="Direct link to Rete: wires you can read" title="Direct link to Rete: wires you can read" translate="no">​</a></h2>
<div class="grid_hCdv" style="grid-template-columns:repeat(1, 1fr);gap:1rem"><img src="https://bitbybit.dev/files/site/learn/rete/rete.tutorials.drone/arms.7e465b54.webp" alt="Build a drone, arms around the frame: One Arm instance takes the arm length and the fitted propeller." width="1920" height="1080" loading="lazy" decoding="async" class="thumbnail_bKFe"></div>
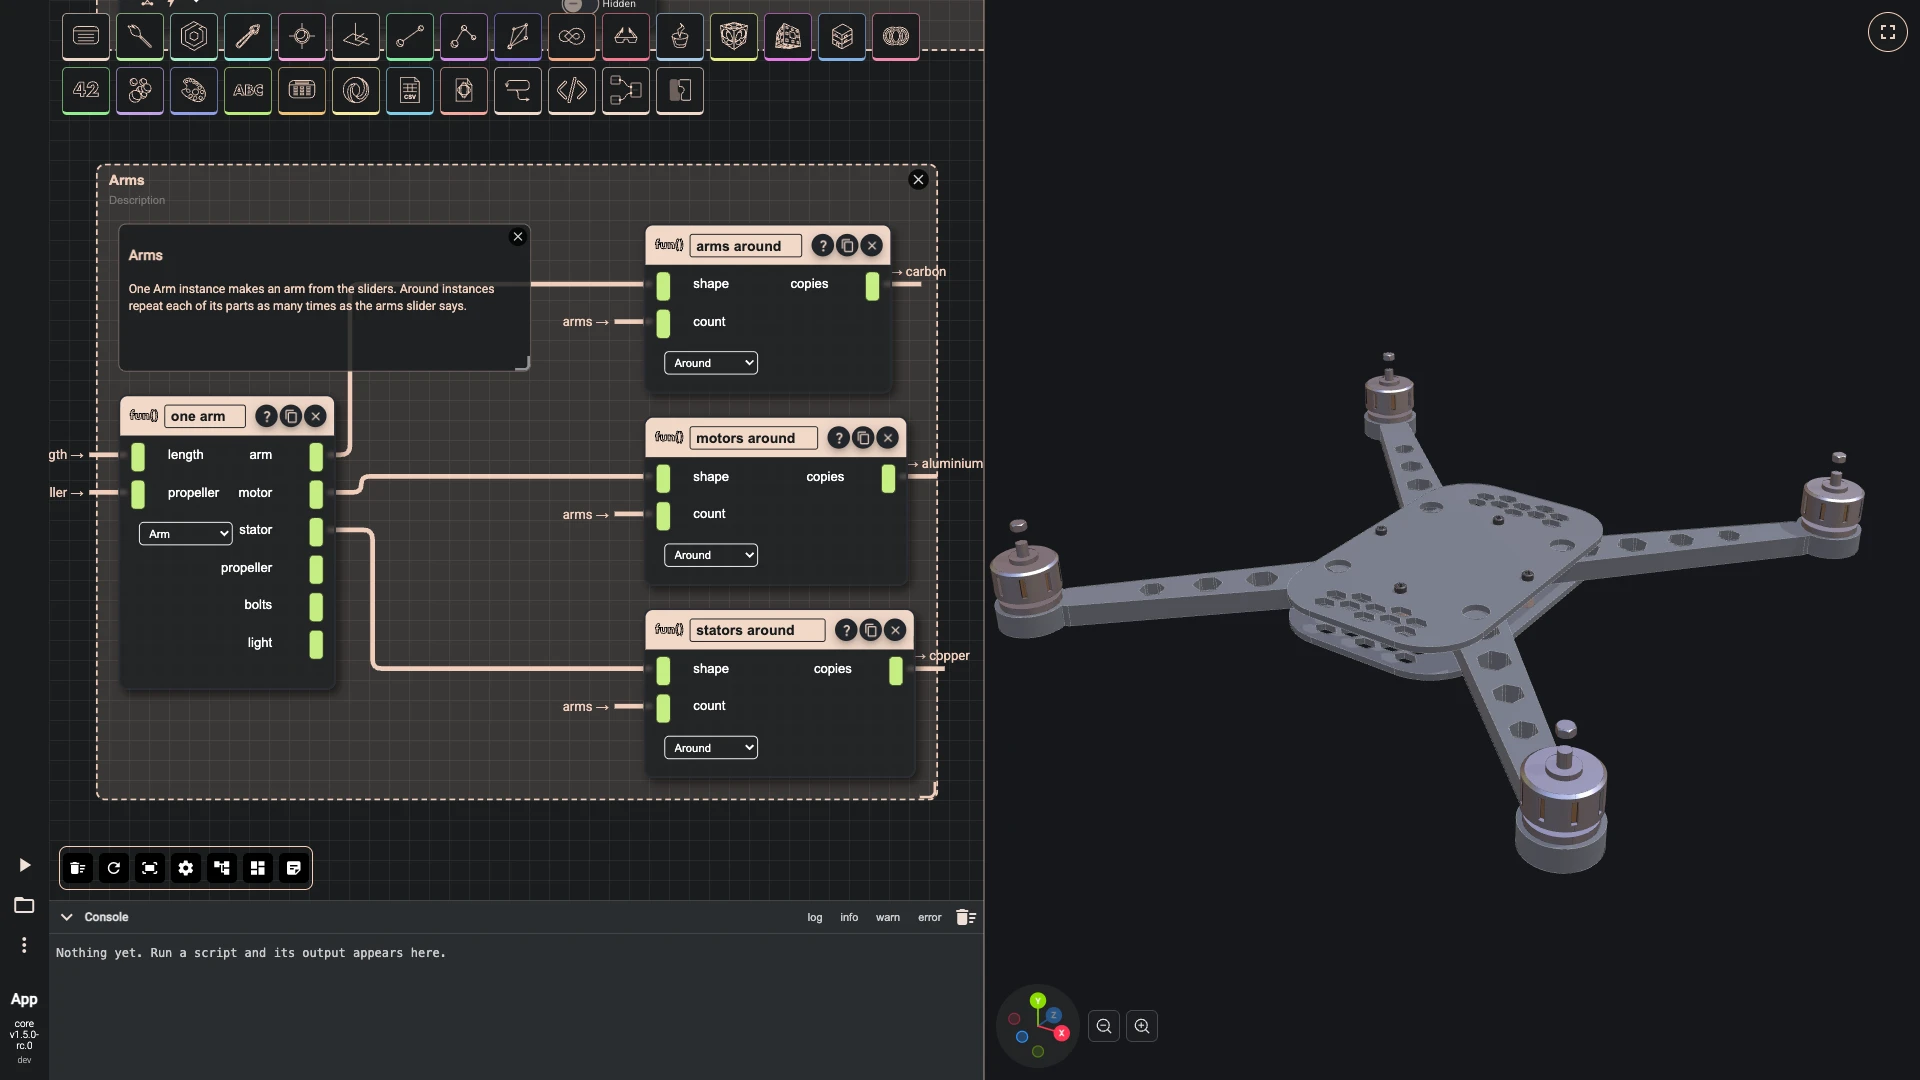
<p>In a large graph, curved wires cross the canvas and turn it into a tangle. Rete now draws wires <strong>right-angled</strong>: each output turns in a lane of its own, so wires that leave one node run side by side instead of on top of each other.</p>
<p>A wire between two <strong>groups</strong> is no longer drawn across the canvas at all. It becomes two short ends, each labelled with the other end: the output says where the value goes, and the input says where it comes from. Point at a label to see the whole wire, or select a node to see all of its wires. Both behaviours are switches in the settings, if you prefer the old look.</p>
<h2 class="anchor anchorTargetStickyNavbar_Vzrq" id="groups-comments-and-an-arrange-that-keeps-them">Groups, comments and an arrange that keeps them<a href="https://learn.bitbybit.dev/blog/coding-editors-revamp-2026#groups-comments-and-an-arrange-that-keeps-them" class="hash-link" aria-label="Direct link to Groups, comments and an arrange that keeps them" title="Direct link to Groups, comments and an arrange that keeps them" translate="no">​</a></h2>
<div class="grid_hCdv" style="grid-template-columns:repeat(1, 1fr);gap:1rem"><img src="https://bitbybit.dev/files/site/learn/rete/rete.canvas.organise/group.e22b8d08.webp" alt="The vector and the 3D text of Hello World put into a group named Words, and the toolbar showing what a selected group offers: remove the group, its colour and its transparency" width="1920" height="1080" loading="lazy" decoding="async" class="thumbnail_bKFe"></div>
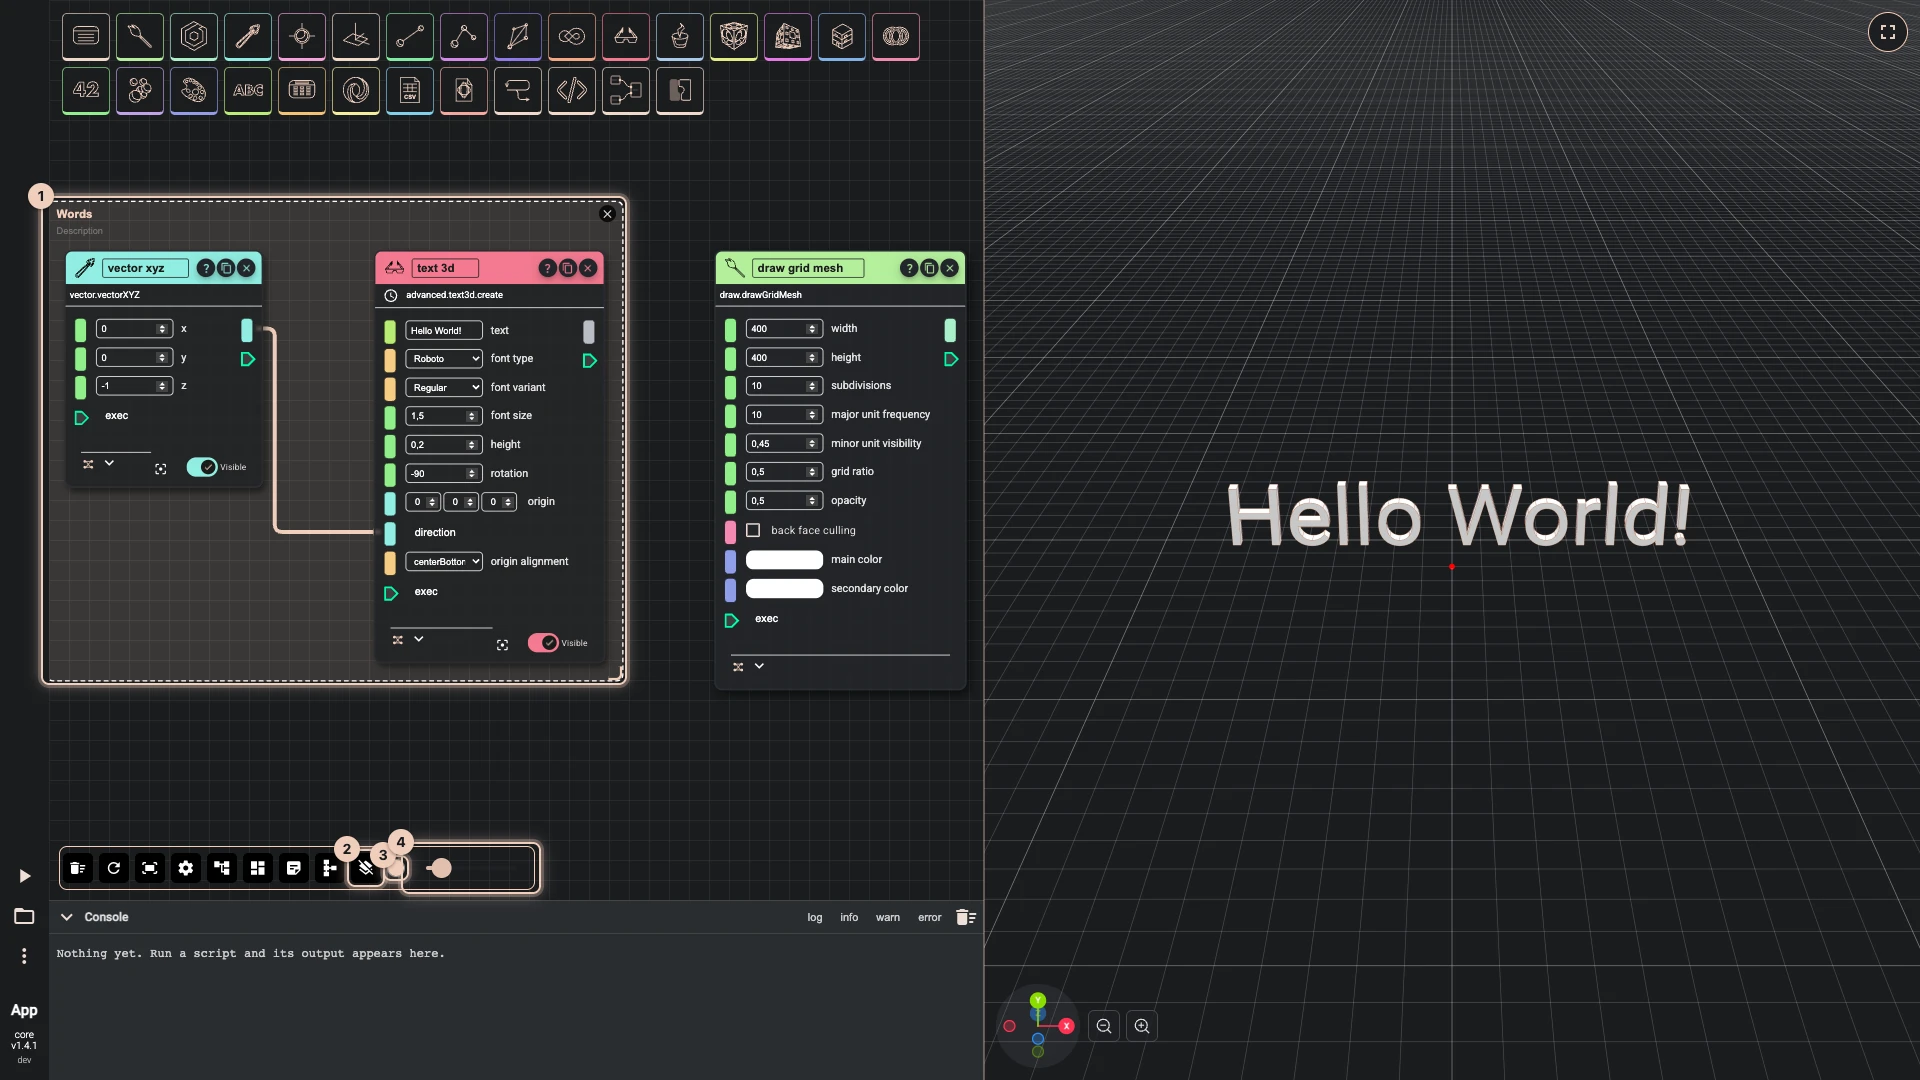
<p><strong>Groups</strong> frame the nodes that belong together, with a title, a colour and a description; drag the group and everything in it moves. <strong>Comments</strong> hold Markdown, so a group can say in a sentence what it makes and how.</p>
<p><strong>Auto-arrange</strong> now keeps groups whole. It lays each group out inside itself, in the order its wires run, wraps tall groups towards a square, and places the groups beside one another without overlap. Press it whenever the canvas gets crowded; the drone tutorial's pictures were taken right after it.</p>
<h2 class="anchor anchorTargetStickyNavbar_Vzrq" id="a-colour-coded-typed-graph">A colour-coded, typed graph<a href="https://learn.bitbybit.dev/blog/coding-editors-revamp-2026#a-colour-coded-typed-graph" class="hash-link" aria-label="Direct link to A colour-coded, typed graph" title="Direct link to A colour-coded, typed graph" translate="no">​</a></h2>
<div class="grid_hCdv" style="grid-template-columns:repeat(1, 1fr);gap:1rem"><img src="https://bitbybit.dev/files/site/learn/rete/rete.start.tour/window.33cc9df4.webp" alt="The Rete editor with the Hello World script: the palette, the toolbar, three nodes and a wire on the canvas, the 3D text in the 3D view, Run The Code and More, numbered as the tour explains them" width="1920" height="1080" loading="lazy" decoding="async" class="thumbnail_bKFe"></div>
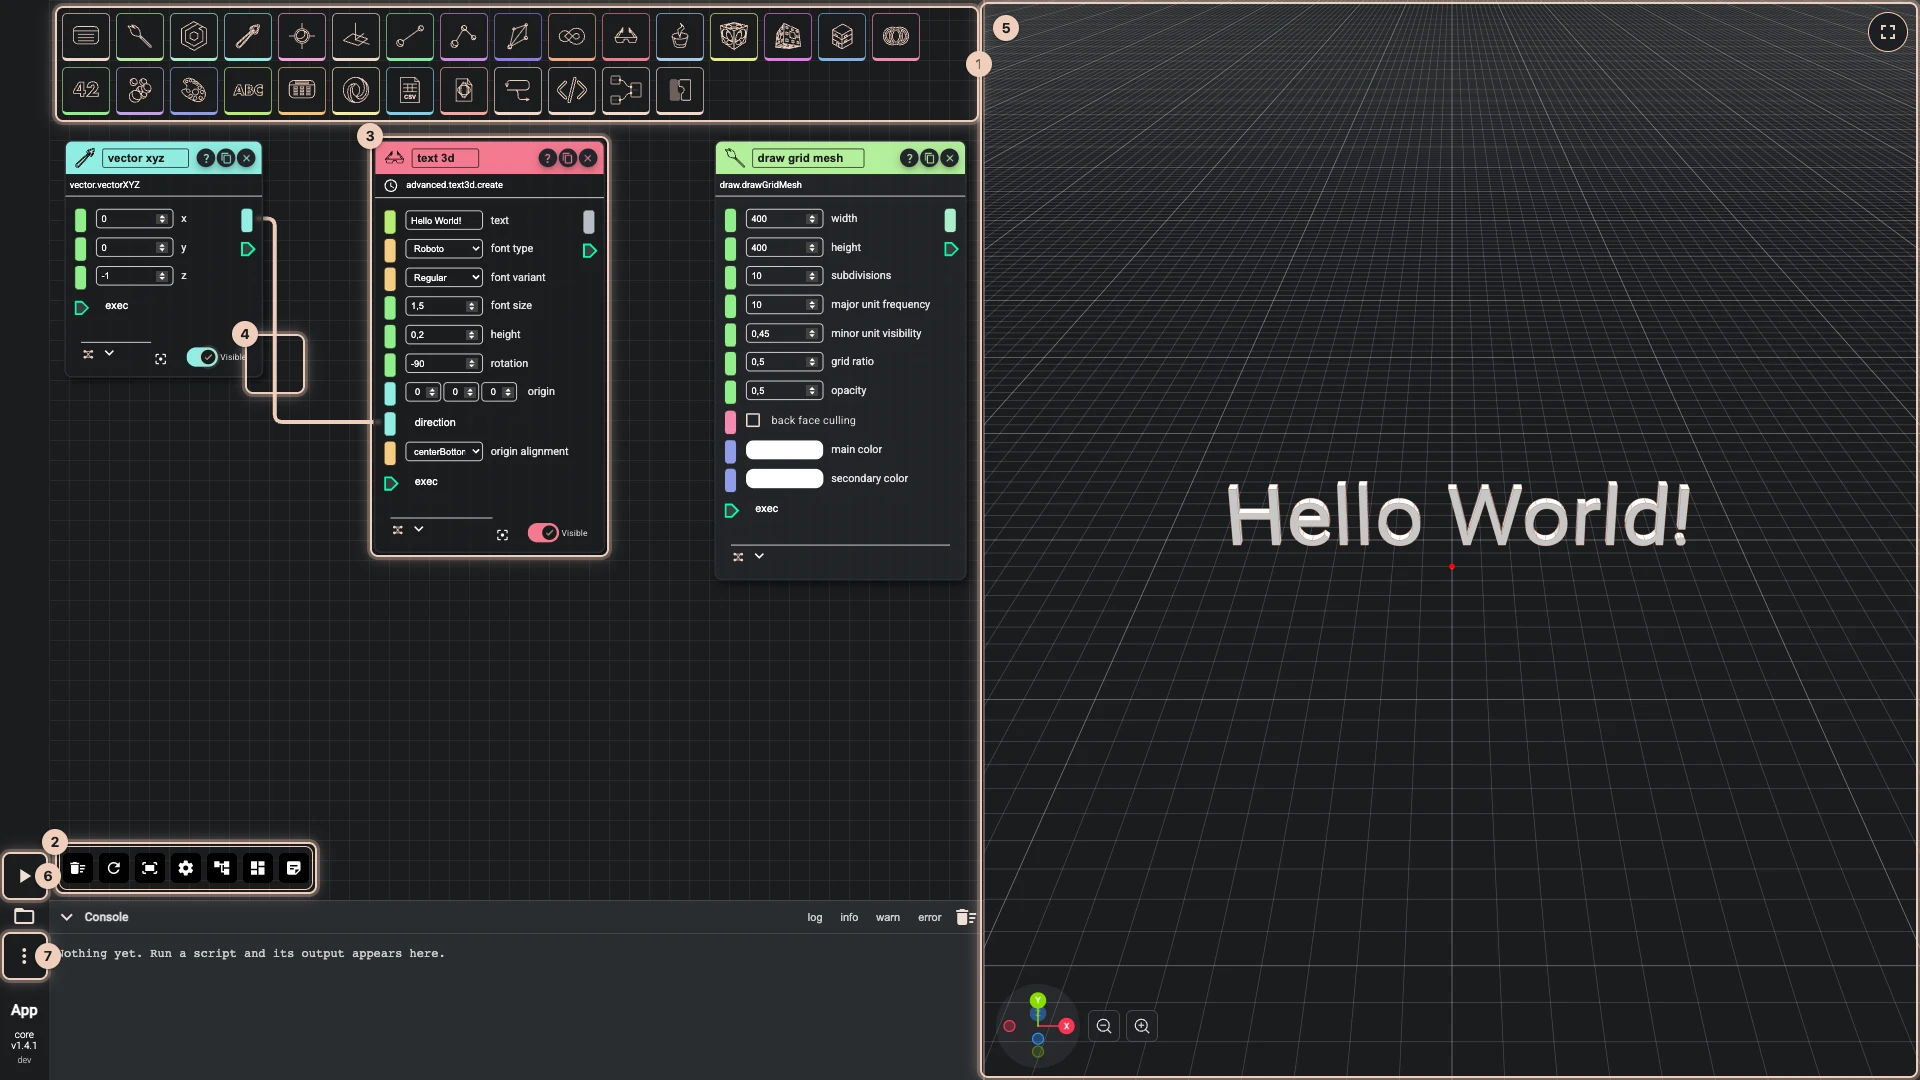
<p>The whole graph is colour-coded by category. The colour runs from the category you pick a component from, through the component on the canvas, to its sockets, so you can tell at a glance which nodes are OCCT solids, which are meshes and which are points.</p>
<p>Sockets now carry <strong>types</strong>. Each socket is tinted for the kind of data it carries, and when you point at one, a tip names the type and shows the value it holds after the last run. If you'd rather have a calmer canvas, monochrome mode is one switch away in the settings.</p>
<h2 class="anchor anchorTargetStickyNavbar_Vzrq" id="socket-coaching-instead-of-silent-failures">Socket coaching instead of silent failures<a href="https://learn.bitbybit.dev/blog/coding-editors-revamp-2026#socket-coaching-instead-of-silent-failures" class="hash-link" aria-label="Direct link to Socket coaching instead of silent failures" title="Direct link to Socket coaching instead of silent failures" translate="no">​</a></h2>
<div class="grid_hCdv" style="grid-template-columns:repeat(1, 1fr);gap:1rem"><img src="https://bitbybit.dev/files/site/learn/rete/rete.nodes.wires/refused.d5e72f37.webp" alt="A wire from a text output dropped on the cube's size refused: the message at the bottom says what the size input needs and that a text output cannot connect there" width="1920" height="1080" loading="lazy" decoding="async" class="thumbnail_bKFe"></div>
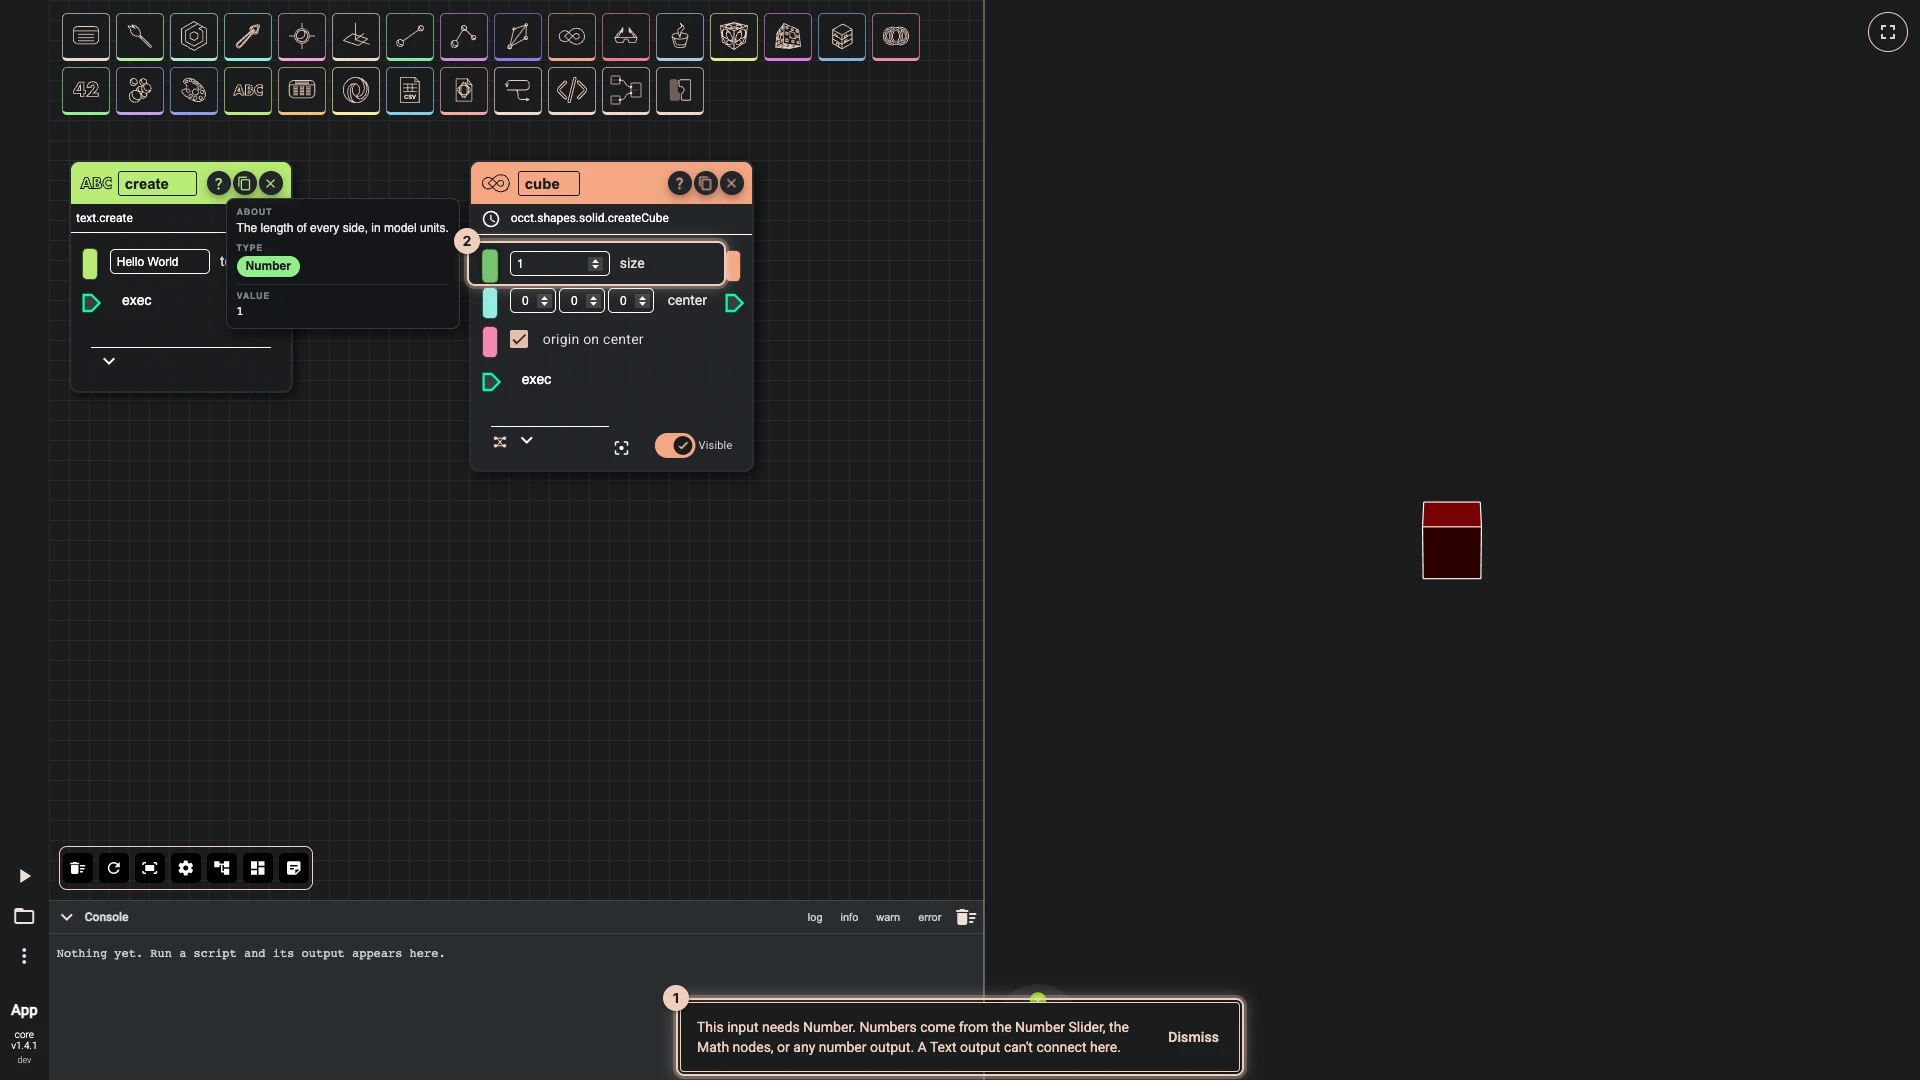
<p>With typed sockets, the editor can help you wire things correctly:</p>
<ul>
<li class=""><strong>A refused wire says why.</strong> Drop a wire on an input that cannot take it and a short message says what that input needs and which nodes make it.</li>
<li class=""><strong>Opened scripts keep their wiring.</strong> An older script whose connections no longer pass the type check keeps them, drawn red and dashed, and a message counts them, so nothing quietly disappears.</li>
<li class=""><strong>Nodes show what they do with lists.</strong> When several wires feed one input, the node runs once per value and a badge says how many it received. Pair lists by position with <strong>1:1</strong> in the node's options.</li>
</ul>
<h2 class="anchor anchorTargetStickyNavbar_Vzrq" id="modules-graphs-you-use-many-times">Modules: graphs you use many times<a href="https://learn.bitbybit.dev/blog/coding-editors-revamp-2026#modules-graphs-you-use-many-times" class="hash-link" aria-label="Direct link to Modules: graphs you use many times" title="Direct link to Modules: graphs you use many times" translate="no">​</a></h2>
<div class="grid_hCdv" style="grid-template-columns:repeat(1, 1fr);gap:1rem"><img src="https://bitbybit.dev/files/site/learn/rete/rete.canvas.modules/instance.b5ac0efc.webp" alt="Back on the main canvas: a module instance set to My Module, its input named after the module's input and driven by a number slider, and the cube the module makes in the 3D view" width="1920" height="1080" loading="lazy" decoding="async" class="thumbnail_bKFe"></div>
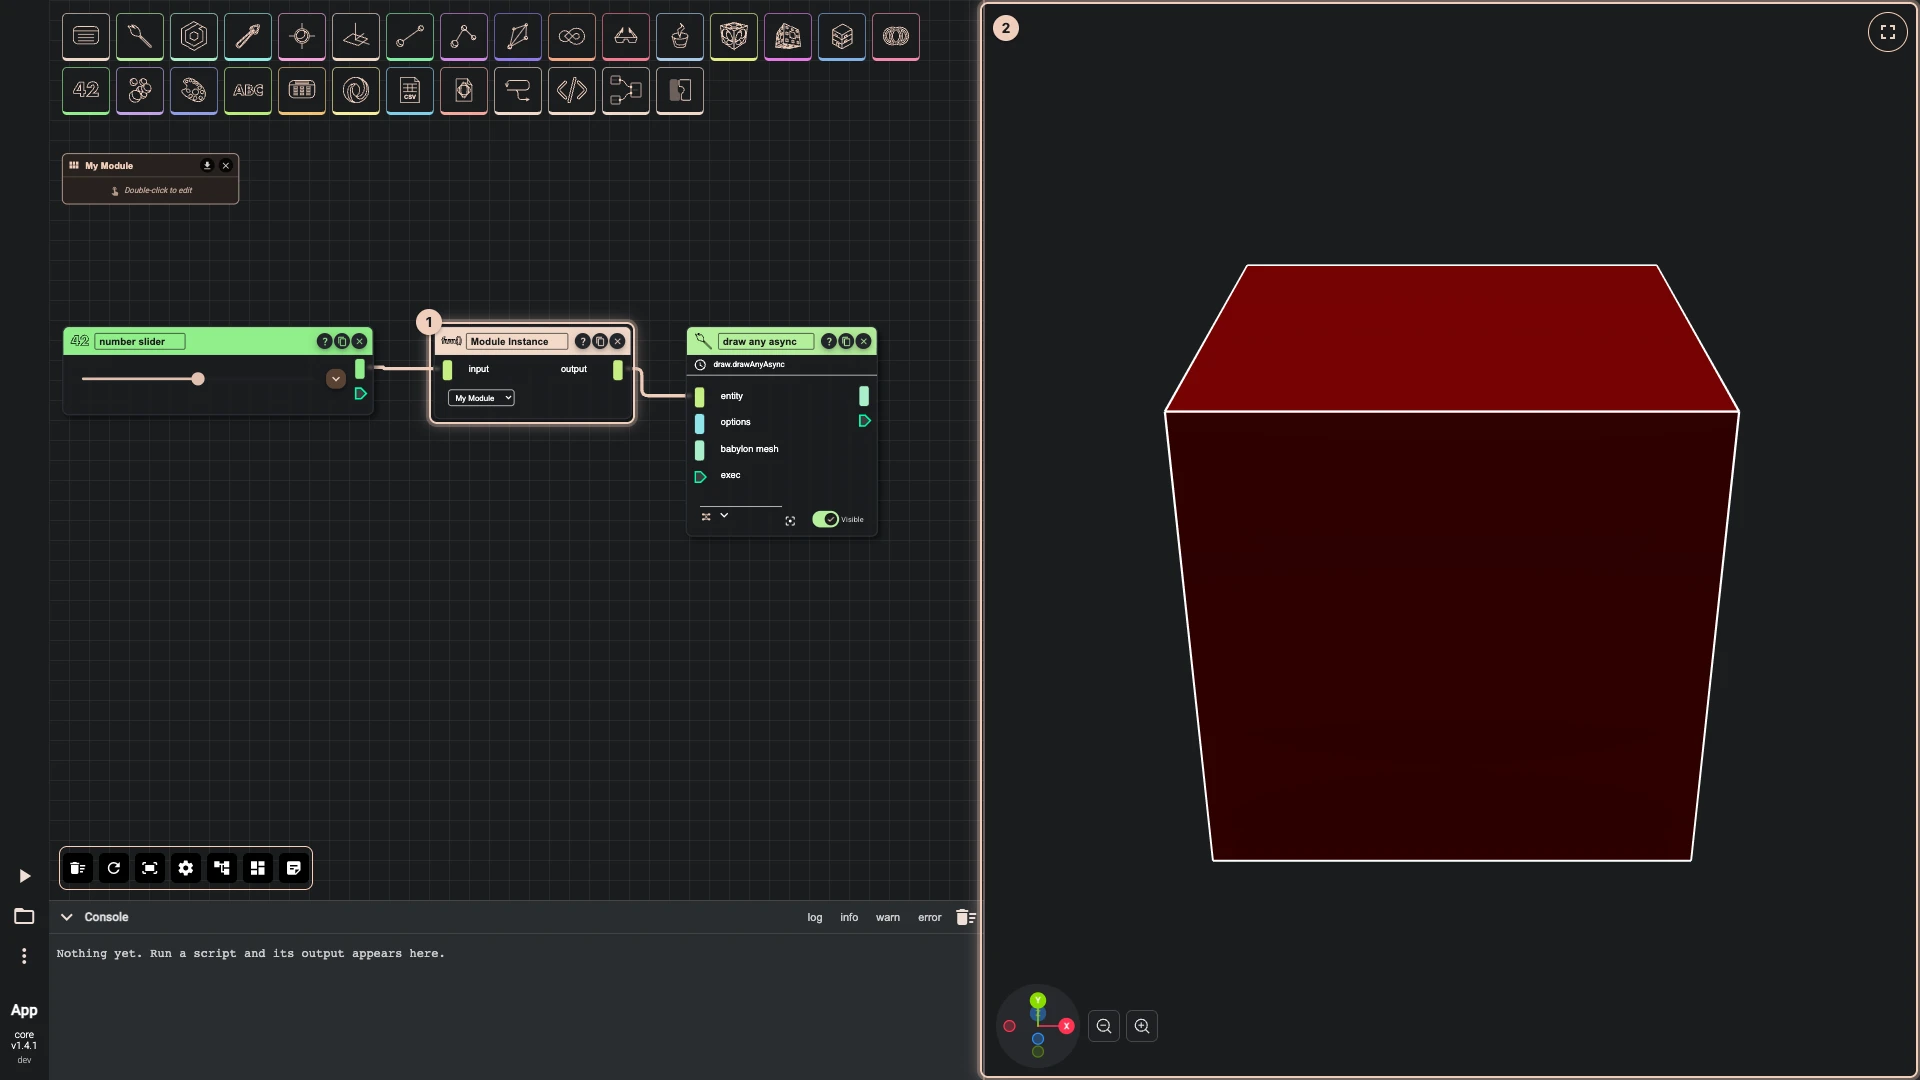
<p>A <strong>module</strong> packages part of a graph with its own inputs and outputs. Define it once, then drop instances of it wherever you need it, the way you call a function in code. Double-click a module to edit the graph inside, with a breadcrumb back to the main canvas; an input's sample value stands in for what an instance gives it, so you can see what the module makes while you build it. The drone uses two modules: Around repeats any part evenly around the drone, and Arm makes a whole arm from its length and the propeller's diameter.</p>
<h2 class="anchor anchorTargetStickyNavbar_Vzrq" id="find-anything-on-the-canvas">Find anything on the canvas<a href="https://learn.bitbybit.dev/blog/coding-editors-revamp-2026#find-anything-on-the-canvas" class="hash-link" aria-label="Direct link to Find anything on the canvas" title="Direct link to Find anything on the canvas" translate="no">​</a></h2>
<div class="grid_hCdv" style="grid-template-columns:repeat(1, 1fr);gap:1rem"><img src="https://bitbybit.dev/files/site/learn/rete/rete.canvas.organise/find.2a7e6d78.webp" alt="Find on canvas with text typed: the count of matches, the arrows to step through them, the list of where each one matched, and the canvas brought to the first match" width="1920" height="1080" loading="lazy" decoding="async" class="thumbnail_bKFe"></div>
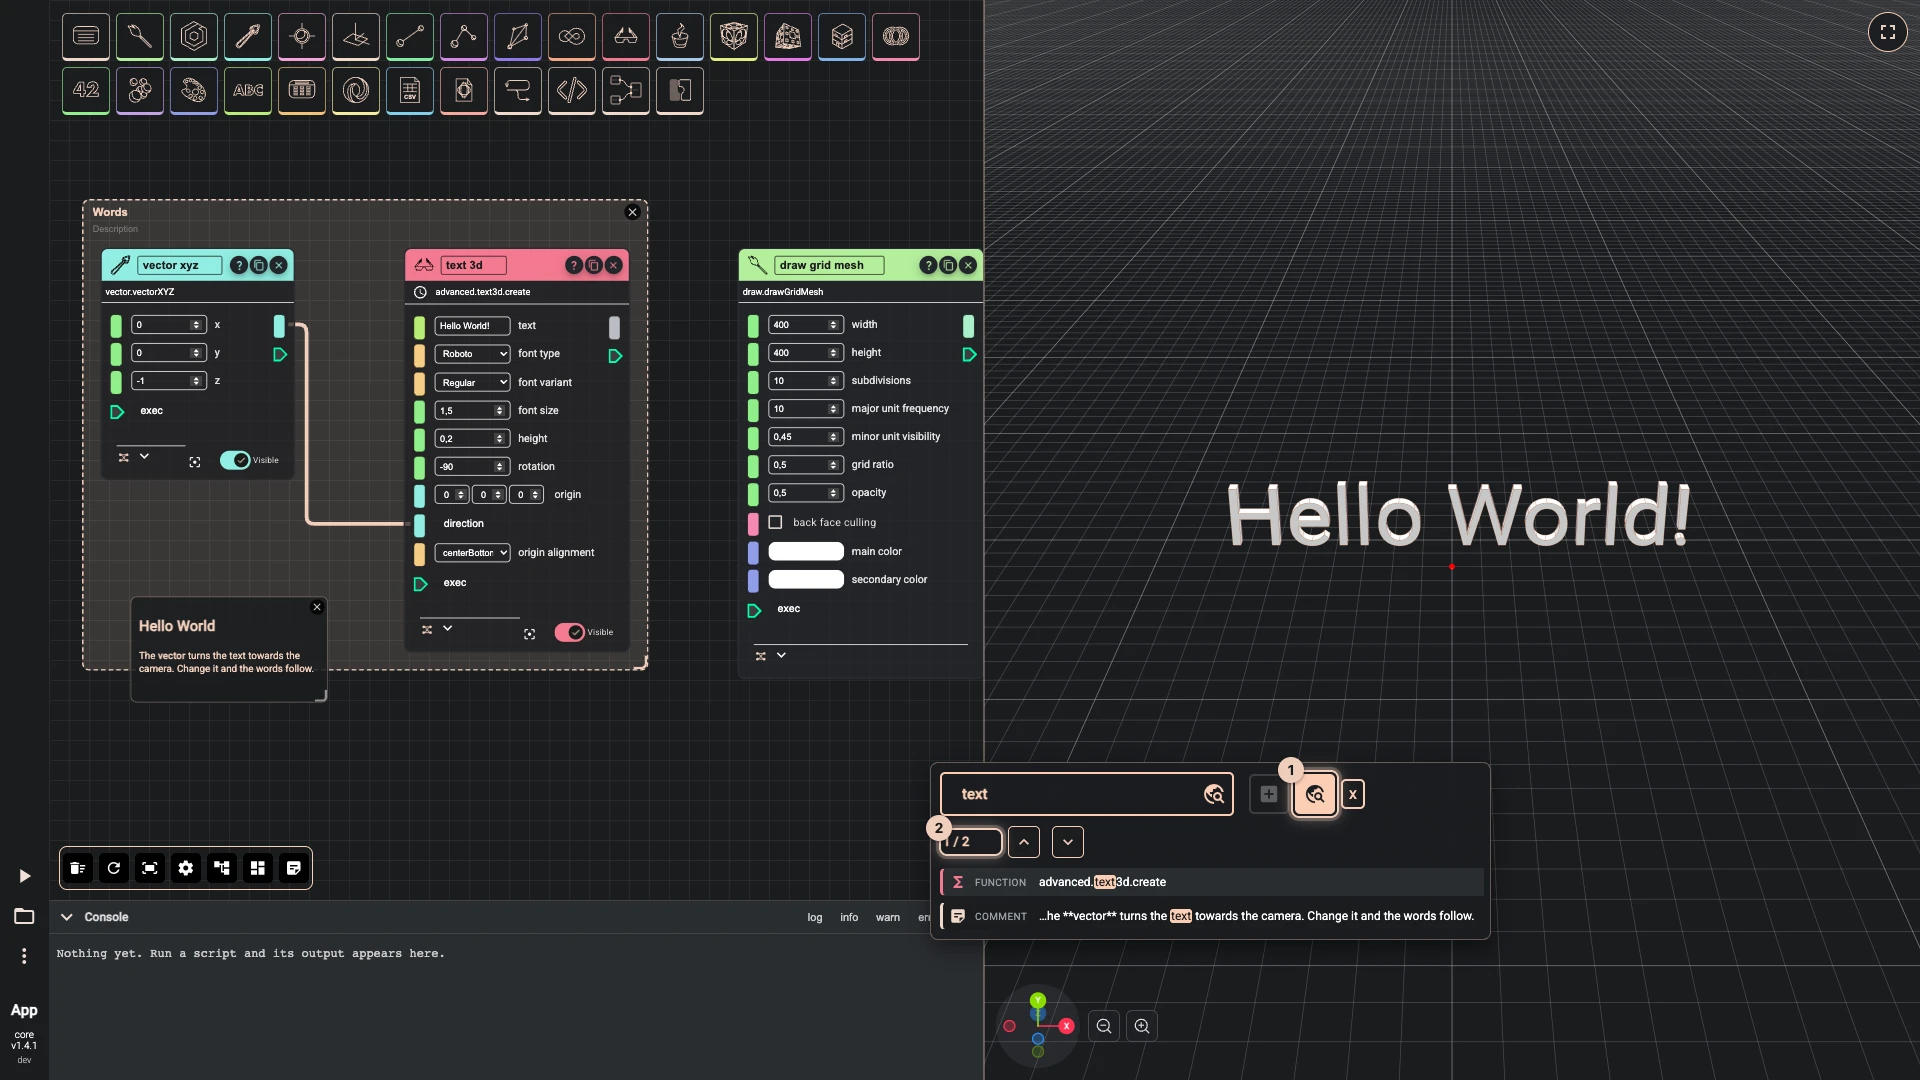
<p>The component search now does two jobs. <strong>Add components</strong> searches the catalogue as before, and <strong>Find on canvas</strong> searches the script in front of you. It matches component names, titles, inputs, outputs, group titles and comment text, counts the matches, and steps through them with the arrows. Each match is framed and pulses so your eye goes straight to it.</p>
<h2 class="anchor anchorTargetStickyNavbar_Vzrq" id="selection-that-shows-its-geometry">Selection that shows its geometry<a href="https://learn.bitbybit.dev/blog/coding-editors-revamp-2026#selection-that-shows-its-geometry" class="hash-link" aria-label="Direct link to Selection that shows its geometry" title="Direct link to Selection that shows its geometry" translate="no">​</a></h2>
<div class="grid_hCdv" style="grid-template-columns:repeat(1, 1fr);gap:1rem"><img src="https://bitbybit.dev/files/site/learn/rete/rete.nodes.wires/selected.83bc219c.webp" alt="The cube node selected on the canvas, and its solid glowing in the 3D view, so you can tell which node made which geometry" width="1920" height="1080" loading="lazy" decoding="async" class="thumbnail_bKFe"></div>
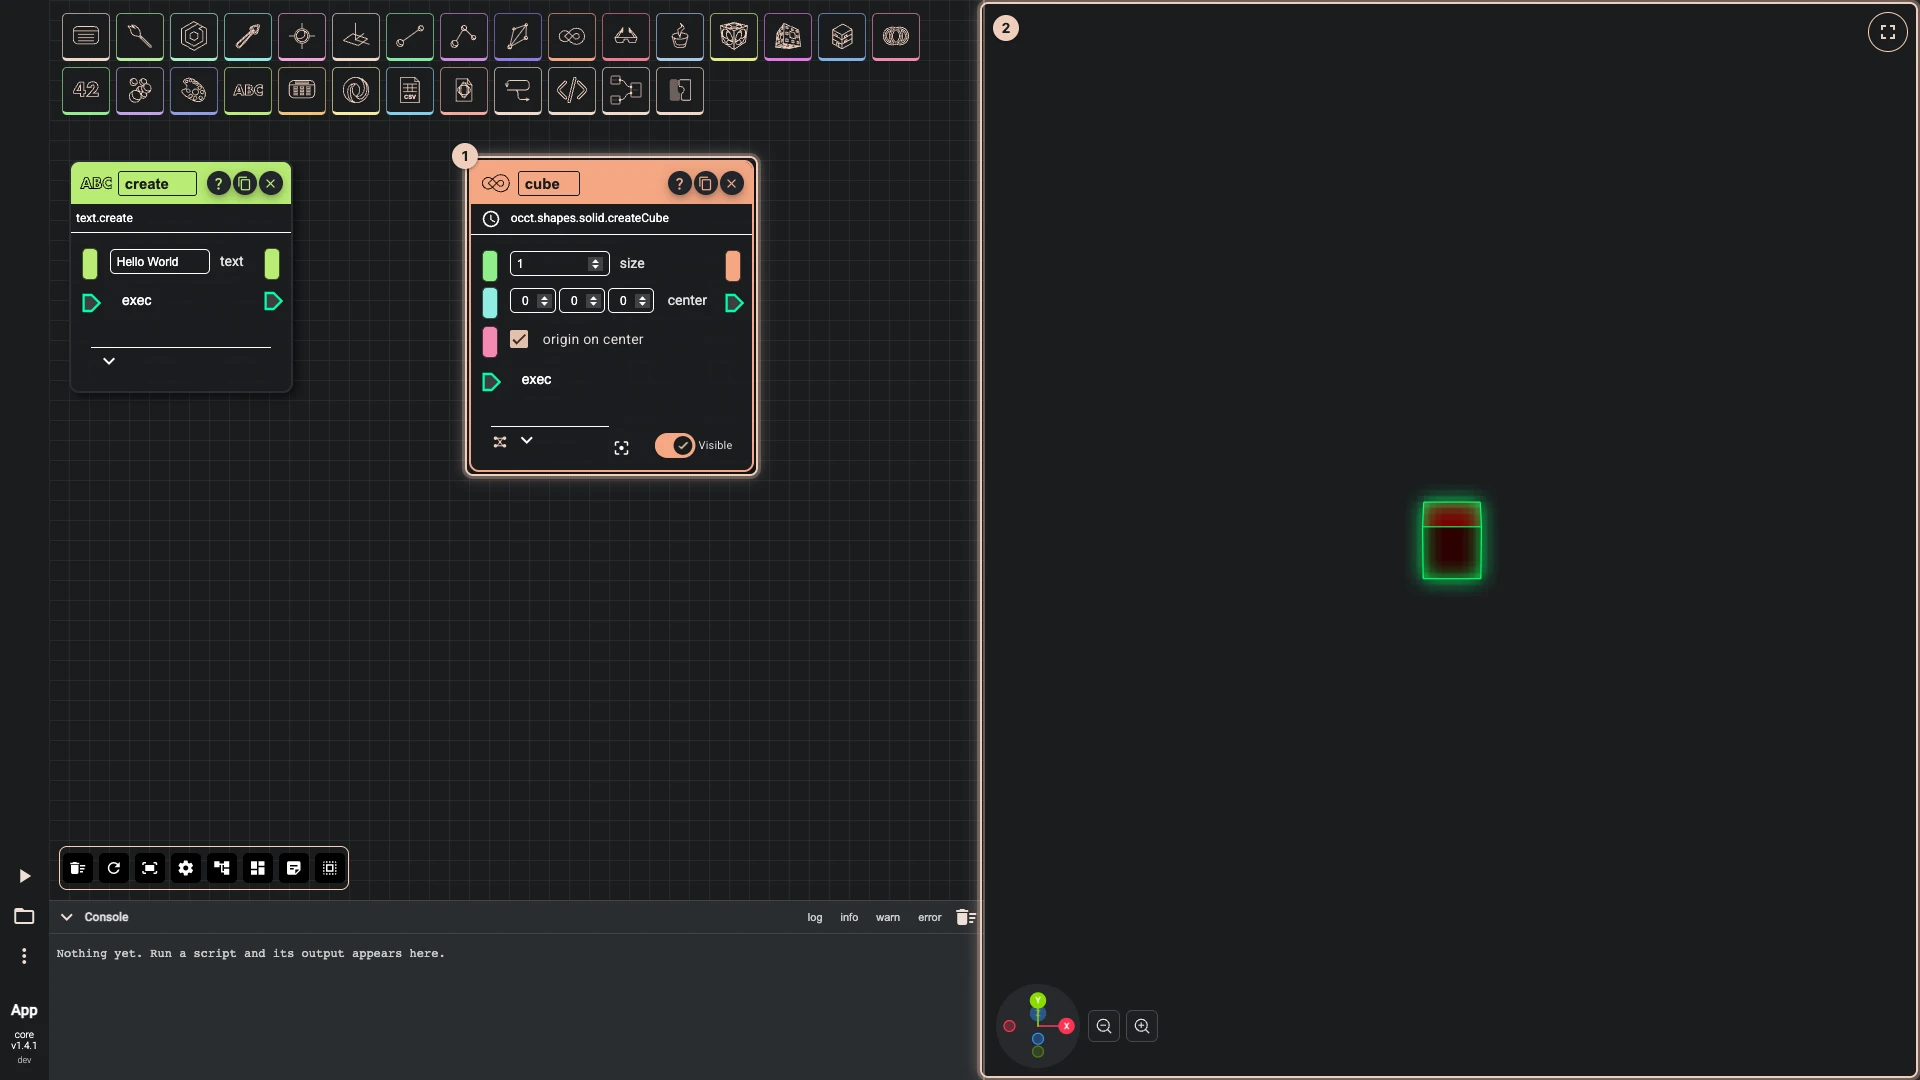
<p>Selecting a node highlights the geometry it made in the 3D view, with a glow that draws on top of everything else. If the node's geometry is hidden, it is drawn while the node stays selected. Double-click a node to frame its geometry and centre the canvas on the node itself.</p>
<h2 class="anchor anchorTargetStickyNavbar_Vzrq" id="code-where-code-is-clearer">Code where code is clearer<a href="https://learn.bitbybit.dev/blog/coding-editors-revamp-2026#code-where-code-is-clearer" class="hash-link" aria-label="Direct link to Code where code is clearer" title="Direct link to Code where code is clearer" translate="no">​</a></h2>
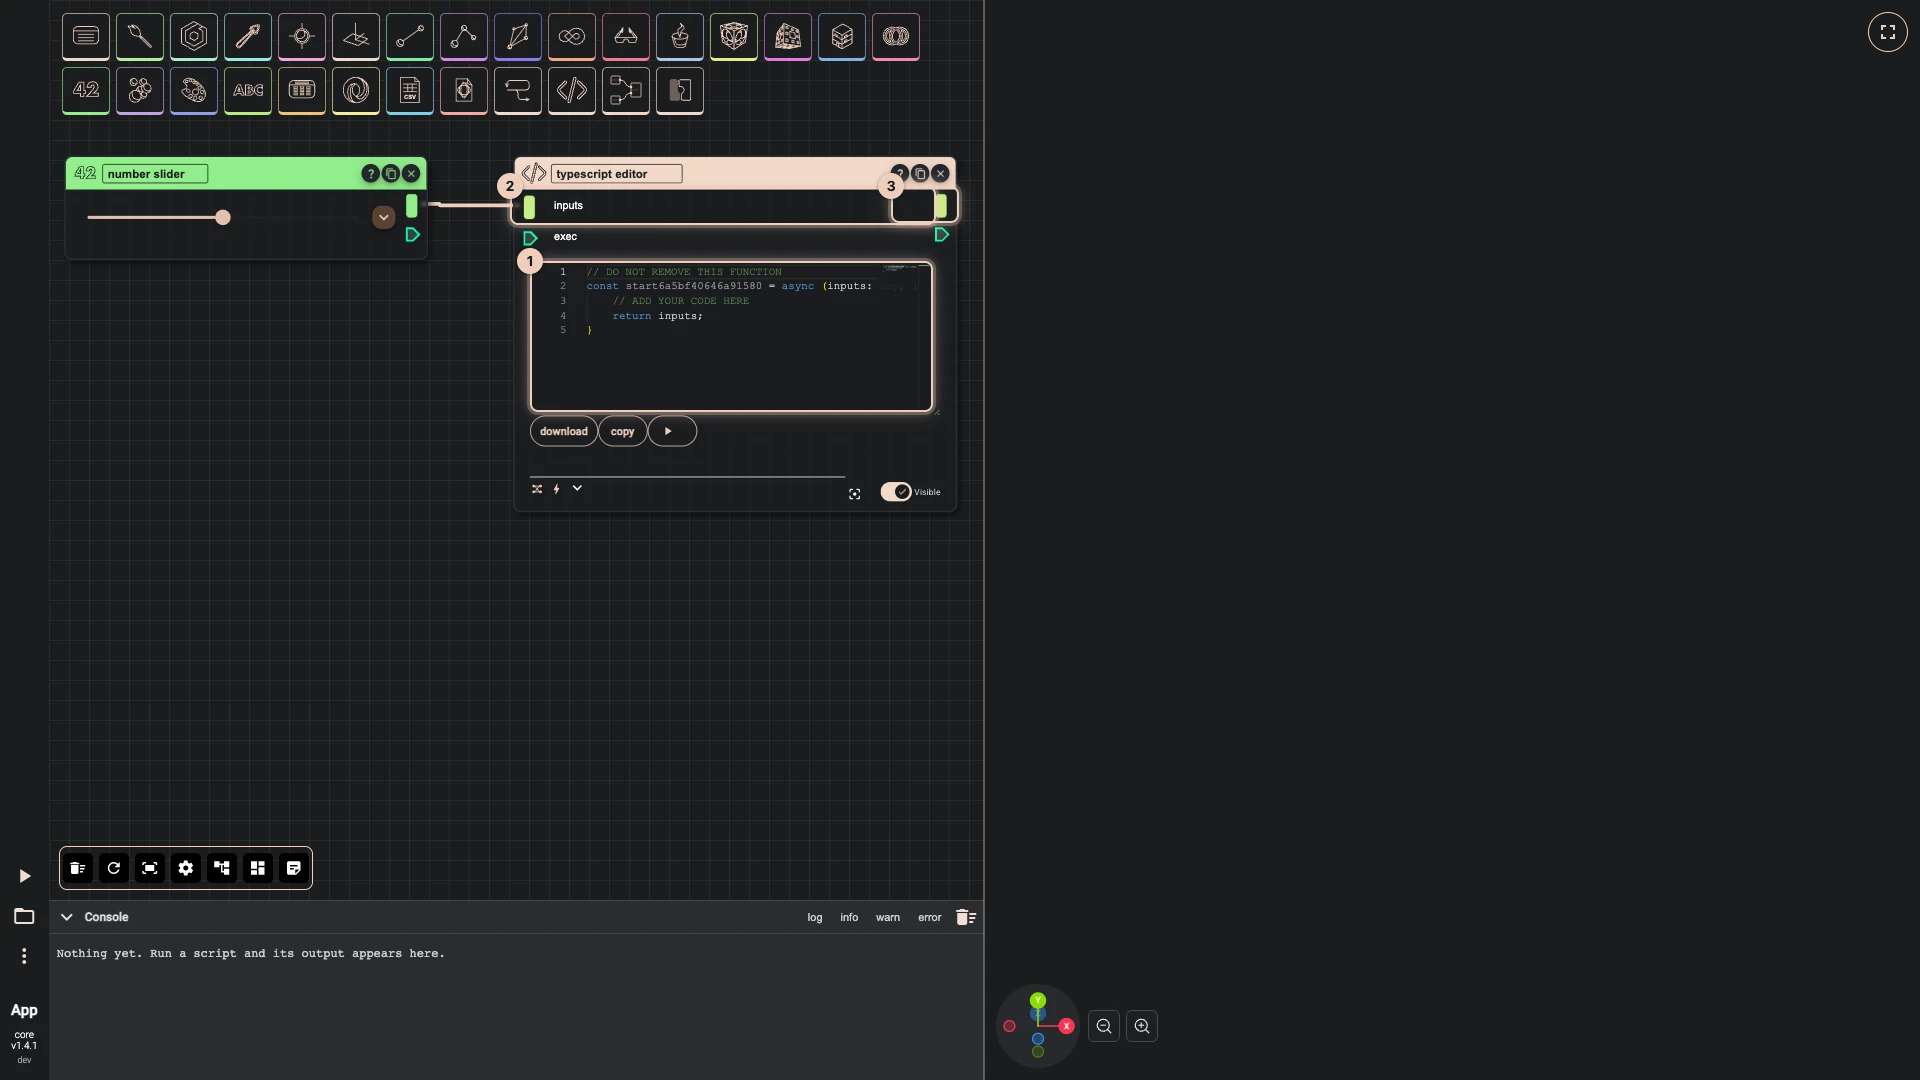
<div class="grid_hCdv" style="grid-template-columns:repeat(1, 1fr);gap:1rem"><img src="https://bitbybit.dev/files/site/learn/rete/rete.nodes.code/editor.c92c8230.webp" alt="A typescript editor node fed by a number slider: its code is one start function that receives the inputs and returns what the node gives out" width="1920" height="1080" loading="lazy" decoding="async" class="thumbnail_bKFe"></div>
<p>Some things are easier to say in a few lines than in a dozen nodes: a formula, a loop with a condition, a list reshaped. A <strong>typescript editor</strong> node holds a function that receives what is wired into it and returns what it gives out, with the same IntelliSense as the TypeScript editor. The drone mixes both: simple shapes are nodes, and parts with a profile of many points or a loop are code nodes.</p>
<h2 class="anchor anchorTargetStickyNavbar_Vzrq" id="settings-and-split-screen">Settings and split screen<a href="https://learn.bitbybit.dev/blog/coding-editors-revamp-2026#settings-and-split-screen" class="hash-link" aria-label="Direct link to Settings and split screen" title="Direct link to Settings and split screen" translate="no">​</a></h2>
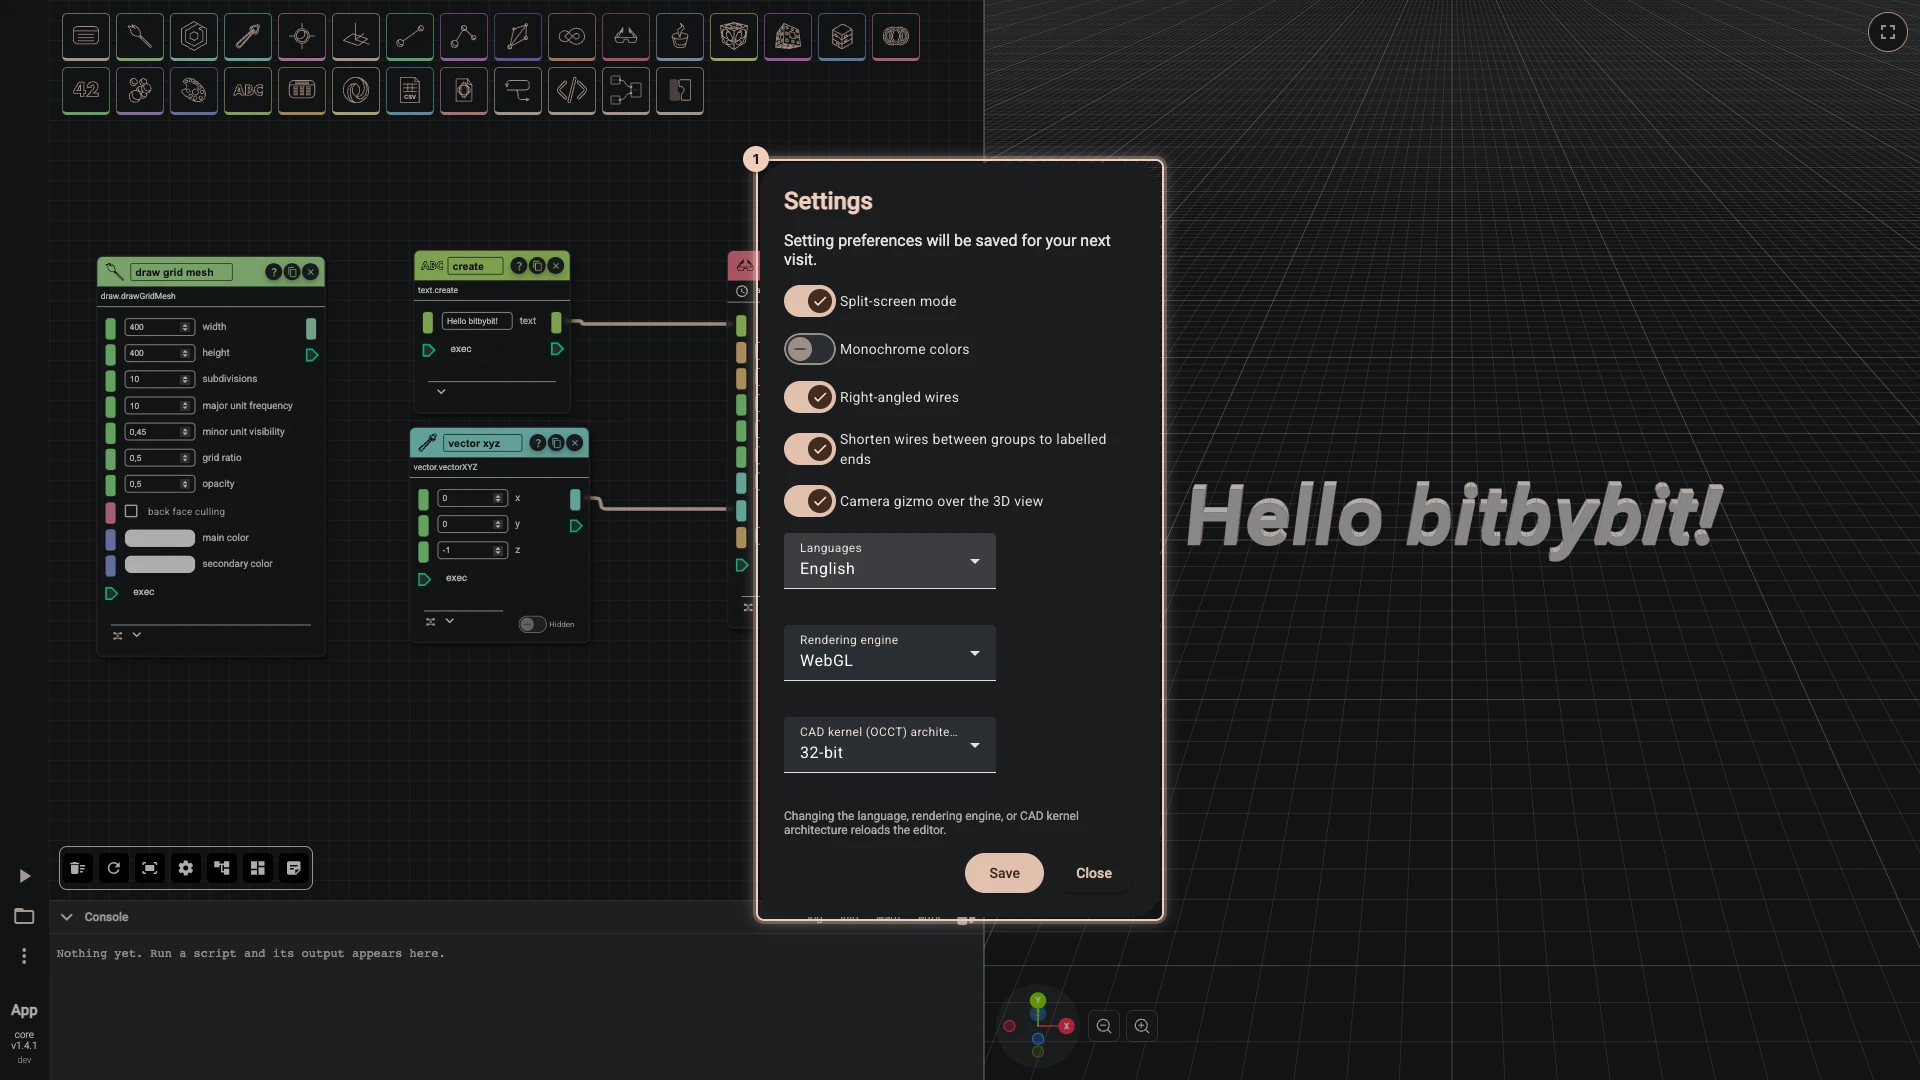
<div class="grid_hCdv" style="grid-template-columns:repeat(1, 1fr);gap:1rem"><img src="https://bitbybit.dev/files/site/learn/platform/platform.basics.settings/dialog.f80bab55.webp" alt="The editor's Settings: split screen, monochrome colors, the camera gizmo, the language, the rendering engine and the CAD kernel architecture" width="1920" height="1080" loading="lazy" decoding="async" class="thumbnail_bKFe"></div>
<p>Work on the graph and the 3D view side by side, with a divider you can drag, or swap the canvas to give the model the whole screen. The <strong>Settings</strong> dialog holds split screen, monochrome colours, the camera gizmo, right-angled wires and labelled wire ends, the language, the rendering engine (WebGL or WebGPU) and the OCCT kernel. Settings are remembered on your device.</p>
<h2 class="anchor anchorTargetStickyNavbar_Vzrq" id="blockly-functions-that-wait">Blockly: functions that wait<a href="https://learn.bitbybit.dev/blog/coding-editors-revamp-2026#blockly-functions-that-wait" class="hash-link" aria-label="Direct link to Blockly: functions that wait" title="Direct link to Blockly: functions that wait" translate="no">​</a></h2>
<p>Blockly functions could always return a shape, because every bitbybit block waits for the shapes it receives. What they could not do was wait for a value themselves: an <strong>await</strong> block inside a function failed when the script ran.</p>
<p>Now a function with an await block in it <strong>runs as async</strong>. A call of it as a block of its own waits for it to finish before the next block runs, a set block that keeps its result waits for it too, and a function that calls it becomes async too. Functions without await blocks run exactly as before, so existing scripts behave the same.</p>
<p>We also fixed a long-standing bug on the way: a function whose return was a bitbybit block, such as a cylinder plugged straight into its return, gave back nothing, because of where a line break fell in the generated code. Such functions now return their shape. And a block dragged from the toolbox no longer fills a number the API leaves unset with 0, which had tinted the edges of a shape drawn with the full drawing options. In the drone, async functions read each light's centre to sort the lights into green and red, and measure the canopy's faces to trace its honeycomb. Collapse functions once they work, and a large Blockly script reads like a list of parts.</p>
<h2 class="anchor anchorTargetStickyNavbar_Vzrq" id="typescript-scripts-of-many-files">TypeScript: scripts of many files<a href="https://learn.bitbybit.dev/blog/coding-editors-revamp-2026#typescript-scripts-of-many-files" class="hash-link" aria-label="Direct link to TypeScript: scripts of many files" title="Direct link to TypeScript: scripts of many files" translate="no">​</a></h2>
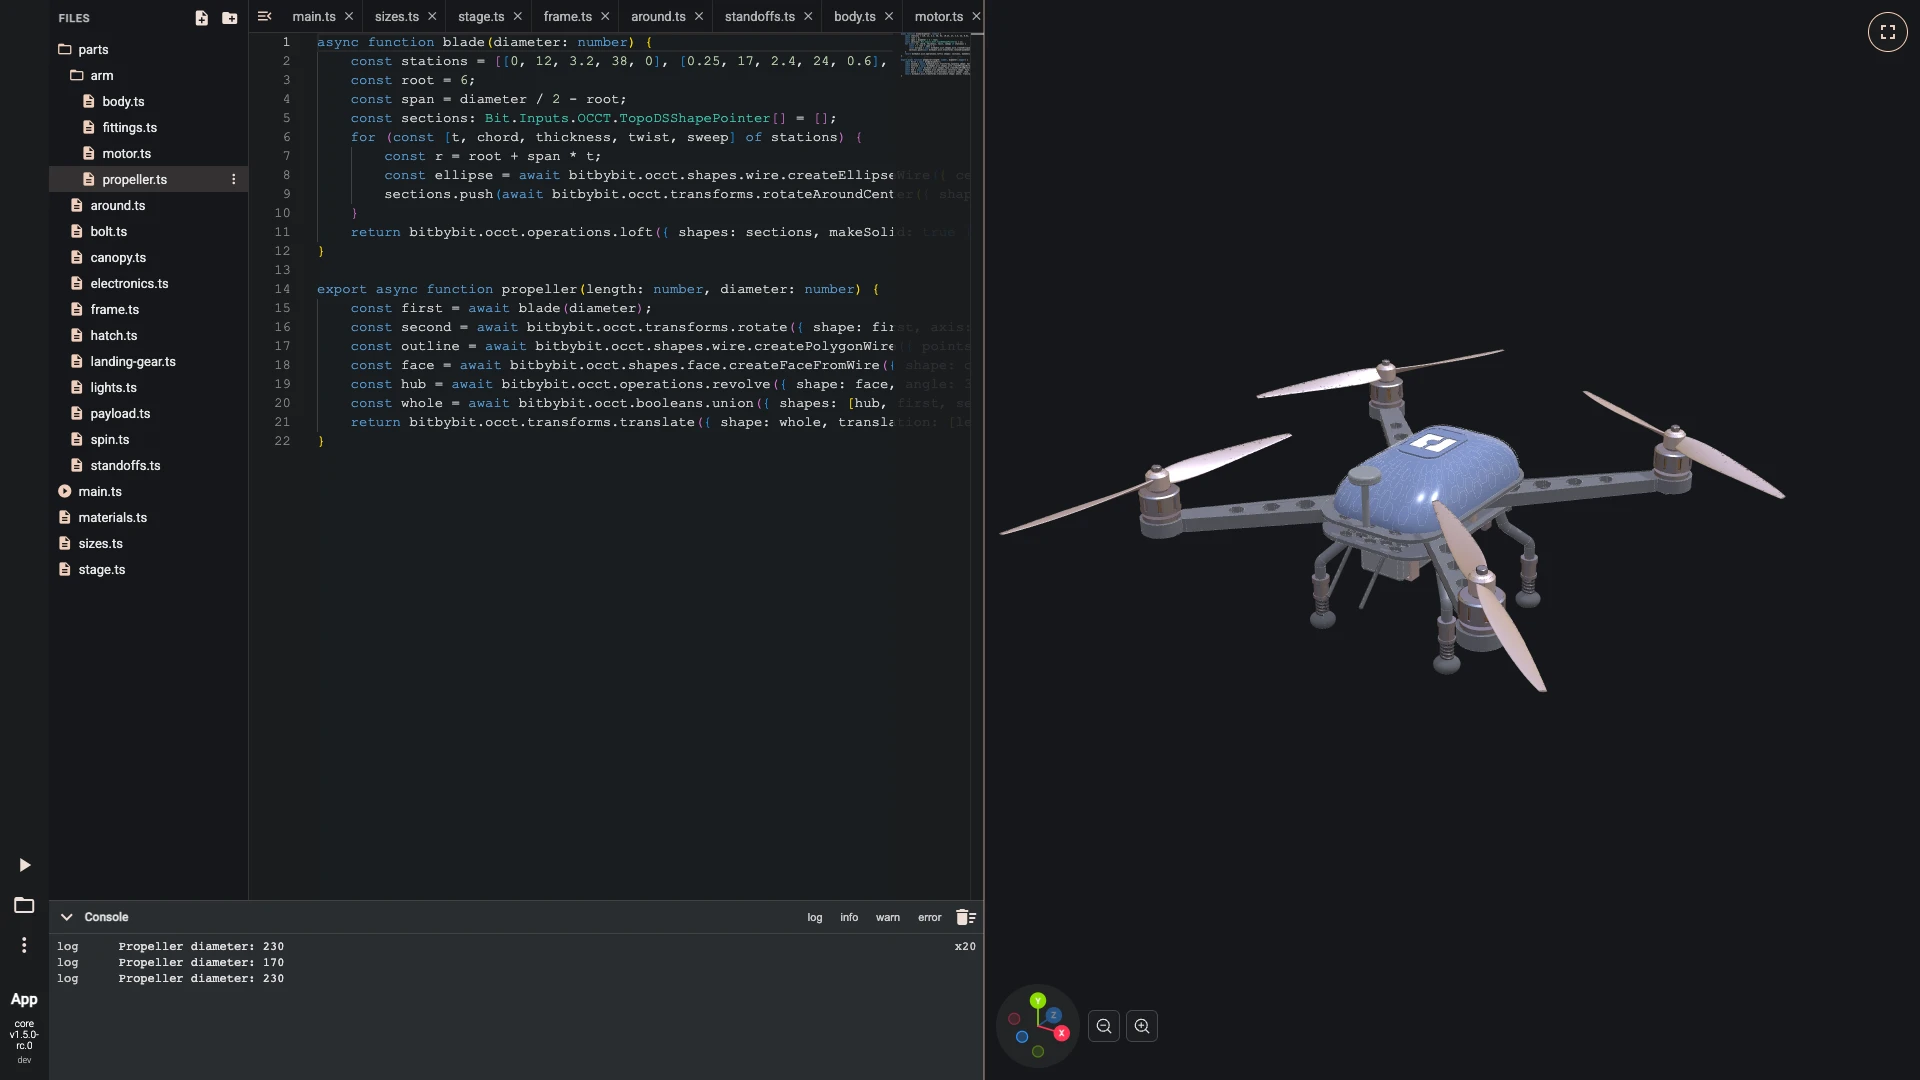
<div class="grid_hCdv" style="grid-template-columns:repeat(1, 1fr);gap:1rem"><img src="https://bitbybit.dev/files/site/learn/typescript/typescript.start.showcases/drone.9edee7e5.webp" alt="The drone in the TypeScript editor: the script's files in their folders, the propeller's file open, and the drone they build beside it" width="1920" height="1080" loading="lazy" decoding="async" class="thumbnail_bKFe"></div>
<p>A TypeScript script can now be many files in folders, with <code>main.ts</code> as the file the run starts from. Files import each other by relative path, every file is checked as you type, and a mistake in a file you have closed still shows its count in the tree. The TypeScript drone keeps each part in a file of its own.</p>
<h2 class="anchor anchorTargetStickyNavbar_Vzrq" id="agents-can-drive-the-editors">Agents can drive the editors<a href="https://learn.bitbybit.dev/blog/coding-editors-revamp-2026#agents-can-drive-the-editors" class="hash-link" aria-label="Direct link to Agents can drive the editors" title="Direct link to Agents can drive the editors" translate="no">​</a></h2>
<p>While an editor is open, it offers its tools to AI agents, through <code>window.bitbybitEditor</code> and through WebMCP in browsers that support it. An agent can search the components or blocks, read the graph or the files, apply a batch of changes that the editor checks first and that one undo takes back, run the script and read what failed, and capture the 3D view. The drone tutorials were built through these tools: each step is a checked batch of edits, played in the real editor and photographed.</p>
<h2 class="anchor anchorTargetStickyNavbar_Vzrq" id="faster-and-lighter-on-your-machine">Faster, and lighter on your machine<a href="https://learn.bitbybit.dev/blog/coding-editors-revamp-2026#faster-and-lighter-on-your-machine" class="hash-link" aria-label="Direct link to Faster, and lighter on your machine" title="Direct link to Faster, and lighter on your machine" translate="no">​</a></h2>
<p>Under all of this, the editors were rebuilt. The 3D scene renders only when something changes instead of 60 times a second. Zoomed far out, Rete nodes simplify to placeholders so the canvas stays smooth. Rete keeps each node's last result and runs again only what a change affects. Large graphs like the drone's 202 nodes stay quick to pan, zoom and edit.</p>
<h2 class="anchor anchorTargetStickyNavbar_Vzrq" id="new-pages-on-learnbitbybitdev">New pages on learn.bitbybit.dev<a href="https://learn.bitbybit.dev/blog/coding-editors-revamp-2026#new-pages-on-learnbitbybitdev" class="hash-link" aria-label="Direct link to New pages on learn.bitbybit.dev" title="Direct link to New pages on learn.bitbybit.dev" translate="no">​</a></h2>
<p>Each coding editor now has its own section in Getting Started: an introduction, a tour of the window, the showcases, tutorials with a picture after every step, a page for each area of the editor and its shortcuts. Start with <a class="" href="https://learn.bitbybit.dev/learn/getting-started/rete/intro">Rete</a>, <a class="" href="https://learn.bitbybit.dev/learn/getting-started/blockly/intro">Blockly</a> or <a class="" href="https://learn.bitbybit.dev/learn/getting-started/typescript/intro">TypeScript</a>.</p>
<h2 class="anchor anchorTargetStickyNavbar_Vzrq" id="try-it-out">Try it out<a href="https://learn.bitbybit.dev/blog/coding-editors-revamp-2026#try-it-out" class="hash-link" aria-label="Direct link to Try it out" title="Direct link to Try it out" translate="no">​</a></h2>
<p>All of this is live in the <a href="https://bitbybit.dev/app?editor=rete" target="_blank" rel="noopener noreferrer" class="">Rete</a>, <a href="https://bitbybit.dev/app?editor=blockly" target="_blank" rel="noopener noreferrer" class="">Blockly</a> and <a href="https://bitbybit.dev/app?editor=typescript" target="_blank" rel="noopener noreferrer" class="">TypeScript</a> editors. Open the drone from a showcase page, change its sizes, and take it apart. We'd love to hear what you build.</p>]]></content>
        <author>
            <name>Matas Ubarevičius</name>
            <uri>https://www.linkedin.com/in/matas-ubarevicius/</uri>
        </author>
        <category label="Bitbybit" term="Bitbybit"/>
        <category label="CAD" term="CAD"/>
        <category label="Visual programming" term="Visual programming"/>
        <category label="TypeScript" term="TypeScript"/>
        <category label="BabylonJS" term="BabylonJS"/>
        <category label="OCCT" term="OCCT"/>
    </entry>
    <entry>
        <title type="html"><![CDATA[Making Bitbybit AI Ready: Our MCP Servers, and a Jet Engine Built With Them]]></title>
        <id>https://learn.bitbybit.dev/blog/bitbybit-mcp-ai-ready-jet-engine</id>
        <link href="https://learn.bitbybit.dev/blog/bitbybit-mcp-ai-ready-jet-engine"/>
        <updated>2026-10-01T00:00:00.000Z</updated>
        <summary type="html"><![CDATA[Bitbybit now runs its own MCP servers, so AI coding agents look up the exact API instead of guessing it and can run CAD operations on request. What that means for Bitbybit users, shown on a turbofan engine with 130 parts placed 4,853 times, built by an AI agent and now a multi-file project in our TypeScript editor.]]></summary>
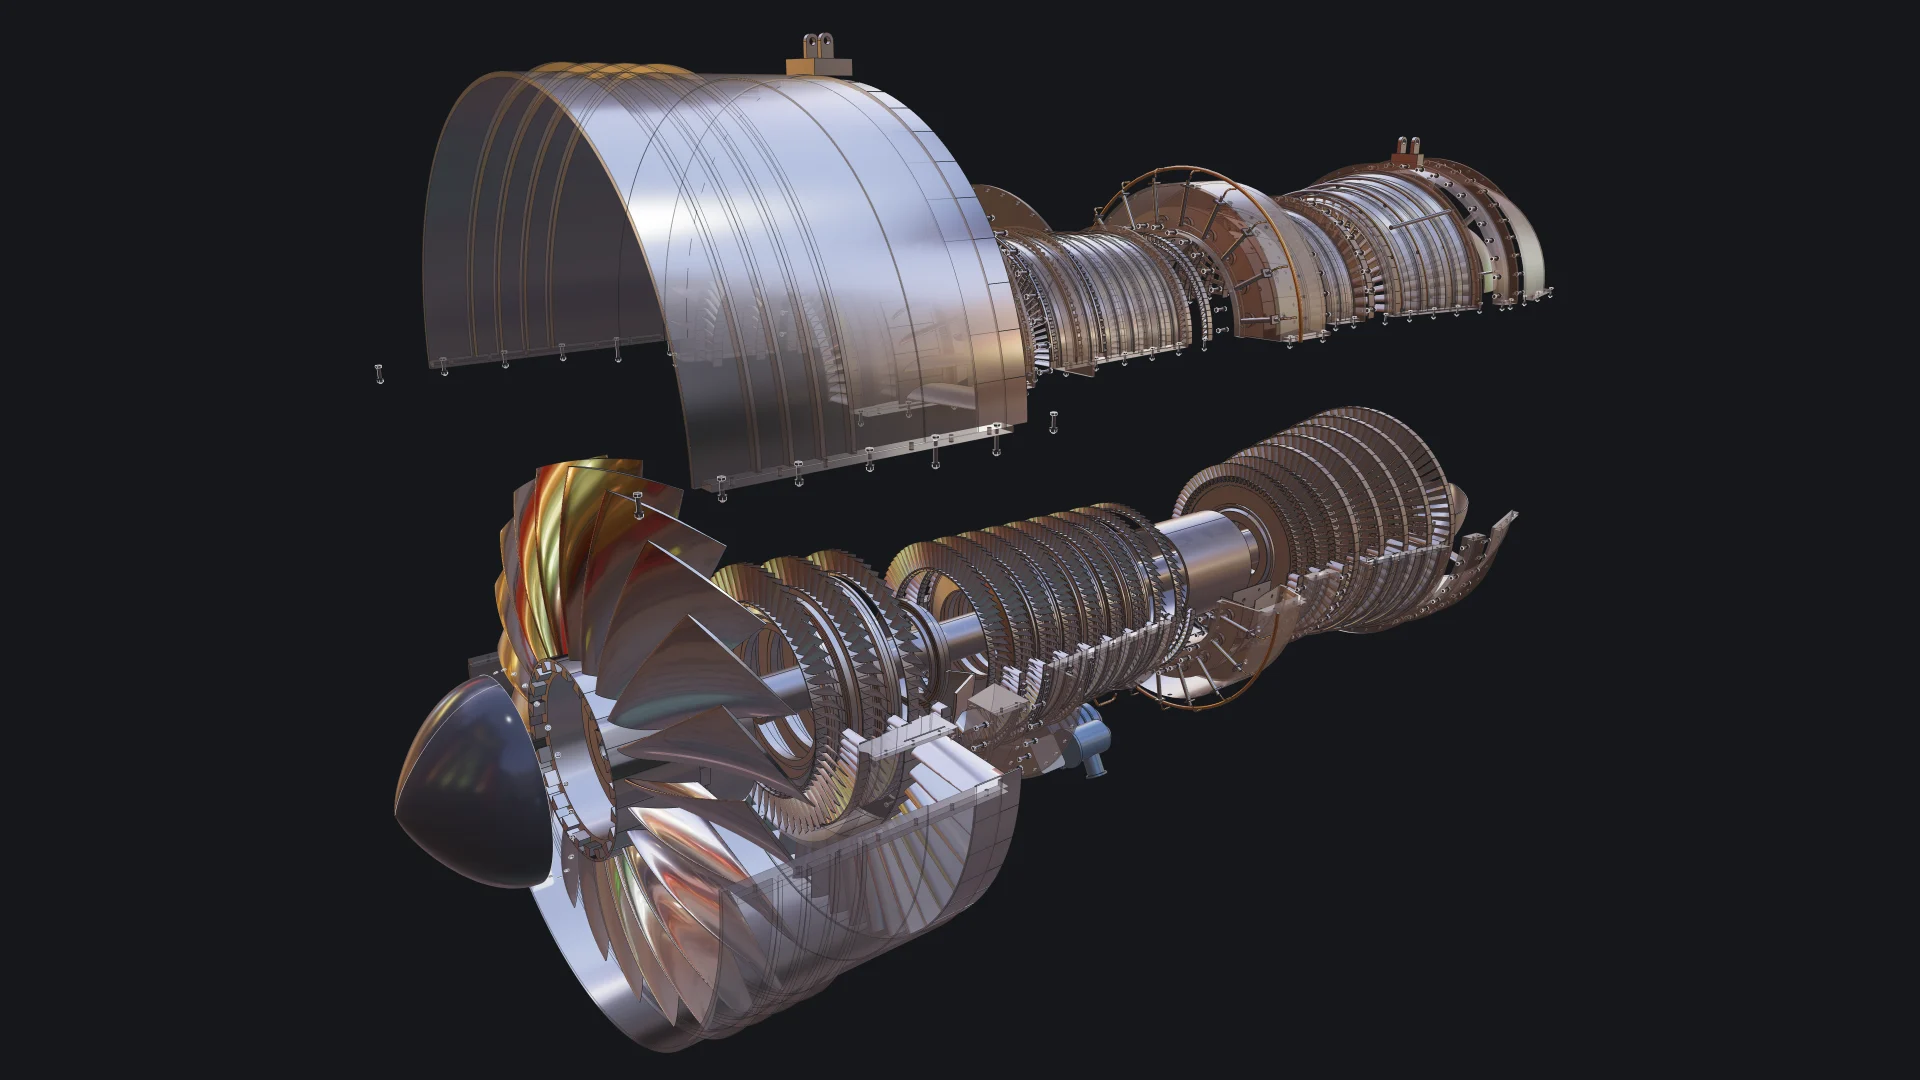
        <content type="html"><![CDATA[<img src="https://learn.bitbybit.dev/img/blog/bitbybit-mcp-jet-engine/hero.webp" alt="Exploded view of a two-spool turbofan engine built with Bitbybit by an AI coding agent, with the upper casing lifted and see-through" title="A turbofan engine built with Bitbybit by an AI coding agent, exploded" style="max-width:100%">
<p>More and more of the code that uses Bitbybit is not typed by a person. It is written by an AI coding agent, inside an editor or a terminal, while a person describes what they want and judges what comes back. We think this is where 3D development is heading, and we want Bitbybit to be the CAD library that agents get right. That is why Bitbybit now runs its own <strong>MCP servers</strong>: one that teaches any agent the exact Bitbybit API, and one that lets an agent run real CAD operations for you.</p>
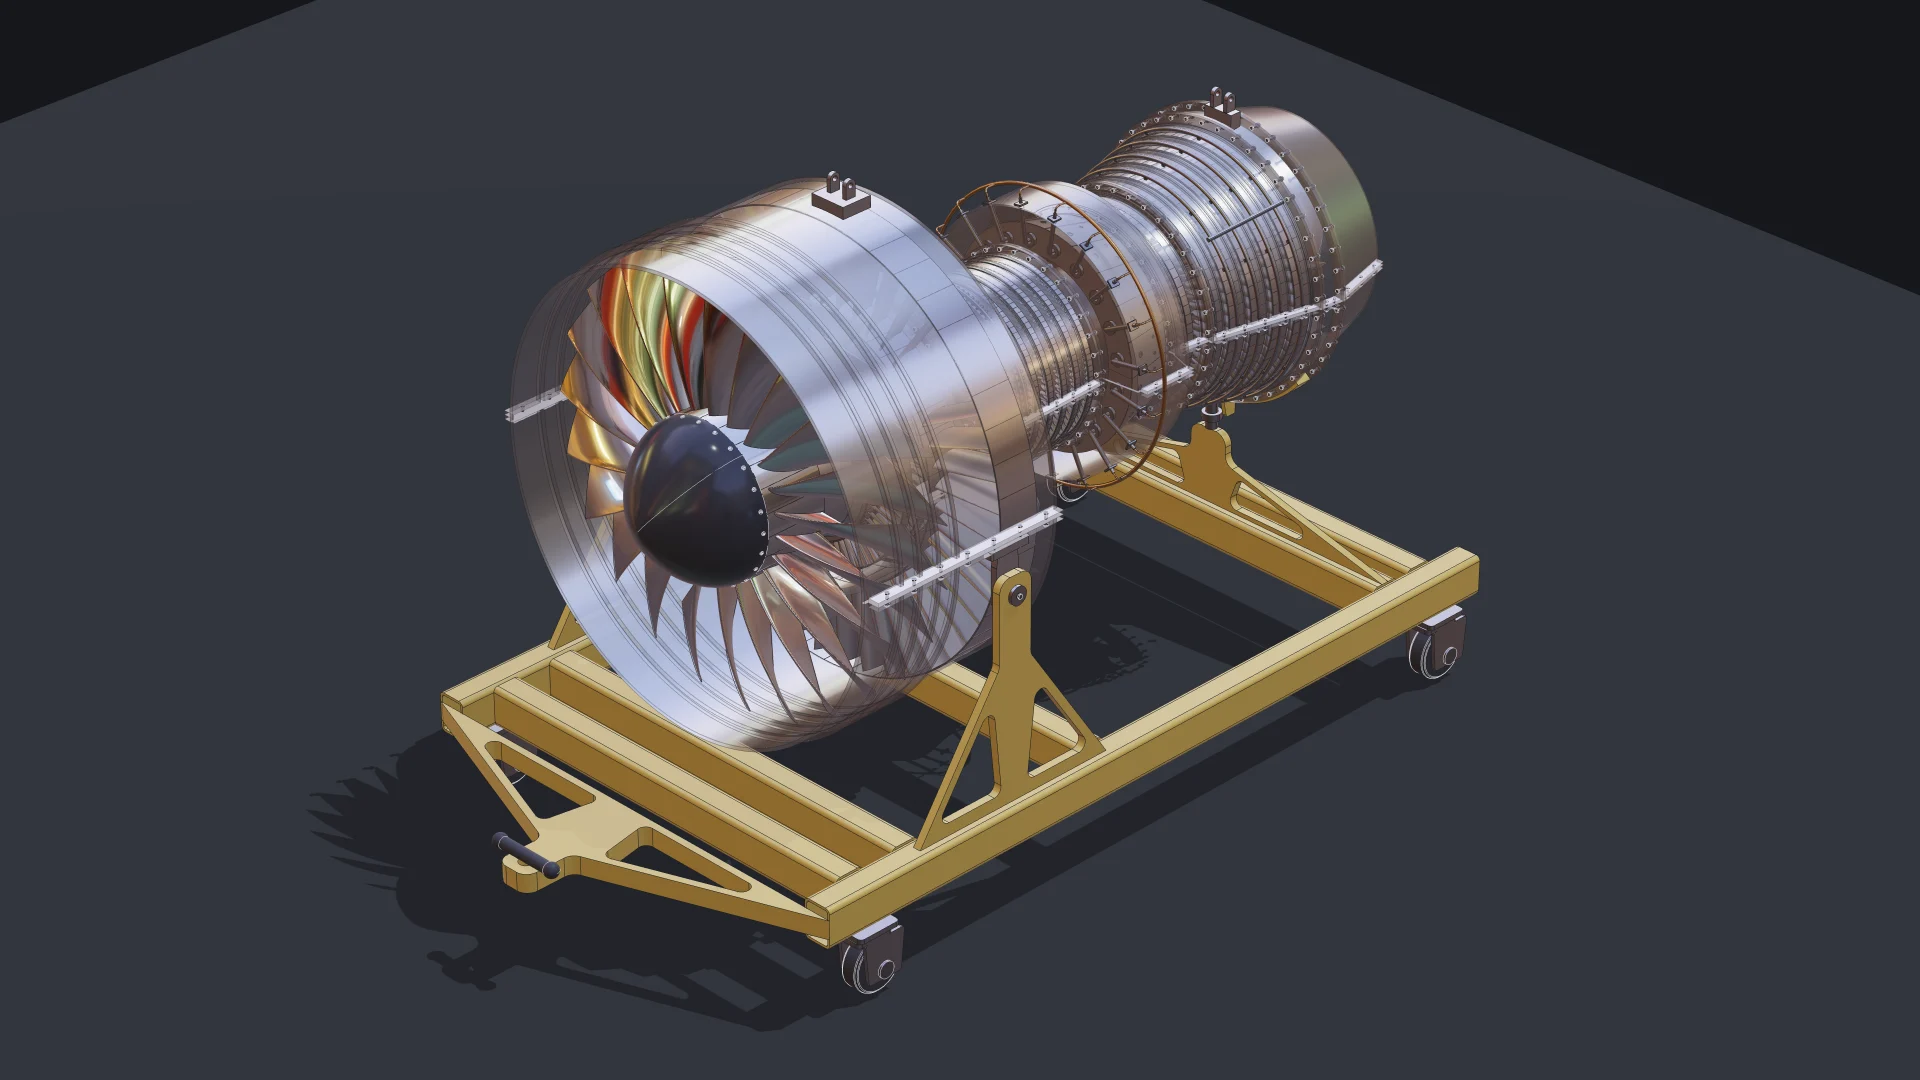
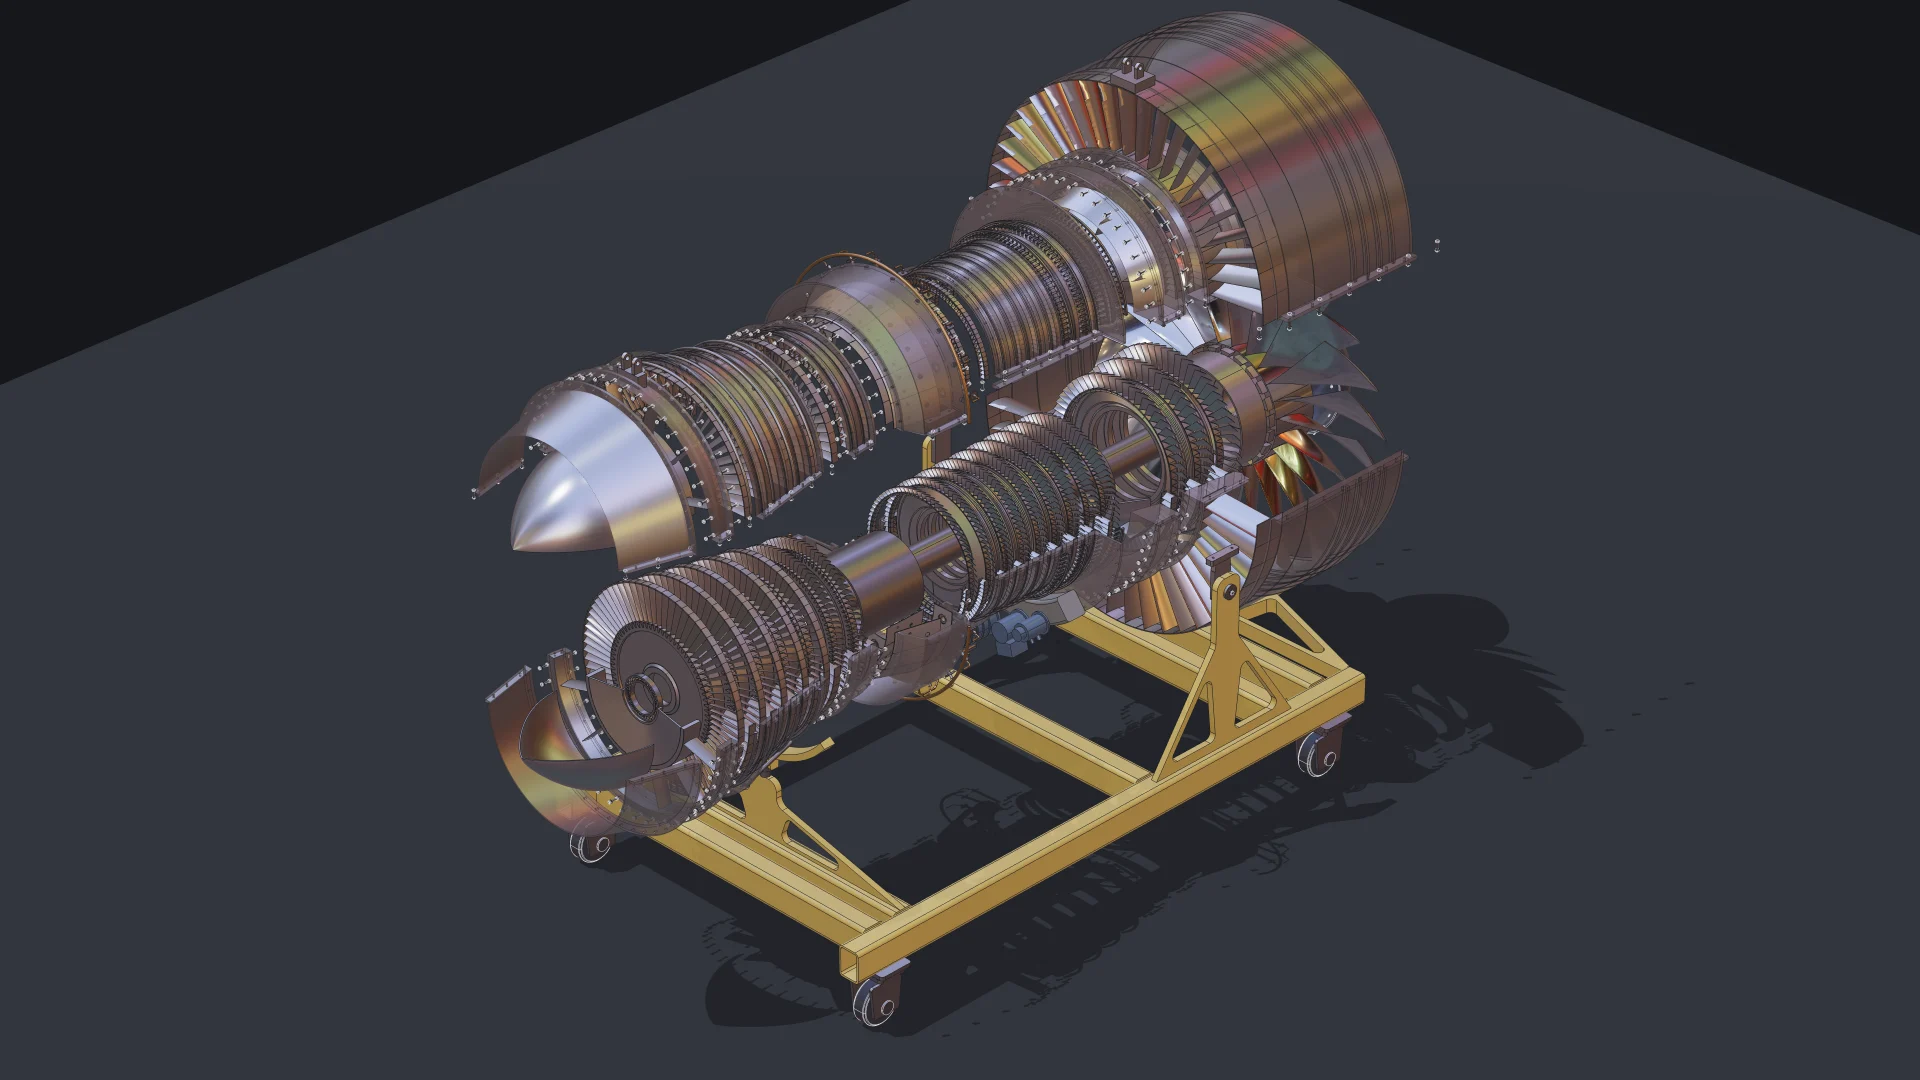
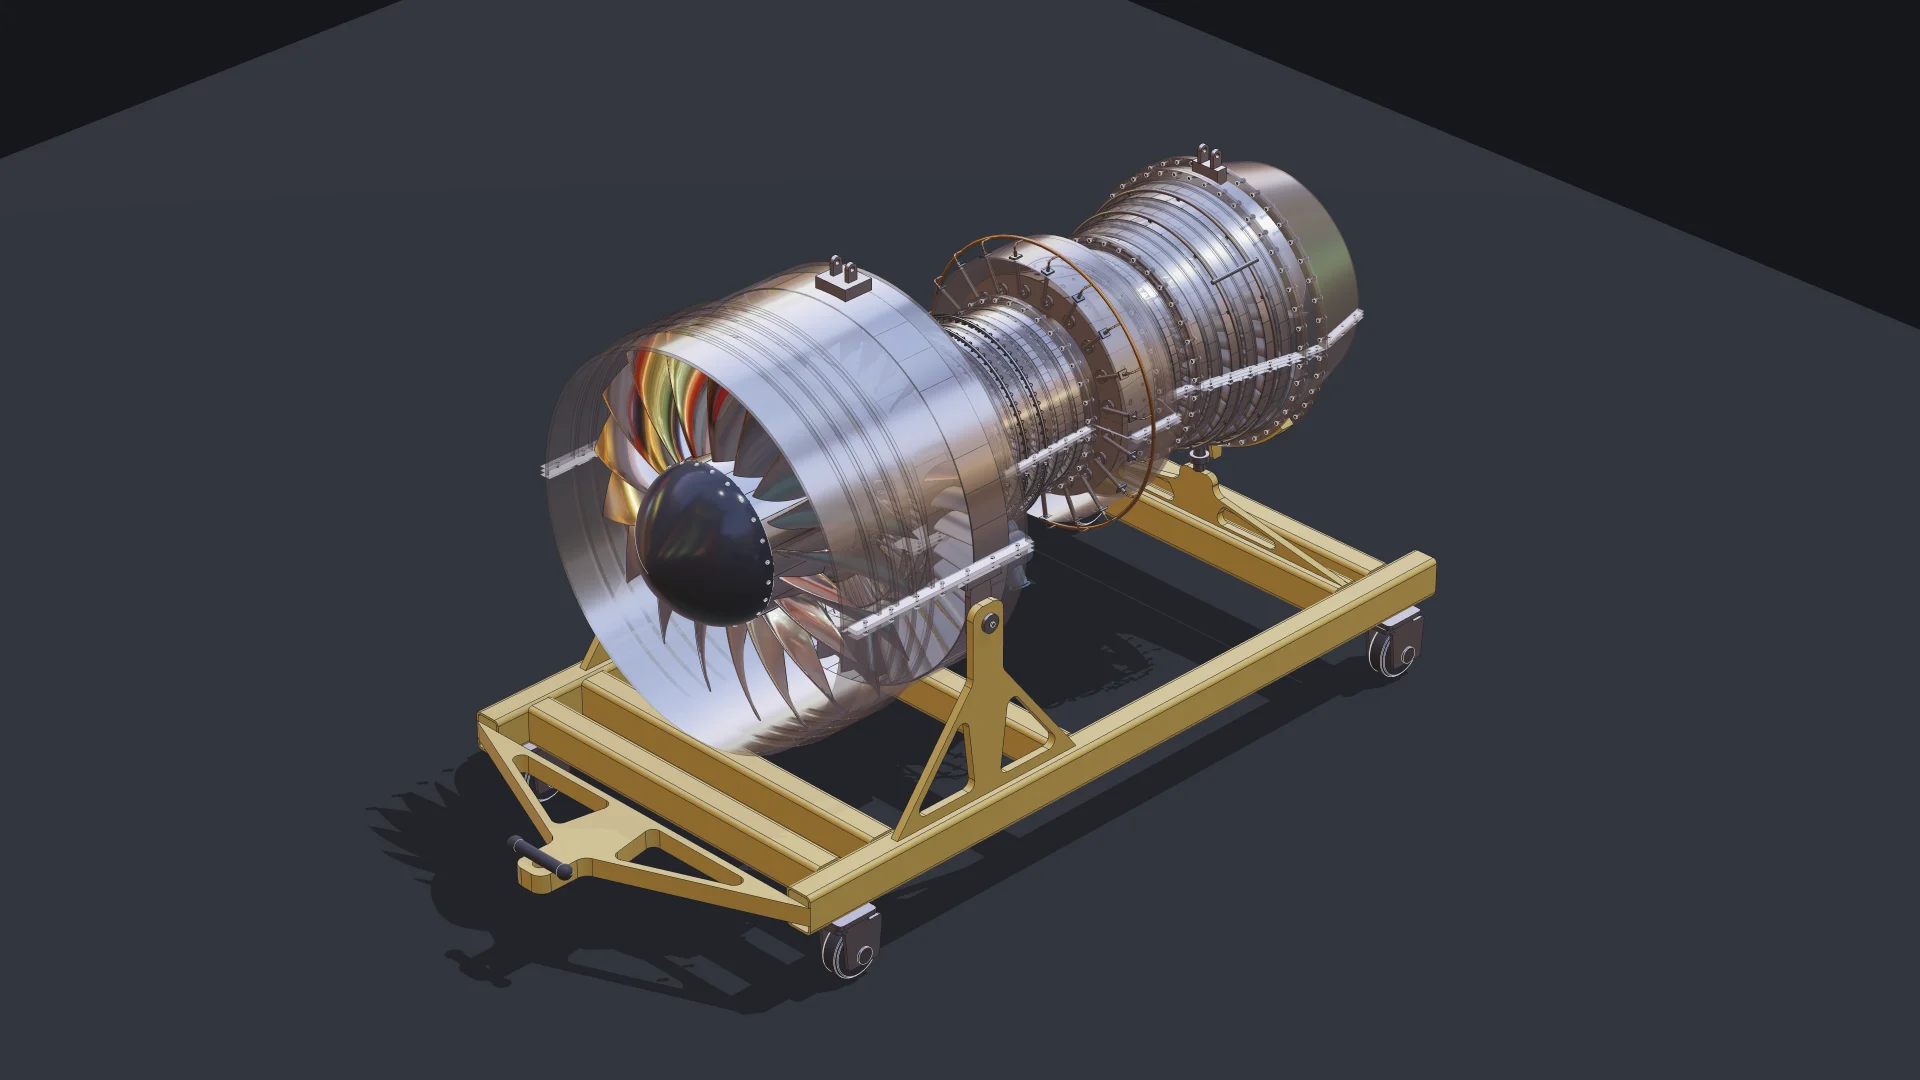
<p>To show what that looks like in practice, we asked an agent to build something far beyond a demo cube: a two-spool turbofan engine with <strong>130 unique parts placed 4,853 times</strong>, bolted flanges, blades seated in slotted disks, a casing that opens, an exploded view and a welded transport stand. This post explains what MCP is, the use cases we care about most, what they mean for you, and how the engine was made.</p>
<h2 class="anchor anchorTargetStickyNavbar_Vzrq" id="watch-it-come-together">Watch It Come Together<a href="https://learn.bitbybit.dev/blog/bitbybit-mcp-ai-ready-jet-engine#watch-it-come-together" class="hash-link" aria-label="Direct link to Watch It Come Together" title="Direct link to Watch It Come Together" translate="no">​</a></h2>
<p>Here is the finished engine in our TypeScript editor: it starts exploded in empty space, assembles itself, takes its place on the stand with its labels, then opens up for a closer look at the fan, the compressor, the combustor, the turbines and the stand.</p>
<div class="responsive-video-container"><iframe width="560" height="315" src="https://www.youtube.com/embed/EGT_QaMeVAQ" title="An AI Agent Built This Jet Engine: 4,853 Parts in CAD, Assembled in the Browser" frameborder="0" allow="accelerometer; autoplay; clipboard-write; encrypted-media; gyroscope; picture-in-picture; web-share; fullscreen" allowfullscreen=""></iframe></div>
<h2 class="anchor anchorTargetStickyNavbar_Vzrq" id="why-an-agent-needs-more-than-its-memory">Why an agent needs more than its memory<a href="https://learn.bitbybit.dev/blog/bitbybit-mcp-ai-ready-jet-engine#why-an-agent-needs-more-than-its-memory" class="hash-link" aria-label="Direct link to Why an agent needs more than its memory" title="Direct link to Why an agent needs more than its memory" translate="no">​</a></h2>
<p>A language model learns libraries from whatever it read during training. For a small, stable library that works. For Bitbybit it does not: the API has close to two thousand functions across three CAD kernels, it changes with every release, and many functions take one argument object with a dozen named fields and defaults. An agent that writes Bitbybit code from memory produces names that sound right and do not exist, or fields that existed two versions ago. The code looks plausible, it fails to compile, and you lose the time you hoped to save.</p>
<p>The fix is not a bigger model. The fix is giving the agent a way to <strong>look things up</strong> at the moment it needs them, the same way a person opens the documentation.</p>
<h2 class="anchor anchorTargetStickyNavbar_Vzrq" id="what-mcp-is-in-one-paragraph">What MCP is, in one paragraph<a href="https://learn.bitbybit.dev/blog/bitbybit-mcp-ai-ready-jet-engine#what-mcp-is-in-one-paragraph" class="hash-link" aria-label="Direct link to What MCP is, in one paragraph" title="Direct link to What MCP is, in one paragraph" translate="no">​</a></h2>
<p>The <a href="https://modelcontextprotocol.io/" target="_blank" rel="noopener noreferrer" class="">Model Context Protocol</a> is an open standard for connecting AI assistants to tools and data. A server publishes a set of tools, the assistant discovers them and calls them while it works, and the answers flow back into its reasoning. Claude Code, Codex, Cursor, VS Code, Gemini CLI, Windsurf, Zed, the JetBrains IDEs, claude.ai and ChatGPT all speak it. One server, written once, works in all of them.</p>
<h2 class="anchor anchorTargetStickyNavbar_Vzrq" id="our-two-servers">Our two servers<a href="https://learn.bitbybit.dev/blog/bitbybit-mcp-ai-ready-jet-engine#our-two-servers" class="hash-link" aria-label="Direct link to Our two servers" title="Direct link to Our two servers" translate="no">​</a></h2>
<table><thead><tr><th></th><th>Bitbybit CAD MCP</th><th>Bitbybit CAD Cloud MCP</th></tr></thead><tbody><tr><td>What it gives the agent</td><td>knowledge: every function, parameter, default, return type and example</td><td>hands: it runs geometry on CAD Cloud and returns files</td></tr><tr><td>Cost</td><td>free, no account</td><td>a <a href="https://bitbybit.dev/cad-cloud" target="_blank" rel="noopener noreferrer" class="">CAD Cloud plan</a> and an API key</td></tr><tr><td>Address</td><td><code>https://mcp.bitbybit.dev/mcp</code>, or locally <code>npx -y @bitbybit-dev/mcp</code></td><td><code>https://api.bitbybit.dev/mcp</code> with your key</td></tr><tr><td>Docs</td><td><a class="" href="https://learn.bitbybit.dev/learn/using-ai-with-bitbybit/mcp/bitbybit-mcp">Bitbybit CAD MCP</a></td><td><a class="" href="https://learn.bitbybit.dev/learn/using-ai-with-bitbybit/mcp/cad-cloud-mcp">Bitbybit CAD Cloud MCP</a></td></tr></tbody></table>
<p>Connecting the free one to Claude Code is a single line:</p>
<div class="language-bash codeBlockContainer_Ckt0 theme-code-block" style="--prism-color:#F8F8F2;--prism-background-color:#282A36"><div class="codeBlockContent_QJqH"><pre tabindex="0" class="prism-code language-bash codeBlock_bY9V thin-scrollbar" style="color:#F8F8F2;background-color:#282A36"><code class="codeBlockLines_e6Vv"><div class="token-line" style="color:#F8F8F2"><span class="token plain">claude mcp add --transport http bitbybit https://mcp.bitbybit.dev/mcp</span><br></div></code></pre></div></div>
<p>Every other host is covered on the <a class="" href="https://learn.bitbybit.dev/learn/using-ai-with-bitbybit/mcp/bitbybit-mcp">MCP page</a>, most of them with a one-click install.</p>
<h2 class="anchor anchorTargetStickyNavbar_Vzrq" id="the-use-cases-that-matter-most">The use cases that matter most<a href="https://learn.bitbybit.dev/blog/bitbybit-mcp-ai-ready-jet-engine#the-use-cases-that-matter-most" class="hash-link" aria-label="Direct link to The use cases that matter most" title="Direct link to The use cases that matter most" translate="no">​</a></h2>
<h3 class="anchor anchorTargetStickyNavbar_Vzrq" id="1-code-that-compiles-the-first-time">1. Code that compiles the first time<a href="https://learn.bitbybit.dev/blog/bitbybit-mcp-ai-ready-jet-engine#1-code-that-compiles-the-first-time" class="hash-link" aria-label="Direct link to 1. Code that compiles the first time" title="Direct link to 1. Code that compiles the first time" translate="no">​</a></h3>
<p>This is the everyday one. Before an agent writes a Bitbybit call, it asks the server: <code>search_api</code> finds the function from a few words ("box with rounded edges"), <code>describe</code> returns its exact signature with every field, default and range, and <code>get_examples</code> returns calls that are known to work. The answers are <strong>version exact</strong>: the local server reads the version installed in your project, so an agent working on a project pinned to an older release is not handed functions from a newer one. A half-remembered name comes back with the nearest real ones, so a near miss still lands.</p>
<h3 class="anchor anchorTargetStickyNavbar_Vzrq" id="2-learning-the-api-by-asking">2. Learning the API by asking<a href="https://learn.bitbybit.dev/blog/bitbybit-mcp-ai-ready-jet-engine#2-learning-the-api-by-asking" class="hash-link" aria-label="Direct link to 2. Learning the API by asking" title="Direct link to 2. Learning the API by asking" translate="no">​</a></h3>
<p>You do not need an agent to write code for you to benefit. Ask it "how do I fillet only the vertical edges of this solid?" or "which kernel should I use for a fast boolean on a mesh?" and it answers from the same index we publish with every release, not from a blog post it half remembers. For people new to Bitbybit, this turns the API from something to study into something to talk to.</p>
<h3 class="anchor anchorTargetStickyNavbar_Vzrq" id="3-honest-advice-about-where-geometry-should-run">3. Honest advice about where geometry should run<a href="https://learn.bitbybit.dev/blog/bitbybit-mcp-ai-ready-jet-engine#3-honest-advice-about-where-geometry-should-run" class="hash-link" aria-label="Direct link to 3. Honest advice about where geometry should run" title="Direct link to 3. Honest advice about where geometry should run" translate="no">​</a></h3>
<p>Bitbybit geometry can run in your users' browsers, on your own Node servers, or on CAD Cloud. The server carries our <a class="" href="https://learn.bitbybit.dev/learn/using-ai-with-bitbybit/agentic-cad">integration guide</a> and serves it to agents verbatim through <code>get_guide</code>, and every function it describes carries a <strong>tier</strong>: <code>oss</code> (in the free MIT packages, runs anywhere), <code>platform-pro</code> (available in the bitbybit.dev editors on Silver and Gold plans) or <code>cloud-pro</code> (runs only on CAD Cloud). An agent that reads the tier never sends you to a paid service for something the free packages already do. We wrote it that way on purpose, because agents repeat what they are told.</p>
<h3 class="anchor anchorTargetStickyNavbar_Vzrq" id="4-answers-about-real-geometry-without-writing-code">4. Answers about real geometry, without writing code<a href="https://learn.bitbybit.dev/blog/bitbybit-mcp-ai-ready-jet-engine#4-answers-about-real-geometry-without-writing-code" class="hash-link" aria-label="Direct link to 4. Answers about real geometry, without writing code" title="Direct link to 4. Answers about real geometry, without writing code" translate="no">​</a></h3>
<p>A language model cannot measure a part by looking at it, and it will happily guess a number anyway. With the CAD Cloud server it does not have to. "How heavy is this bracket in aluminium?" becomes an upload, a pipeline that loads the STEP file and measures its volume, and a multiplication. "Will it fit in a 60 by 40 by 20 box?", "where is the center of mass?", "convert this STEP to glTF for my web page", "flatten this sheet-metal part": each becomes one request, computed by the same kernels that run in our editors, and returned as a number or a file link.</p>
<h3 class="anchor anchorTargetStickyNavbar_Vzrq" id="5-automation-and-batches">5. Automation and batches<a href="https://learn.bitbybit.dev/blog/bitbybit-mcp-ai-ready-jet-engine#5-automation-and-batches" class="hash-link" aria-label="Direct link to 5. Automation and batches" title="Direct link to 5. Automation and batches" translate="no">​</a></h3>
<p>Twenty variants of a parametric model as STL, a folder of STEP files converted for the web, a measurement run over a whole catalogue: an agent with the CAD Cloud server chains operations into one pipeline per request, so the heavy lifting happens next to the kernels and only the results come back. This is the path for work that is too big or too repetitive to do by hand, and for backends such as edge functions that cannot host a CAD kernel themselves.</p>
<h3 class="anchor anchorTargetStickyNavbar_Vzrq" id="6-scripts-for-the-bitbybit-editors">6. Scripts for the Bitbybit editors<a href="https://learn.bitbybit.dev/blog/bitbybit-mcp-ai-ready-jet-engine#6-scripts-for-the-bitbybit-editors" class="hash-link" aria-label="Direct link to 6. Scripts for the Bitbybit editors" title="Direct link to 6. Scripts for the Bitbybit editors" translate="no">​</a></h3>
<p>The same server describes the <code>platform-pro</code> members that exist only inside our editors, so an agent can write TypeScript for the Monaco editor at bitbybit.dev with the full API, including the parts you will not find on npm. The jet engine below ended up exactly there.</p>
<h2 class="anchor anchorTargetStickyNavbar_Vzrq" id="what-this-means-for-you">What this means for you<a href="https://learn.bitbybit.dev/blog/bitbybit-mcp-ai-ready-jet-engine#what-this-means-for-you" class="hash-link" aria-label="Direct link to What this means for you" title="Direct link to What this means for you" translate="no">​</a></h2>
<ul>
<li class=""><strong>If you write code with Bitbybit</strong>, connect the free server once and let your agent look things up. You spend your time on the design, not on correcting invented function names.</li>
<li class=""><strong>If you script in our editors</strong>, an agent can now draft multi-file projects for you, and the editors run them as they are.</li>
<li class=""><strong>If you scaffold an app</strong> with <code>npm init @bitbybit-dev/app</code>, it already comes wired for agents: an <code>AGENTS.md</code> that tells the agent how to work, the MCP server configured for Claude Code, Cursor and VS Code, and a smoke test the agent can iterate against. See <a class="" href="https://learn.bitbybit.dev/learn/npm-packages/create-app">create-app</a>.</li>
<li class=""><strong>If you do not write code at all</strong>, the CAD Cloud server lets an assistant answer questions about your parts and convert your files, with nothing to install but a connector.</li>
<li class=""><strong>If you run a company</strong> that needs its own operations, we build and host private algorithm namespaces on the same infrastructure, so your agents can call your geometry the same way they call ours. <a href="https://bitbybit.dev/contact" target="_blank" rel="noopener noreferrer" class="">Write to us</a>.</li>
</ul>
<h2 class="anchor anchorTargetStickyNavbar_Vzrq" id="the-example-a-turbofan-engine-built-by-an-agent">The example: a turbofan engine, built by an agent<a href="https://learn.bitbybit.dev/blog/bitbybit-mcp-ai-ready-jet-engine#the-example-a-turbofan-engine-built-by-an-agent" class="hash-link" aria-label="Direct link to The example: a turbofan engine, built by an agent" title="Direct link to The example: a turbofan engine, built by an agent" translate="no">​</a></h2>
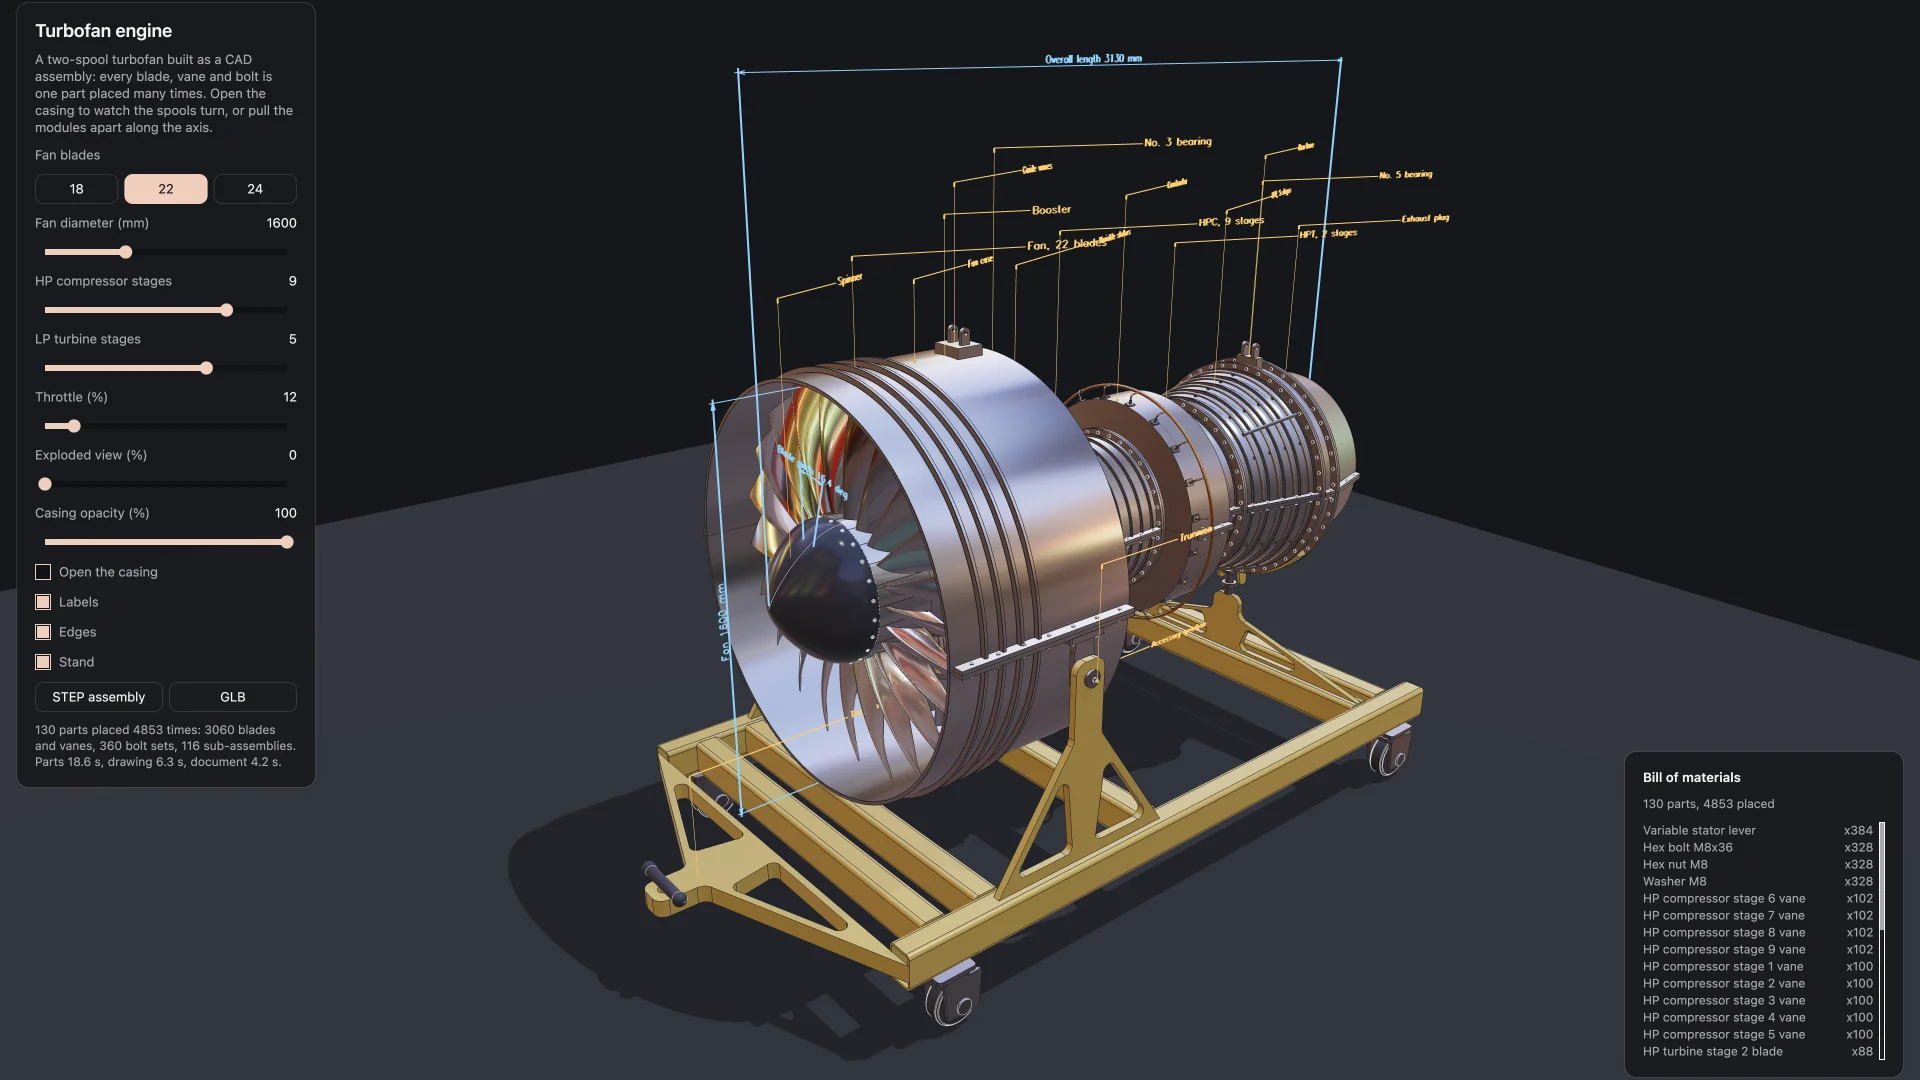
<p>We wanted an example that would break a careless approach. A jet engine is a good test: thousands of blades that must sit in their slots, flanges that must line up bolt for bolt, a casing that splits in two, two spools turning at different speeds, and every part named and placed so the assembly exports as a proper STEP file.</p>
<p>The engine was built by Claude Opus 5.5, Anthropic's model, working as a coding agent in Claude Code, in a project scaffolded with <code>npm init @bitbybit-dev/app</code>, on our three.js template, with the Bitbybit CAD MCP configured from the first minute. A person directed the work, as you would direct a colleague: "make the blades smoother up close", "the fillets on the stand's triangular plates are not symmetric", "the front A-frame does not touch the sides of the base". The agent wrote and corrected every line.</p>
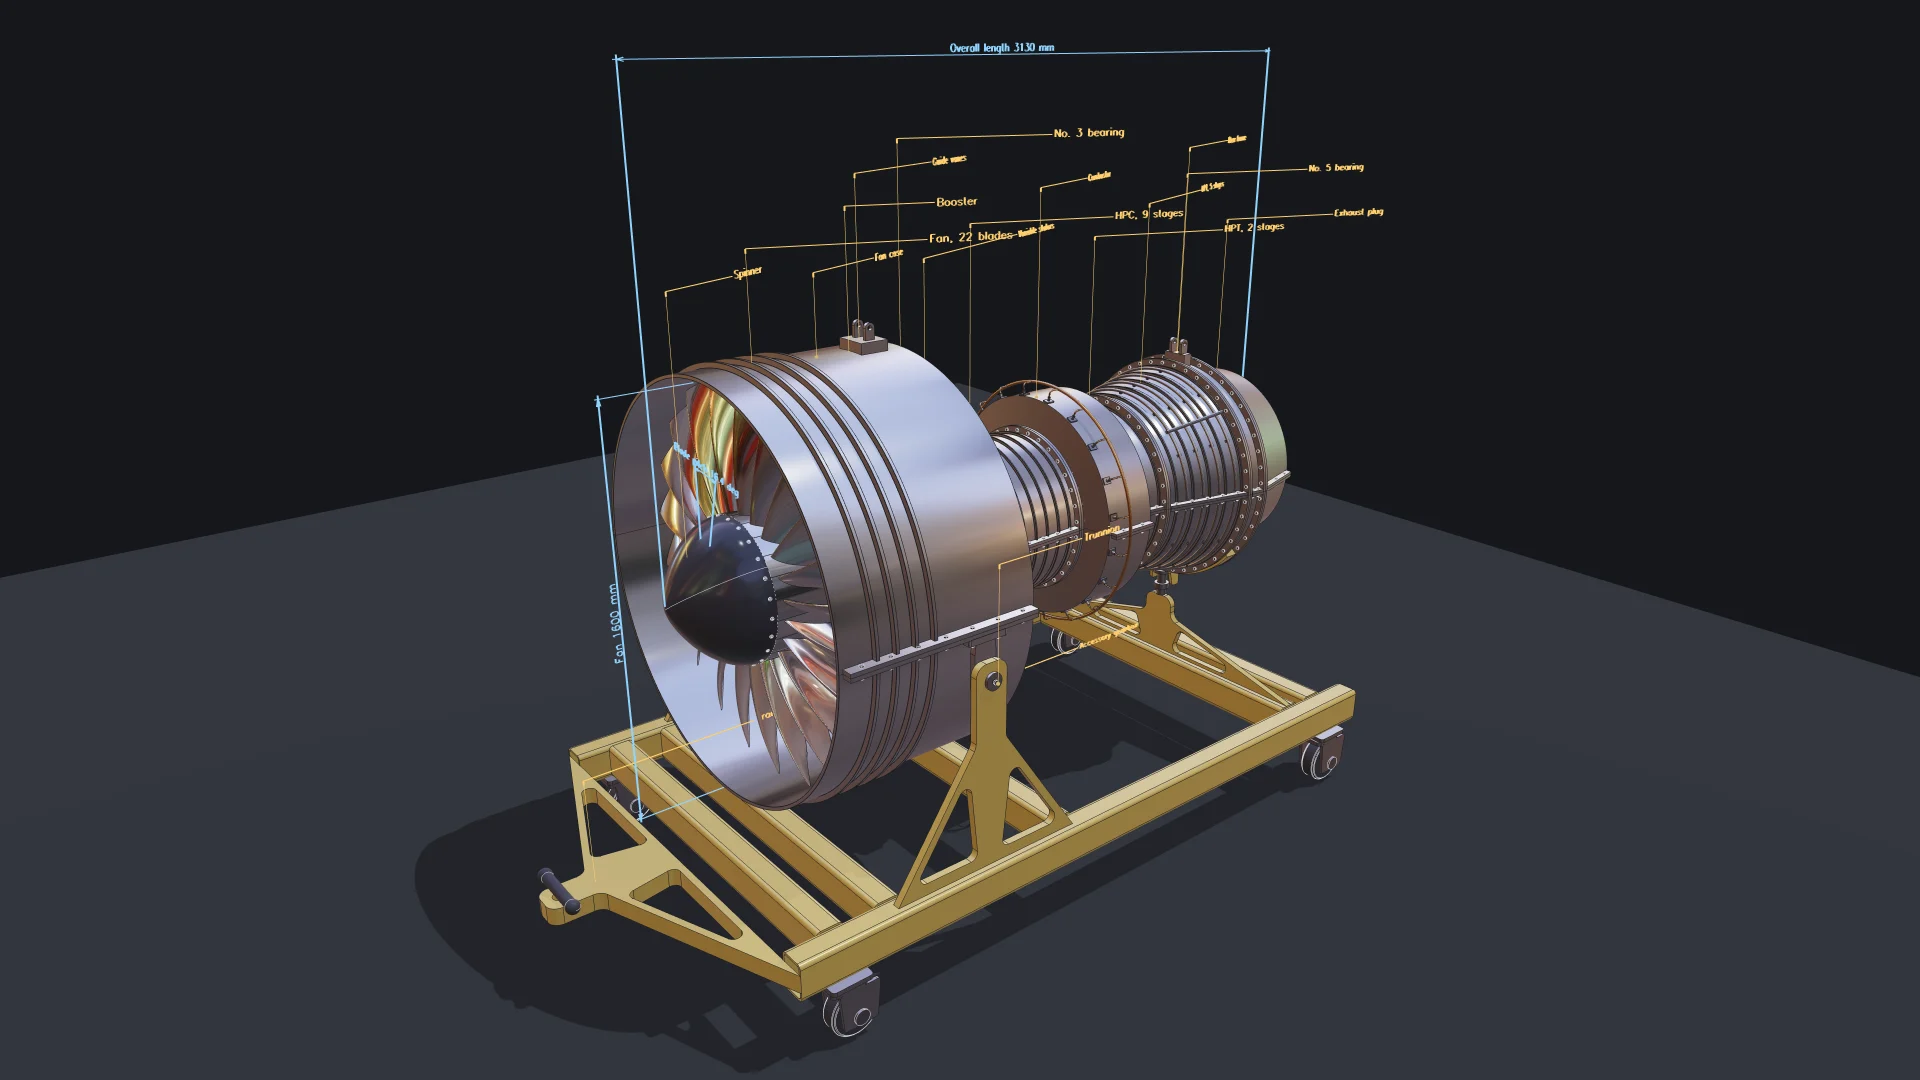
<div class="grid_hCdv" style="grid-template-columns:repeat(1, 1fr);gap:1rem"><img src="https://learn.bitbybit.dev/img/blog/bitbybit-mcp-jet-engine/labelled.webp" alt="The closed turbofan engine on its transport stand with 3D callouts for every module and dimensions for the length and fan diameter 1" loading="lazy" decoding="async" class="thumbnail_bKFe"></div>
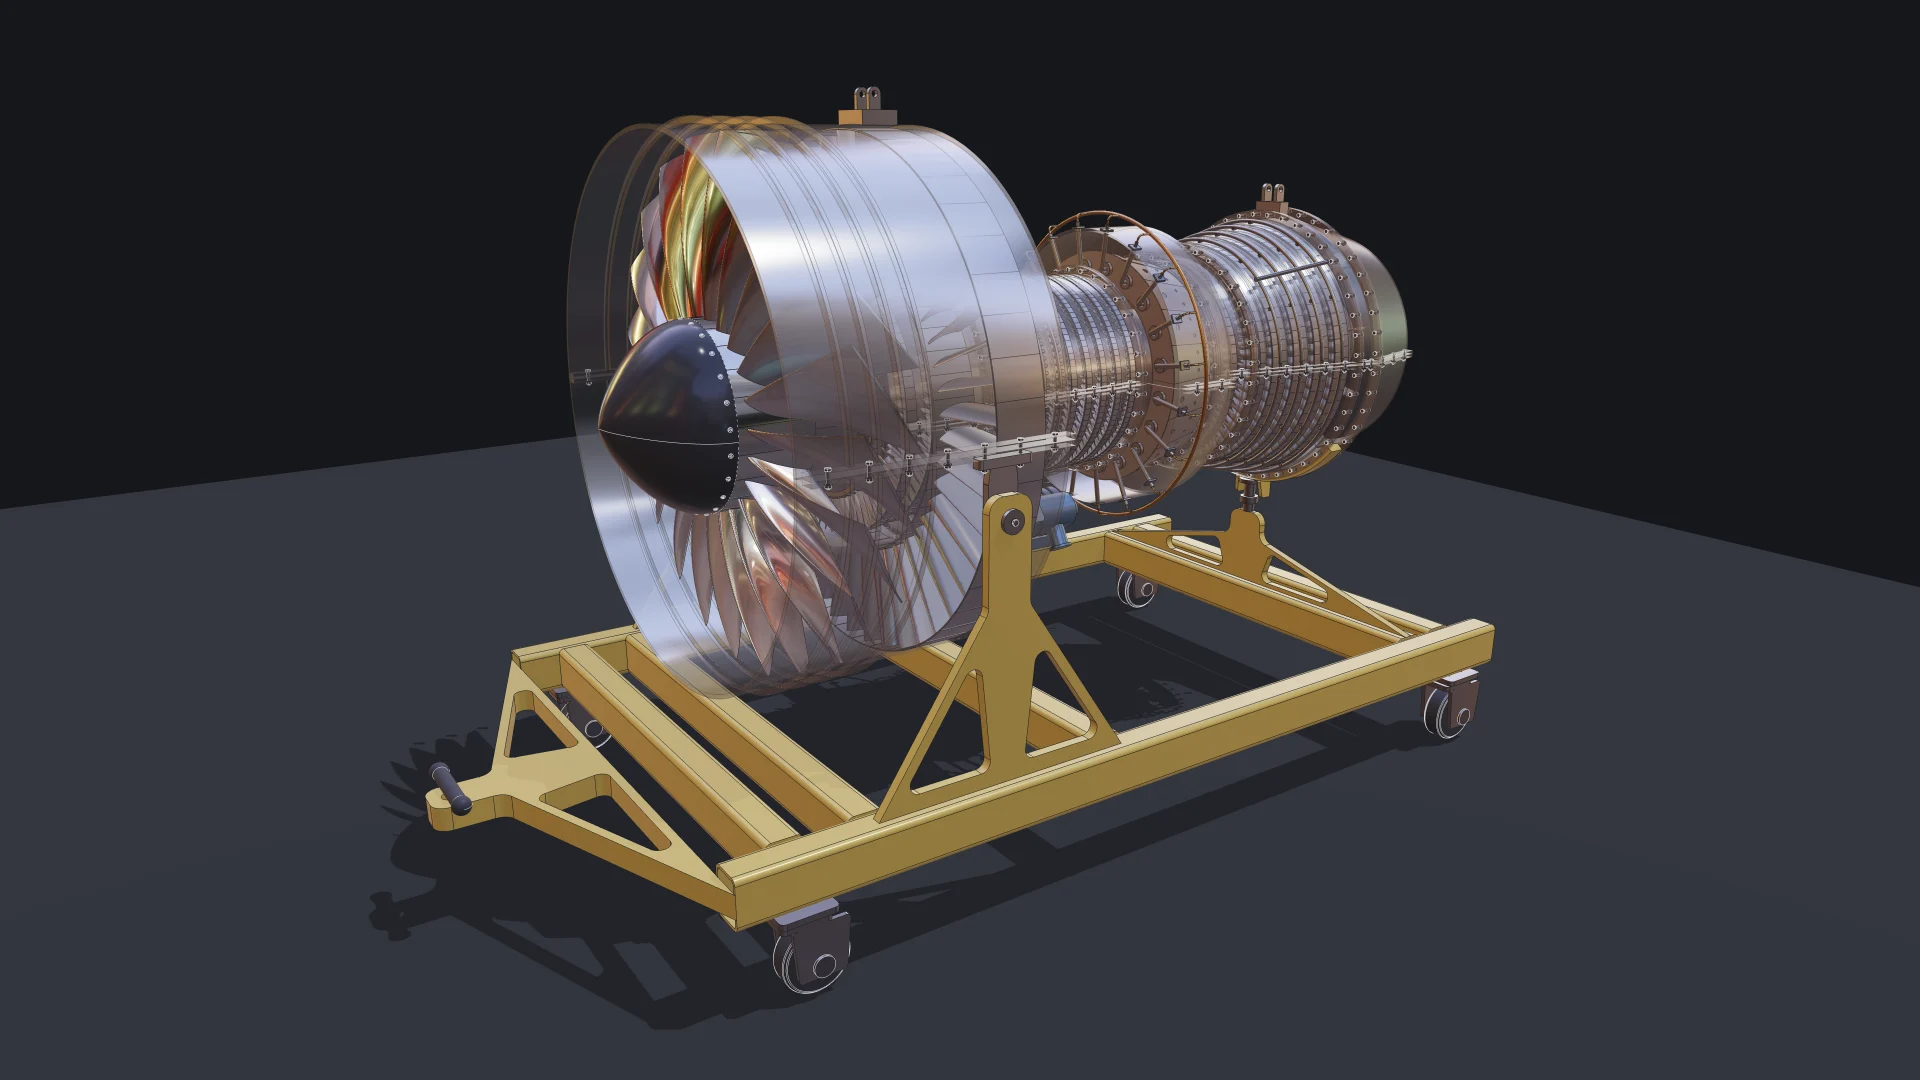
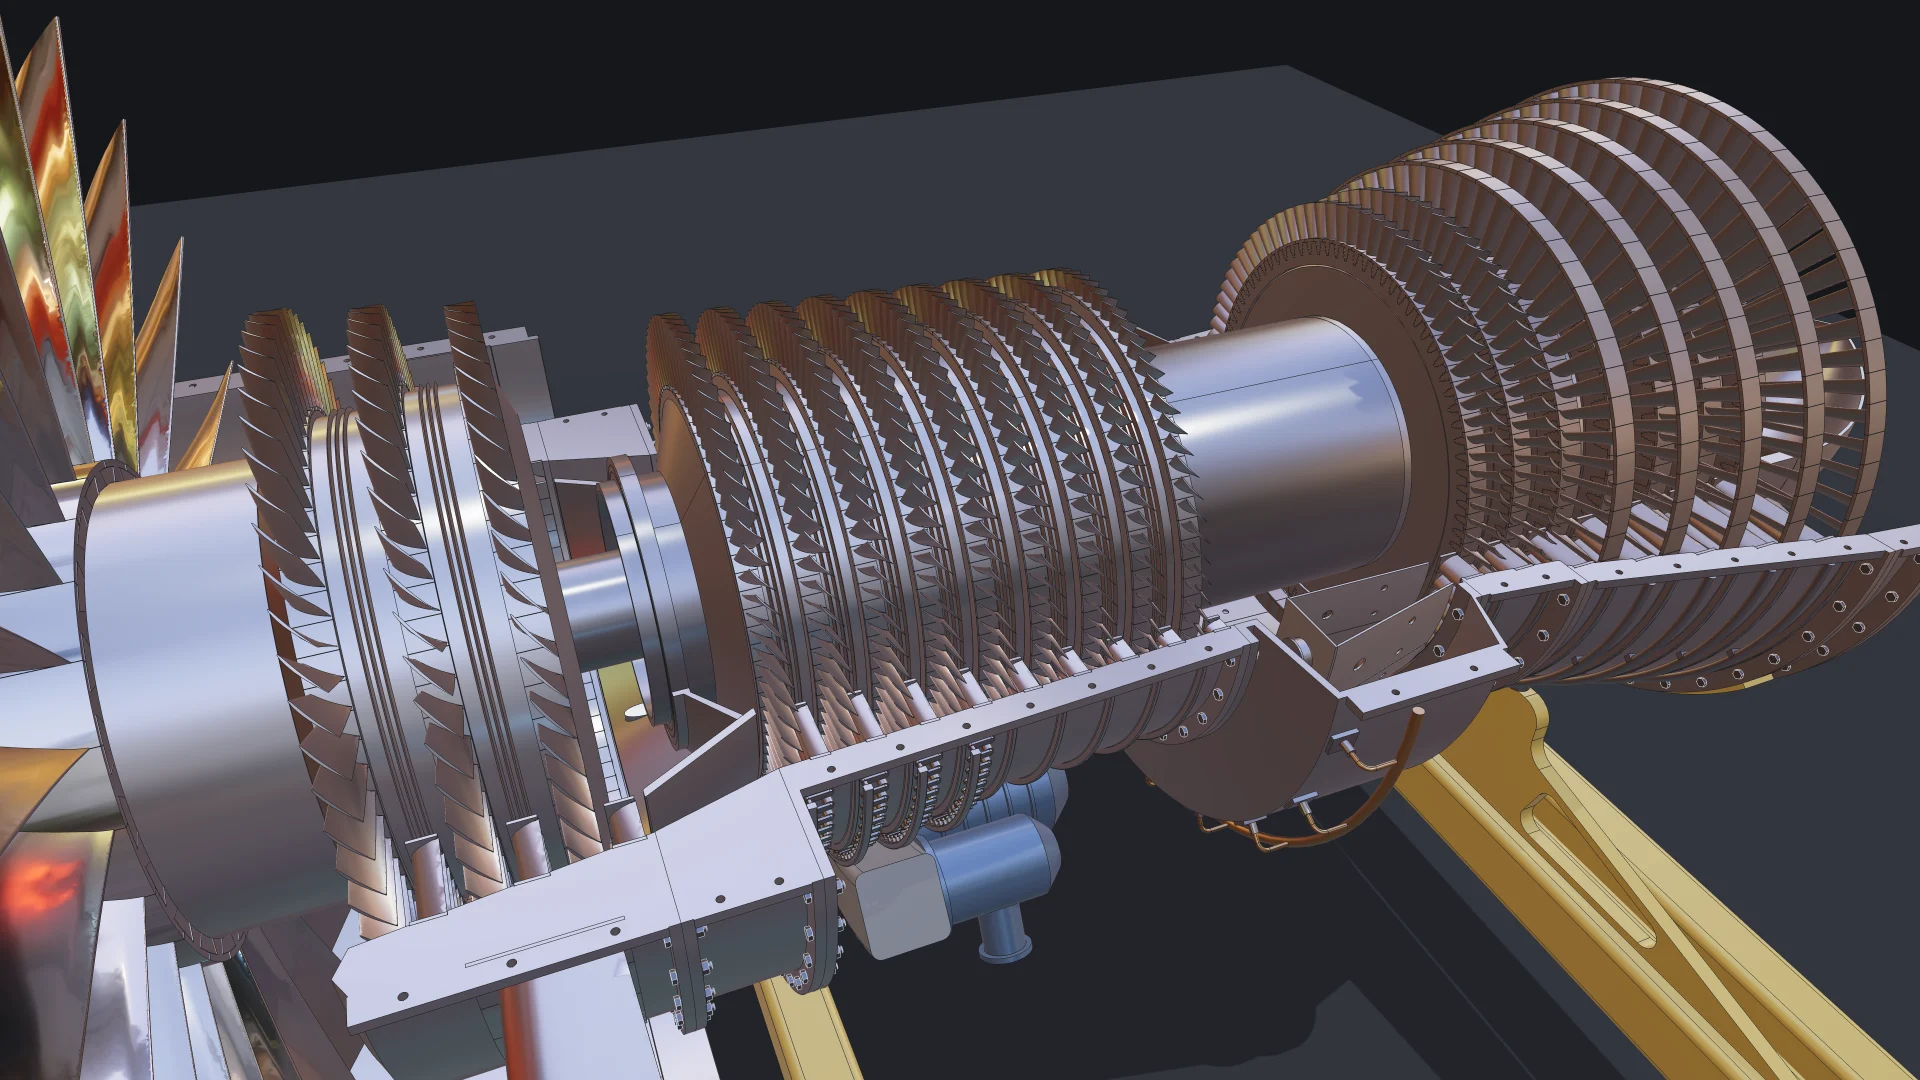
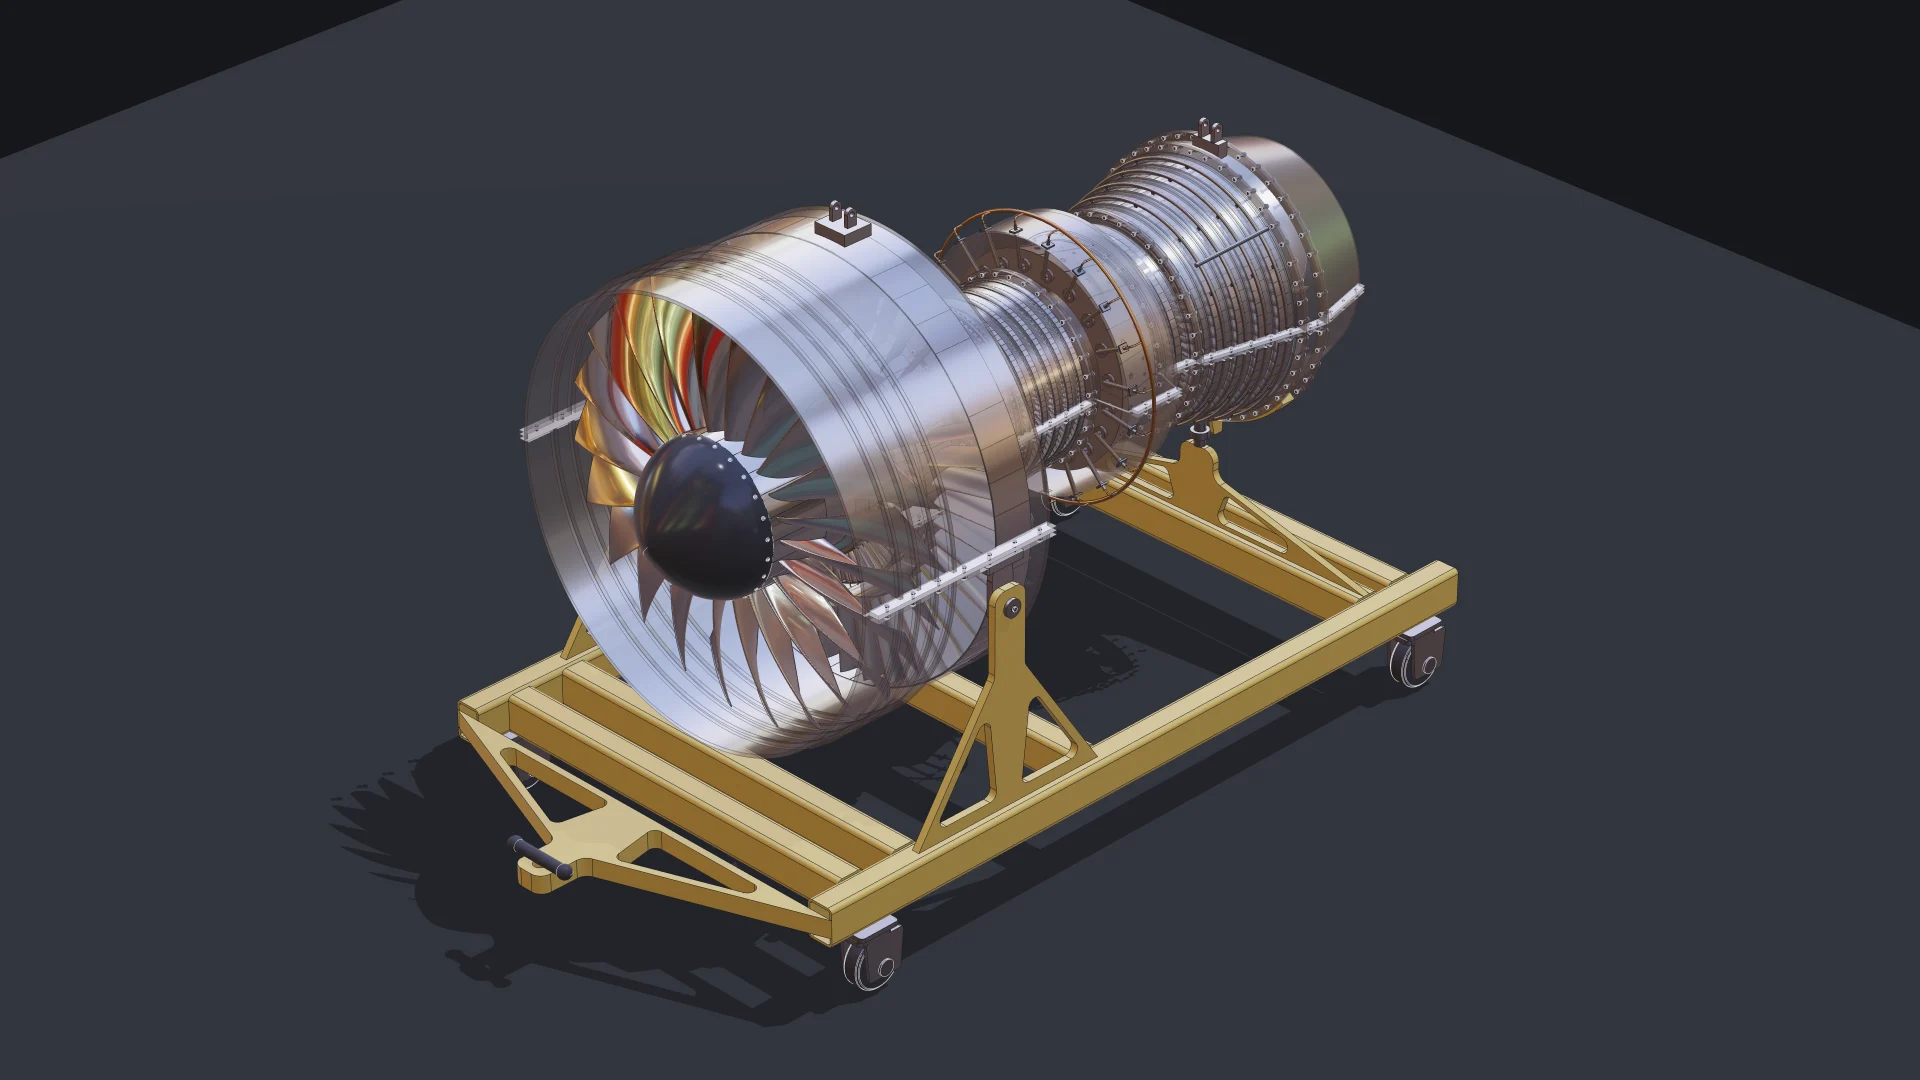
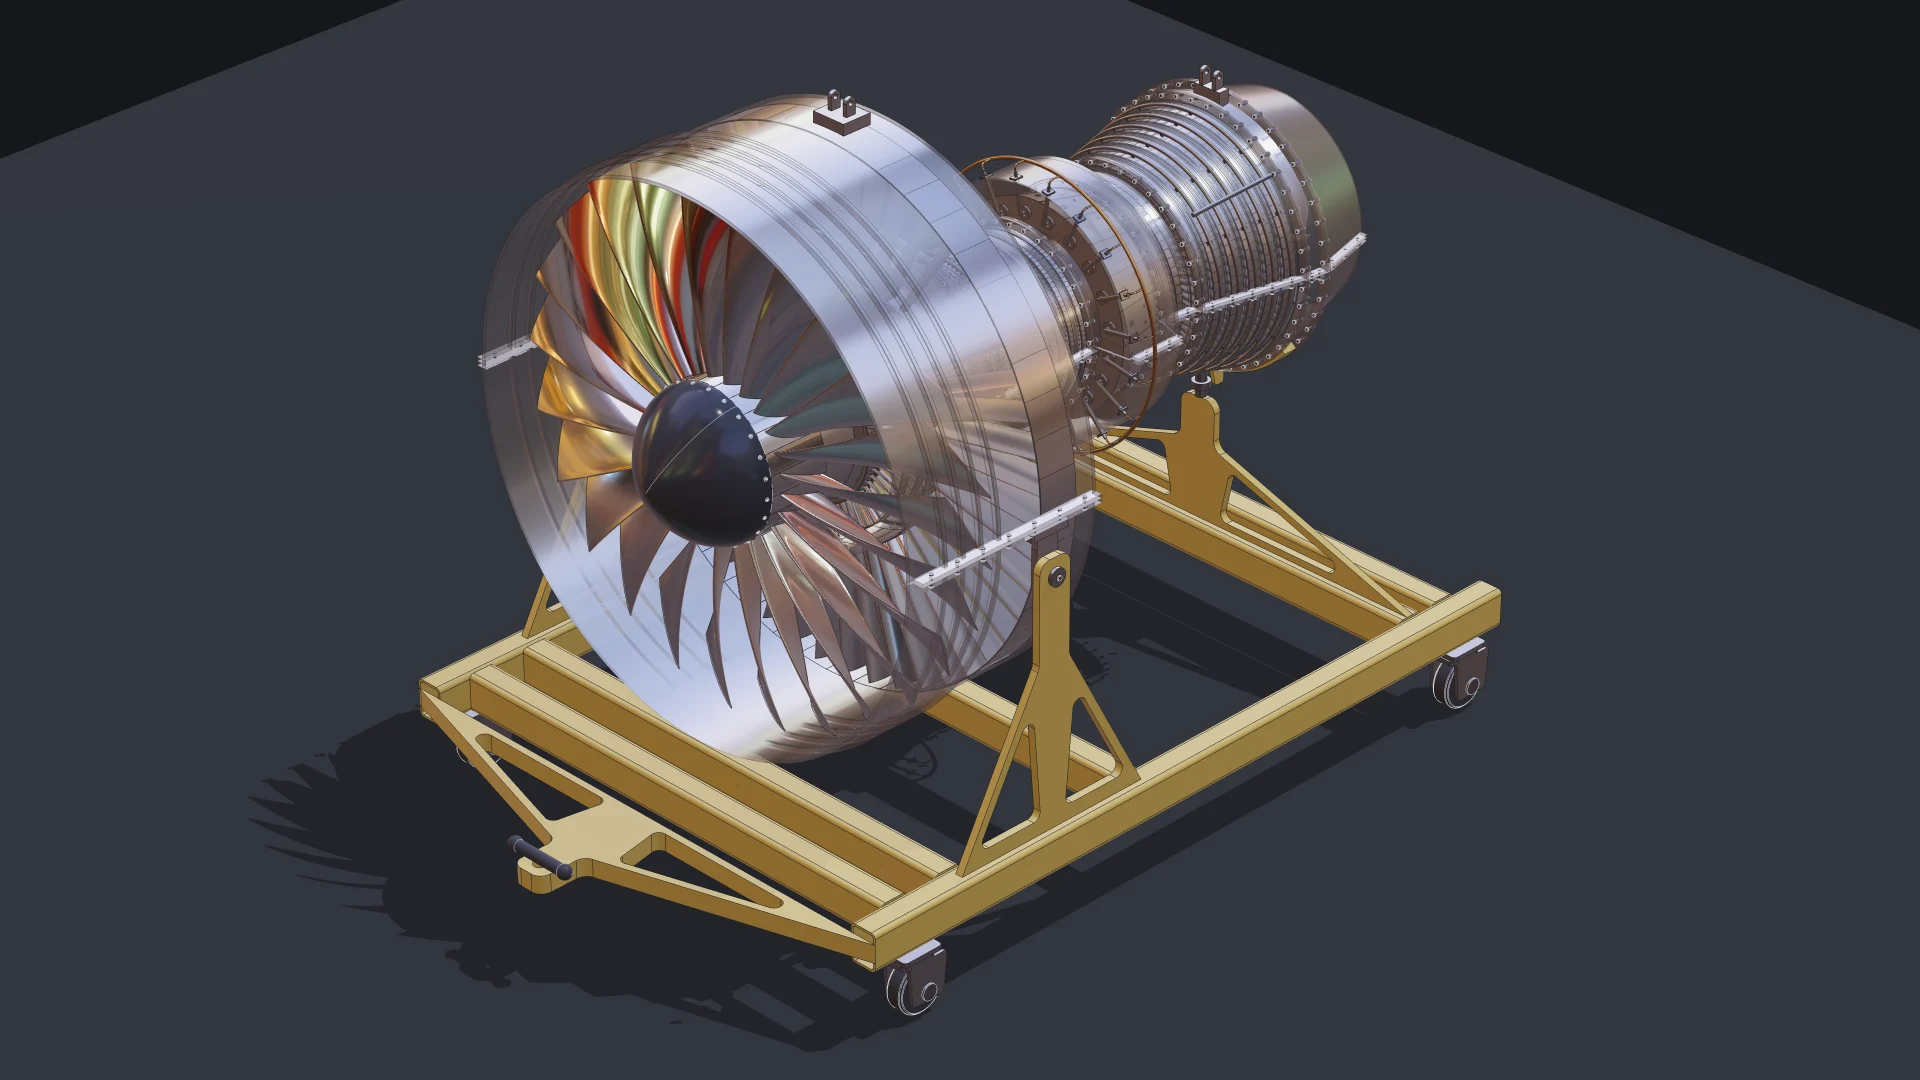
<div class="grid_hCdv" style="grid-template-columns:repeat(2, 1fr);gap:1rem"><img src="https://learn.bitbybit.dev/img/blog/bitbybit-mcp-jet-engine/casing-faded.webp" alt="Turbofan engine built with Bitbybit: casing faded to show the internals, and the upper casing removed to show the spools 1" loading="lazy" decoding="async" class="thumbnail_bKFe"><img src="https://learn.bitbybit.dev/img/blog/bitbybit-mcp-jet-engine/casing-open.webp" alt="Turbofan engine built with Bitbybit: casing faded to show the internals, and the upper casing removed to show the spools 2" loading="lazy" decoding="async" class="thumbnail_bKFe"></div>
<p>What it contains:</p>
<ul>
<li class="">a fan with wide-chord swept blades on dovetail roots in a slotted disk, a spinner held by a ring of screws, and twice as many outlet guide vanes as fan blades;</li>
<li class="">booster and high-pressure compressor stages with blades in grooved drums, stators split into halves, and variable stator levers on unison rings;</li>
<li class="">a combustor with fuel nozzles, a manifold ring and drilled liner tiles;</li>
<li class="">high- and low-pressure turbines with fir-tree blades and clearance-control pipes clipped to the case;</li>
<li class="">shafts, two bearings, an accessory gearbox with its pumps, and mounts;</li>
<li class=""><strong>360 bolt sets</strong> (bolt, washer and nut defined once and placed by reference) on every flanged joint and split line;</li>
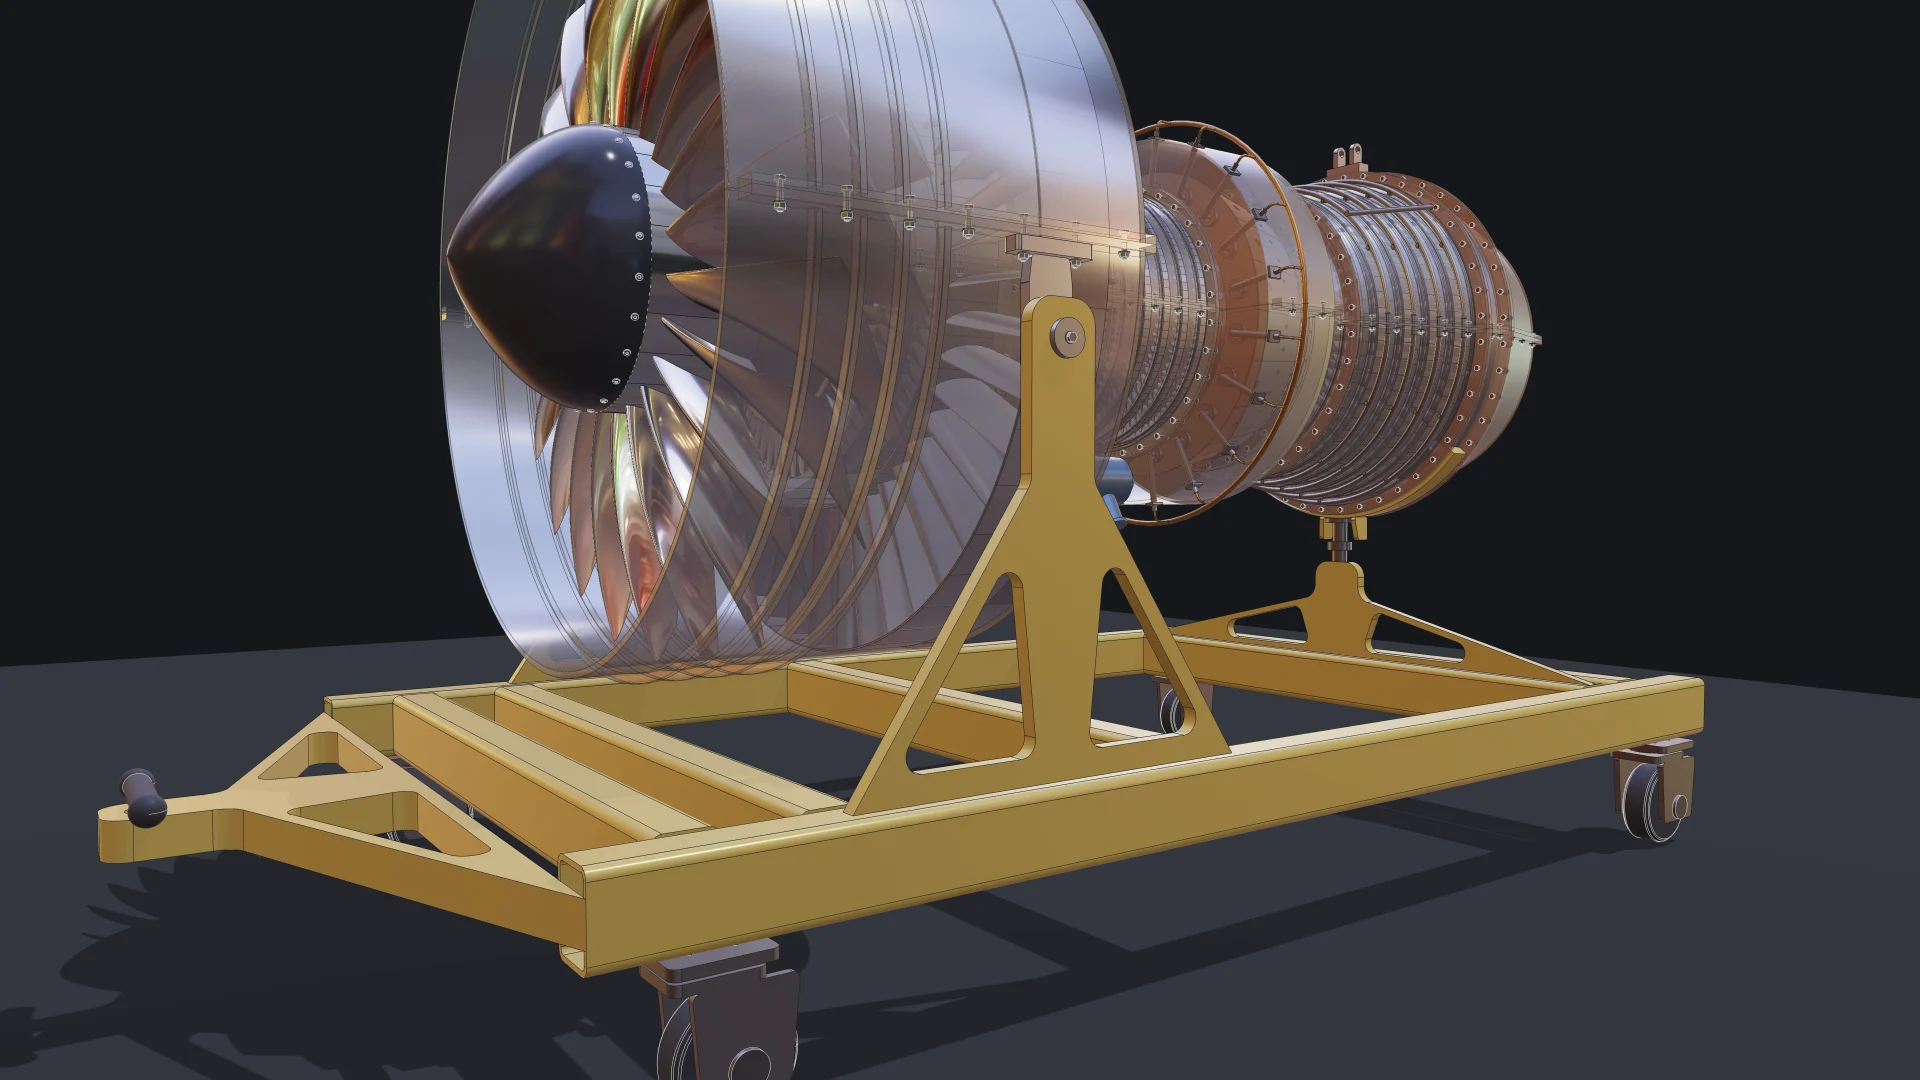
<li class="">a welded transport stand on four swivel casters, sized from the fan so the engine always clears the frame.</li>
</ul>
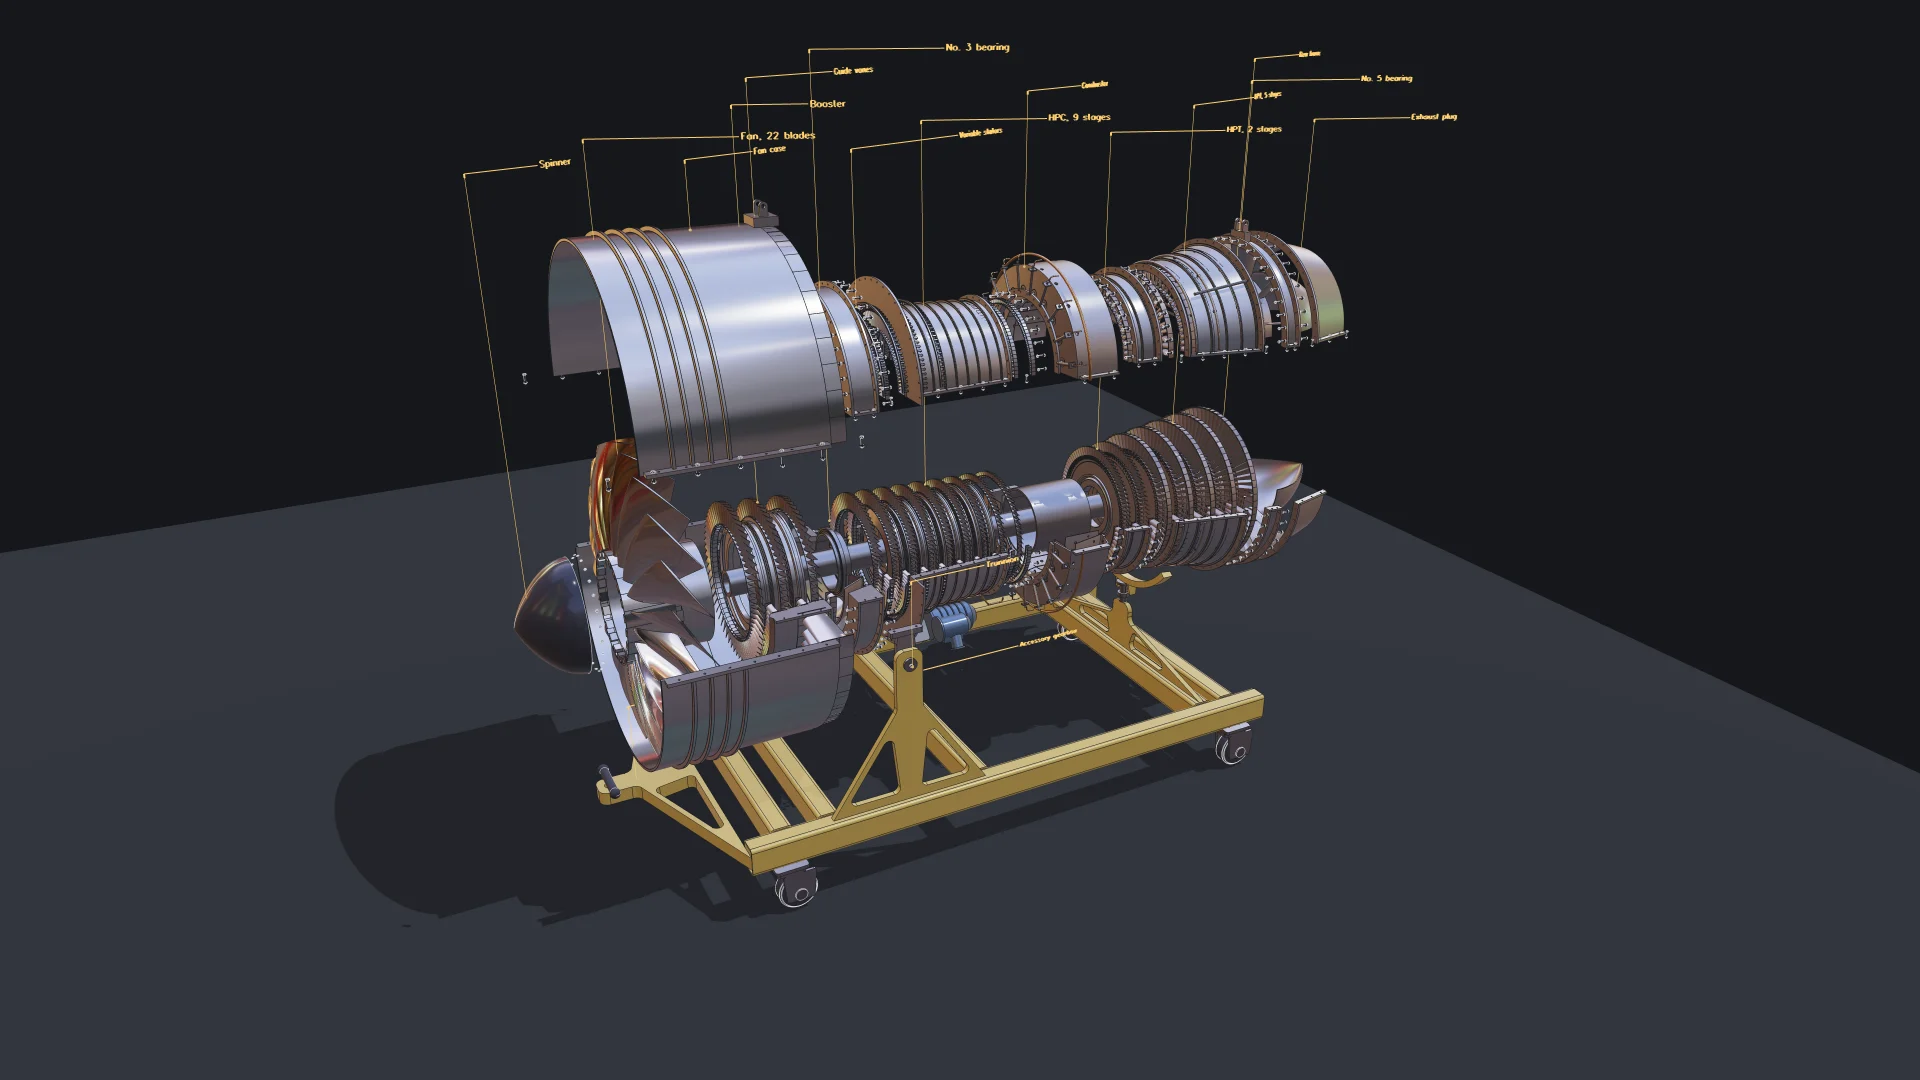
<div class="grid_hCdv" style="grid-template-columns:repeat(2, 1fr);gap:1rem"><img src="https://learn.bitbybit.dev/img/blog/bitbybit-mcp-jet-engine/fan-detail.webp" alt="Turbofan engine details: fan and spinner, compressor and turbine stages, the welded stand, and the exploded view 1" loading="lazy" decoding="async" class="thumbnail_bKFe"><img src="https://learn.bitbybit.dev/img/blog/bitbybit-mcp-jet-engine/core-detail.webp" alt="Turbofan engine details: fan and spinner, compressor and turbine stages, the welded stand, and the exploded view 2" loading="lazy" decoding="async" class="thumbnail_bKFe"><img src="https://learn.bitbybit.dev/img/blog/bitbybit-mcp-jet-engine/stand-detail.webp" alt="Turbofan engine details: fan and spinner, compressor and turbine stages, the welded stand, and the exploded view 3" loading="lazy" decoding="async" class="thumbnail_bKFe"><img src="https://learn.bitbybit.dev/img/blog/bitbybit-mcp-jet-engine/exploded.webp" alt="Turbofan engine details: fan and spinner, compressor and turbine stages, the welded stand, and the exploded view 4" loading="lazy" decoding="async" class="thumbnail_bKFe"></div>
<p>Every blade, vane and bolt is <strong>one part placed many times</strong>, not a copy. That is what keeps an assembly of this size light: 130 unique shapes, 4,853 placements, 3,060 of them blades and vanes. The same structure goes into the exports: the STEP file holds one product per unique part with every placement as an instance, so it opens in your CAD tool as an assembly with names and colours, not as a soup of solids.</p>
<div class="grid_hCdv" style="grid-template-columns:repeat(2, 1fr);gap:1rem"><img src="https://learn.bitbybit.dev/img/blog/bitbybit-mcp-jet-engine/iso-front.webp" alt="Isometric views of the turbofan engine: from the front with a see-through casing, and exploded from the rear 1" loading="lazy" decoding="async" class="thumbnail_bKFe"><img src="https://learn.bitbybit.dev/img/blog/bitbybit-mcp-jet-engine/iso-rear-exploded.webp" alt="Isometric views of the turbofan engine: from the front with a see-through casing, and exploded from the rear 2" loading="lazy" decoding="async" class="thumbnail_bKFe"></div>
<h3 class="anchor anchorTargetStickyNavbar_Vzrq" id="how-an-agent-checks-geometry-it-cannot-see">How an agent checks geometry it cannot see<a href="https://learn.bitbybit.dev/blog/bitbybit-mcp-ai-ready-jet-engine#how-an-agent-checks-geometry-it-cannot-see" class="hash-link" aria-label="Direct link to How an agent checks geometry it cannot see" title="Direct link to How an agent checks geometry it cannot see" translate="no">​</a></h3>
<p>The most interesting part of the project was not writing the parts. It was <strong>verifying</strong> them. An agent cannot look at a blade root and notice that it bites into its groove, so we did not let it rely on looking. The project has a smoke test that builds the whole engine headlessly on the same OpenCascade kernel and asks the kernel the questions a reviewer would ask:</p>
<ul>
<li class="">does every part have real volume?</li>
<li class="">do <strong>103 pairs of neighbouring parts</strong> share any volume at all, measured exactly?</li>
<li class="">do the parts that are meant to touch, such as blade roots in slots, races on shafts and the engine on its stand, actually touch?</li>
<li class="">does the exported STEP read back with exactly the expected number of solids, standing on the ground?</li>
</ul>
<p>A separate scan checks every part for self-intersection and every pair of parts for interference. Together these checks caught real mistakes that no screenshot would have shown: drum spacers built inside out, blade roots sinking 0.2 mm into their grooves, a turbine flange reaching into a nozzle groove, a guide vane whose trailing edge overhung its platform. The agent found each one in a test result, fixed the code, and ran the checks again. This loop of writing, measuring and correcting, with the kernel as the judge, is how we believe serious CAD gets built with agents.</p>
<div class="grid_hCdv" style="grid-template-columns:repeat(1, 1fr);gap:1rem"><img src="https://learn.bitbybit.dev/img/blog/bitbybit-mcp-jet-engine/exploded-transparent.webp" alt="Every module of the turbofan pulled apart along its axis, with the upper casing lifted and see-through 1" loading="lazy" decoding="async" class="thumbnail_bKFe"></div>
<h3 class="anchor anchorTargetStickyNavbar_Vzrq" id="parametric-to-the-last-bolt">Parametric to the last bolt<a href="https://learn.bitbybit.dev/blog/bitbybit-mcp-ai-ready-jet-engine#parametric-to-the-last-bolt" class="hash-link" aria-label="Direct link to Parametric to the last bolt" title="Direct link to Parametric to the last bolt" translate="no">​</a></h3>
<p>The engine is not a fixed model. The fan blade count, the fan diameter, and the number of compressor and turbine stages are parameters, and a change rebuilds only the parts whose inputs moved. Here is the same code at three settings, seen from the same camera:</p>
<ul>
<li class="">an 18-blade, 1,400 mm fan with six compressor and three turbine stages: 116 parts placed 3,389 times;</li>
<li class="">the default 22-blade, 1,600 mm fan with nine and five: 130 parts placed 4,853 times;</li>
<li class="">a 24-blade, 2,000 mm fan with ten and six: 136 parts placed 5,560 times.</li>
</ul>
<p>The stand resizes itself from the fan, and every bolt circle, blade row and label follows.</p>
<div class="grid_hCdv" style="grid-template-columns:repeat(3, 1fr);gap:1rem"><img src="https://learn.bitbybit.dev/img/blog/bitbybit-mcp-jet-engine/variant-small.webp" alt="The same turbofan code with a small, the default and a large set of parameters, seen from the same camera 1" loading="lazy" decoding="async" class="thumbnail_bKFe"><img src="https://learn.bitbybit.dev/img/blog/bitbybit-mcp-jet-engine/variant-default.webp" alt="The same turbofan code with a small, the default and a large set of parameters, seen from the same camera 2" loading="lazy" decoding="async" class="thumbnail_bKFe"><img src="https://learn.bitbybit.dev/img/blog/bitbybit-mcp-jet-engine/variant-large.webp" alt="The same turbofan code with a small, the default and a large set of parameters, seen from the same camera 3" loading="lazy" decoding="async" class="thumbnail_bKFe"></div>
<h3 class="anchor anchorTargetStickyNavbar_Vzrq" id="from-a-threejs-app-to-our-typescript-editor">From a three.js app to our TypeScript editor<a href="https://learn.bitbybit.dev/blog/bitbybit-mcp-ai-ready-jet-engine#from-a-threejs-app-to-our-typescript-editor" class="hash-link" aria-label="Direct link to From a three.js app to our TypeScript editor" title="Direct link to From a three.js app to our TypeScript editor" translate="no">​</a></h3>
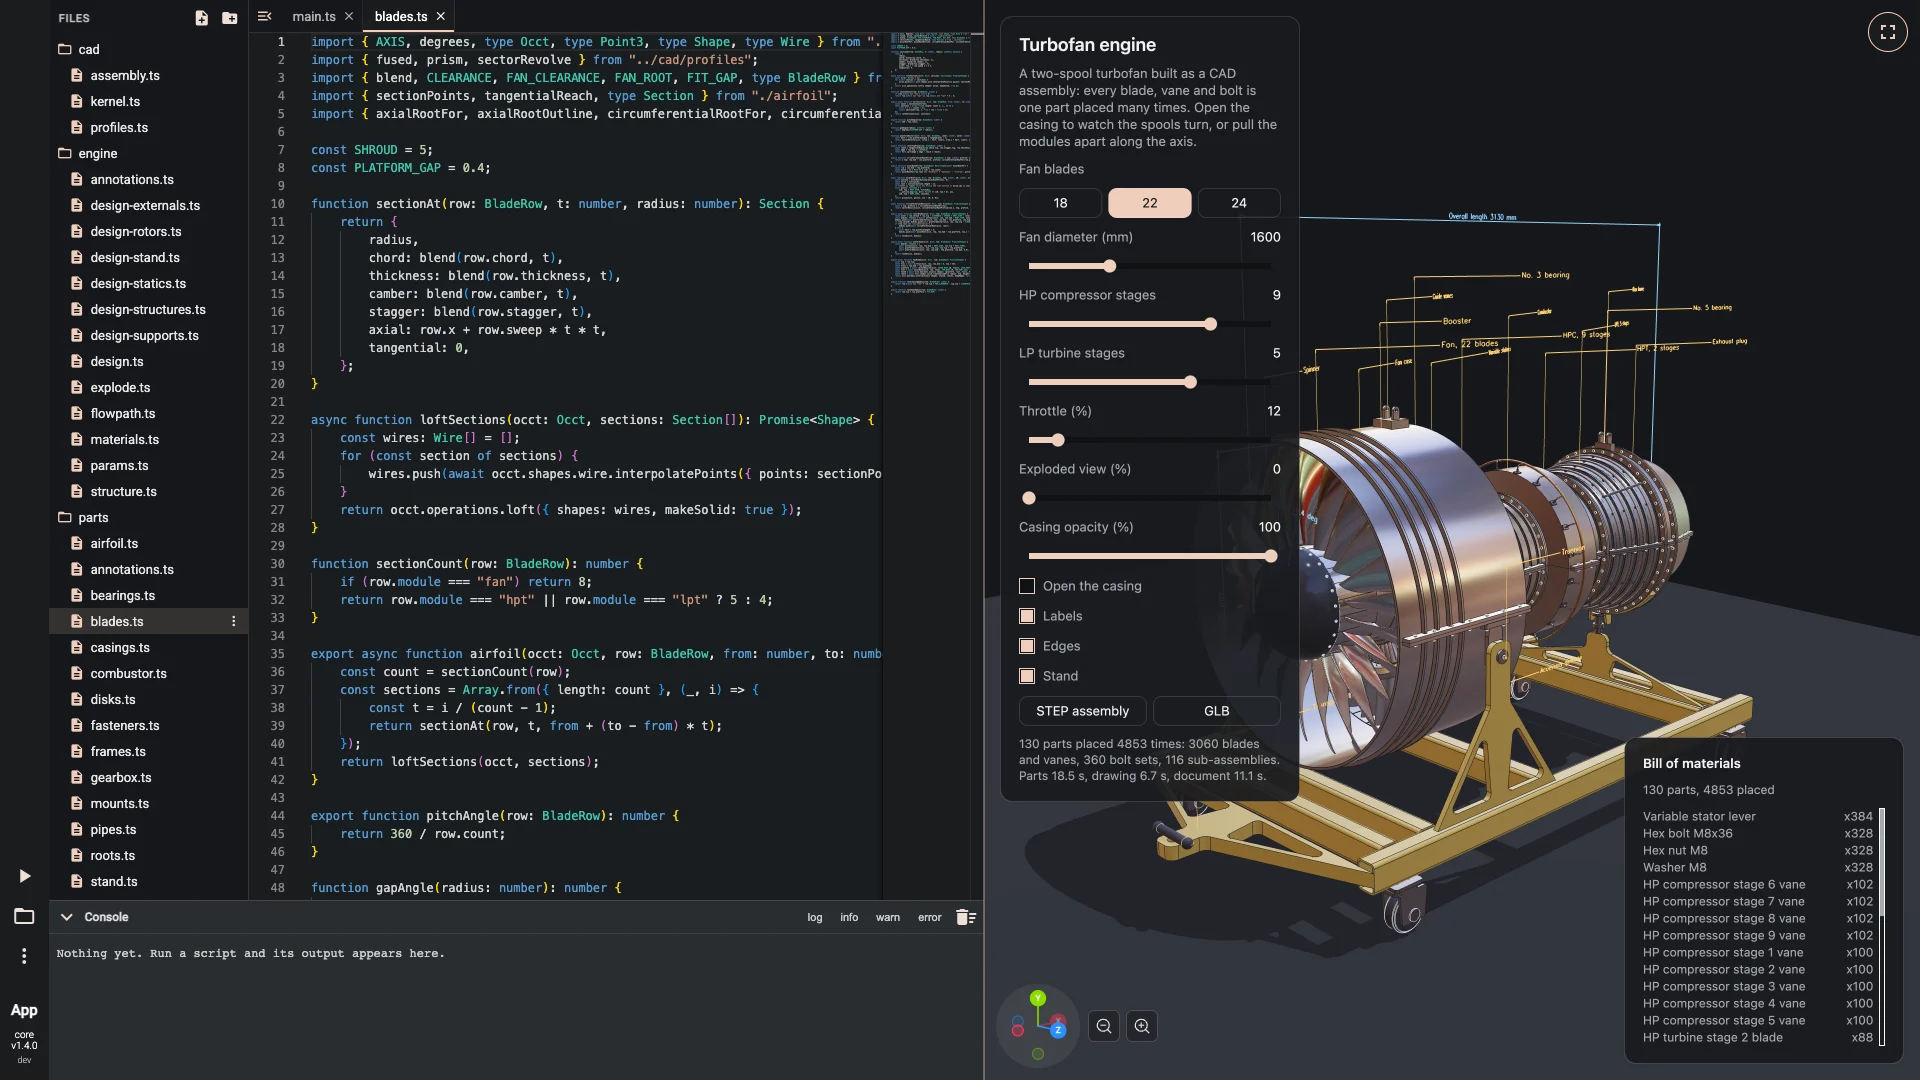
<p>The engine started as a standalone three.js app on our npm packages. Because the model code never touches a renderer, moving it into the Babylon.js editor at bitbybit.dev was a matter of rewriting the viewer and the panel: <strong>30 of the 43 files carried over unchanged</strong>. The result is a multi-file project of about 4,800 lines in the editor, with folders for the CAD helpers, the engine plan, the parts, the viewer and the user interface, that builds the engine in the browser in well under a minute and animates it smoothly.</p>
<div class="grid_hCdv" style="grid-template-columns:repeat(2, 1fr);gap:1rem"><img src="https://learn.bitbybit.dev/img/blog/bitbybit-mcp-jet-engine/editor-project.webp" alt="The turbofan as a multi-file TypeScript project in the Bitbybit editor, and its configurator panel with the bill of materials 1" loading="lazy" decoding="async" class="thumbnail_bKFe"><img src="https://learn.bitbybit.dev/img/blog/bitbybit-mcp-jet-engine/configurator.webp" alt="The turbofan as a multi-file TypeScript project in the Bitbybit editor, and its configurator panel with the bill of materials 2" loading="lazy" decoding="async" class="thumbnail_bKFe"></div>
<h3 class="anchor anchorTargetStickyNavbar_Vzrq" id="get-the-source">Get the source<a href="https://learn.bitbybit.dev/blog/bitbybit-mcp-ai-ready-jet-engine#get-the-source" class="hash-link" aria-label="Direct link to Get the source" title="Direct link to Get the source" translate="no">​</a></h3>
<p>The complete source of the engine, as a multi-file project you can open, run and change in our TypeScript editor, is available to <strong>Gold plan</strong> subscribers. Use it as a reference for assemblies, instancing, fasteners placed by reference, parametric rebuilds, exploded views, labels and STEP export, or hand it to your own agent as a worked example. <a href="https://bitbybit.dev/auth/pick-plan" target="_blank" rel="noopener noreferrer" class="">See the plans</a>.</p>
<h2 class="anchor anchorTargetStickyNavbar_Vzrq" id="what-the-agent-did-and-what-it-did-not">What the agent did, and what it did not<a href="https://learn.bitbybit.dev/blog/bitbybit-mcp-ai-ready-jet-engine#what-the-agent-did-and-what-it-did-not" class="hash-link" aria-label="Direct link to What the agent did, and what it did not" title="Direct link to What the agent did, and what it did not" translate="no">​</a></h2>
<p>We want to be precise about this, because it is easy to oversell. The agent wrote the code, looked up the API instead of guessing it, and found and fixed its own mistakes through tests. A person decided what to build, judged how it looked, and pointed at what was wrong. The engine is a detailed showcase, not a certified design: its proportions are plausible, not taken from a real engine's drawings. That division of work, a person with intent and judgement and an agent with patience and precision, is what we are building for.</p>
<h2 class="anchor anchorTargetStickyNavbar_Vzrq" id="our-ambition-bitbybit-ready-for-agents">Our ambition: Bitbybit, ready for agents<a href="https://learn.bitbybit.dev/blog/bitbybit-mcp-ai-ready-jet-engine#our-ambition-bitbybit-ready-for-agents" class="hash-link" aria-label="Direct link to Our ambition: Bitbybit, ready for agents" title="Direct link to Our ambition: Bitbybit, ready for agents" translate="no">​</a></h2>
<p>Making a library usable by agents is not one feature. It is a way of maintaining the whole product:</p>
<ul>
<li class=""><strong>Every function documented for machines as well as people.</strong> The API reference your agent reads is generated from the same source as the libraries, published with every release and addressed by exact version, never by a moving "latest".</li>
<li class=""><strong>Clear tiers.</strong> Every function says where it runs and what it costs, so neither a person nor an agent is surprised.</li>
<li class=""><strong>Scaffolds that teach agents how to work.</strong> New projects come with instructions for the agent, the MCP server configured, and a test it can iterate against.</li>
<li class=""><strong>Learning from the gaps.</strong> The public server records which names agents reach for that do not exist (never your prompts or your code), and we use that to improve the API and its documentation.</li>
<li class=""><strong>One vocabulary everywhere.</strong> The dotted API an agent learns from the free server is the same one it runs on CAD Cloud, the same one in our editors and the same one in the npm packages.</li>
</ul>
<p>We think the next generation of CAD will be designed in conversation: you describe the product, an agent writes the parametric model on proven geometry kernels, the kernels check the result, and you decide. Bitbybit's job is to make every step of that reliable.</p>
<h2 class="anchor anchorTargetStickyNavbar_Vzrq" id="get-started">Get started<a href="https://learn.bitbybit.dev/blog/bitbybit-mcp-ai-ready-jet-engine#get-started" class="hash-link" aria-label="Direct link to Get started" title="Direct link to Get started" translate="no">​</a></h2>
<ol>
<li class="">Connect the free server to your agent: <code>claude mcp add --transport http bitbybit https://mcp.bitbybit.dev/mcp</code>, or see the <a class="" href="https://learn.bitbybit.dev/learn/using-ai-with-bitbybit/mcp/bitbybit-mcp">MCP page</a> for every other host.</li>
<li class="">Ask for something: "Using the bitbybit MCP, make a 10 by 20 by 5 box, fillet its edges by 1 and draw it with three.js."</li>
<li class="">Start a real project with <code>npm init @bitbybit-dev/app</code> and let your agent iterate against its smoke test.</li>
<li class="">When you want the agent to compute geometry for you rather than write code, connect the <a class="" href="https://learn.bitbybit.dev/learn/using-ai-with-bitbybit/mcp/cad-cloud-mcp">CAD Cloud MCP</a>.</li>
</ol>
<p>The <a class="" href="https://learn.bitbybit.dev/learn/using-ai-with-bitbybit/intro">Using AI with Bitbybit</a> section has the details. We would love to see what you and your agents build.</p>]]></content>
        <author>
            <name>Matas Ubarevičius</name>
            <uri>https://www.linkedin.com/in/matas-ubarevicius/</uri>
        </author>
        <category label="AI" term="AI"/>
        <category label="MCP" term="MCP"/>
        <category label="Bitbybit" term="Bitbybit"/>
        <category label="CAD" term="CAD"/>
        <category label="Assembly" term="Assembly"/>
        <category label="BabylonJS" term="BabylonJS"/>
    </entry>
    <entry>
        <title type="html"><![CDATA[Gamechanger Furniture Launched a Personalised Gaming Chair Configurator on Shopify, Built Entirely With 3D Bits]]></title>
        <id>https://learn.bitbybit.dev/blog/gamechanger-furniture-custom-gaming-chair-3d-configurator-on-shopify-with-3d-bits</id>
        <link href="https://learn.bitbybit.dev/blog/gamechanger-furniture-custom-gaming-chair-3d-configurator-on-shopify-with-3d-bits"/>
        <updated>2026-09-14T00:00:00.000Z</updated>
        <summary type="html"><![CDATA[How Gamechanger Furniture built a fully personalised 3D gaming chair configurator on Shopify with the 3D Bits app - custom option panel, live pricing, embroidered initials and logos projected onto the chair, guided camera moves and PDF documents, all without code.]]></summary>
        <content type="html"><![CDATA[<img src="https://learn.bitbybit.dev/img/blog/gamechanger-furniture-custom-gaming-chair-3d-configurator-on-shopify-with-3d-bits.webp" alt="Gamechanger Furniture personalised gaming chair 3D configurator on Shopify built with 3D Bits" title="Gamechanger Furniture personalised gaming chair 3D configurator on Shopify built with 3D Bits" style="max-width:100%">
<p>Some companies pick a name and then have to live up to it. Gamechanger Furniture builds gaming chairs by hand in northern Germany, and when they decided that every customer should design their own chair - the fabric, the colours, the stitching, their initials embroidered on the headrest, even their own logo - they needed a product page that could keep up with the name. What they launched is, quite literally, a game changer for how a chair gets sold: shoppers put it together in 3D, watch the price follow every choice, see their name appear on the chair, and take a PDF of their design away with them. All of it was built inside the 3D Bits app for Shopify, without a single line of code.</p>
<h2 class="anchor anchorTargetStickyNavbar_Vzrq" id="the-client-gamechanger-furniture">The Client: Gamechanger Furniture<a href="https://learn.bitbybit.dev/blog/gamechanger-furniture-custom-gaming-chair-3d-configurator-on-shopify-with-3d-bits#the-client-gamechanger-furniture" class="hash-link" aria-label="Direct link to The Client: Gamechanger Furniture" title="Direct link to The Client: Gamechanger Furniture" translate="no">​</a></h2>
<img src="https://learn.bitbybit.dev/img/blog/gamechanger/gamechanger-logo.webp" alt="Gamechanger Furniture logo" style="max-width:280px;display:block;margin:2rem 0">
<p><a href="https://gamechanger-germany.com/" target="_blank" rel="noopener noreferrer" class="">Gamechanger</a> is a German gaming chair brand. Their chairs are largely handcrafted in a manufactory in northern Germany, from components sourced in Germany and the EU, and come with a five-year warranty. Their promise is that no two chairs need to look alike: three upholstery materials, dozens of colours for every part of the chair, a choice of stitching colour, and embroidery of your initials or your logo on the headrest and the side panels.</p>
<p>That promise is easy to make on a brochure and hard to keep on a product page. A shopper needs to see the chair they are describing, not imagine it from a list of dropdowns. That is where 3D Bits came in.</p>
<div class="grid_hCdv" style="grid-template-columns:repeat(1, 1fr);gap:1rem"><img src="https://learn.bitbybit.dev/img/blog/gamechanger/gamechanger-custom-gaming-chair-3d-configurator-on-shopify-1.webp" alt="Gamechanger personalised gaming chair 3D configurator on Shopify 1" loading="lazy" decoding="async" class="thumbnail_bKFe"></div>
<h2 class="anchor anchorTargetStickyNavbar_Vzrq" id="see-it-in-action">See It in Action<a href="https://learn.bitbybit.dev/blog/gamechanger-furniture-custom-gaming-chair-3d-configurator-on-shopify-with-3d-bits#see-it-in-action" class="hash-link" aria-label="Direct link to See It in Action" title="Direct link to See It in Action" translate="no">​</a></h2>
<p>Here is the configurator as a shopper sees it on the Gamechanger store: picking materials and colours, switching on the upgrades, typing initials and watching them appear on the chair, and downloading the PDF at the end.</p>
<div class="responsive-video-container"><iframe width="560" height="315" src="https://www.youtube.com/embed/J9PUfOQ5Ey4" title="Gamechanger Furniture Personalised Gaming Chair Configurator - Built with 3D Bits App for Shopify" frameborder="0" allow="accelerometer; autoplay; clipboard-write; encrypted-media; gyroscope; picture-in-picture; web-share; fullscreen" allowfullscreen=""></iframe></div>
<div class="grid_hCdv" style="grid-template-columns:repeat(2, 1fr);gap:1rem"><img src="https://learn.bitbybit.dev/img/blog/gamechanger/gamechanger-custom-gaming-chair-3d-configurator-on-shopify-2.webp" alt="Gamechanger gaming chair configurator materials and colours 1" loading="lazy" decoding="async" class="thumbnail_bKFe"><img src="https://learn.bitbybit.dev/img/blog/gamechanger/gamechanger-custom-gaming-chair-3d-configurator-on-shopify-3.webp" alt="Gamechanger gaming chair configurator materials and colours 2" loading="lazy" decoding="async" class="thumbnail_bKFe"></div>
<h2 class="anchor anchorTargetStickyNavbar_Vzrq" id="one-app-for-the-whole-configurator">One App for the Whole Configurator<a href="https://learn.bitbybit.dev/blog/gamechanger-furniture-custom-gaming-chair-3d-configurator-on-shopify-with-3d-bits#one-app-for-the-whole-configurator" class="hash-link" aria-label="Direct link to One App for the Whole Configurator" title="Direct link to One App for the Whole Configurator" translate="no">​</a></h2>
<p>Readers of our earlier case studies will remember that a 3D Bits configurator used to be a team effort between apps. The 3D scene came from us, the options usually came from Shopify variants or a product options app, and the prices came from wherever those options lived. Some merchants, like Strength Shop, went further and built their own option panel from scratch.</p>
<p>That is no longer necessary. 3D Bits has grown into a complete configurator app. The panel of options your shoppers use, the prices behind every choice, the personalisation, the guided camera, the documents that go with the order - all of it is set up in one place, our visual editor called <strong>Composer</strong>, and published to the product page with one switch. There is nothing else to install and nothing to code.</p>
<p>Gamechanger is the first case study we are publishing that uses this new, all-in-one setup from end to end. Every part of what you see on their product page was authored in Composer:</p>
<ul>
<li class="">The <strong>option panel</strong> - four collapsible groups with pills, colour swatches, switches, text fields, font pickers and file uploads</li>
<li class="">The <strong>prices</strong> - a starting price, an amount for each upgrade, and a live breakdown that Shopify charges exactly at checkout</li>
<li class="">The <strong>personalisation</strong> - initials, text and logos projected onto the headrest and the side panels</li>
<li class="">The <strong>camera</strong> - eighteen automatic camera moves that show the shopper whatever they just changed</li>
<li class="">The <strong>documents</strong> - a PDF for the shopper and a separate one for the workshop, generated from the exact configuration</li>
</ul>
<p>Let's walk through each of them.</p>
<h2 class="anchor anchorTargetStickyNavbar_Vzrq" id="the-option-panel-built-in-composer">The Option Panel, Built in Composer<a href="https://learn.bitbybit.dev/blog/gamechanger-furniture-custom-gaming-chair-3d-configurator-on-shopify-with-3d-bits#the-option-panel-built-in-composer" class="hash-link" aria-label="Direct link to The Option Panel, Built in Composer" title="Direct link to The Option Panel, Built in Composer" translate="no">​</a></h2>
<p>The panel a shopper sees next to the chair is arranged in four groups, each one an accordion that opens and closes:</p>
<ol>
<li class=""><strong>Choose your size</strong> - S/M, L or XL, presented as pills, with the XL adding to the price</li>
<li class=""><strong>Choose your materials and colours</strong> - five zones of the chair, each with its own material and colour</li>
<li class=""><strong>Upgrades for maximum comfort</strong> - padded armrests, polished aluminium, memory foam, lumbar support, gas spring, base and castors</li>
<li class=""><strong>Your logo or lettering</strong> - front, back, and the two side panels</li>
</ol>
<div class="grid_hCdv" style="grid-template-columns:repeat(2, 1fr);gap:1rem"><img src="https://learn.bitbybit.dev/img/blog/gamechanger/gamechanger-custom-gaming-chair-3d-configurator-on-shopify-composer-1.webp" alt="Composer Layout and Controls tabs for the Gamechanger chair 1" loading="lazy" decoding="async" class="thumbnail_bKFe"><img src="https://learn.bitbybit.dev/img/blog/gamechanger/gamechanger-custom-gaming-chair-3d-configurator-on-shopify-composer-2.webp" alt="Composer Layout and Controls tabs for the Gamechanger chair 2" loading="lazy" decoding="async" class="thumbnail_bKFe"></div>
<p>The materials group is where the real variety lives. The main surface, the appliqués, the outer edge and the back of the chair each get a material choice - fabric, faux leather or real leather - and a colour swatch list that depends on that material. Fabric comes in fifteen colours, faux leather in nineteen (seven of them breathable, at a small extra charge) and real leather in five. Pick fabric and only the fabric colours appear. Pick real leather and the list changes. A nineteen-colour swatch for the stitching completes the group.</p>
<p>That "only show what applies" behaviour is a <strong>condition</strong> on a control in Composer, and it is the tool that keeps a panel with fifty-three controls from feeling like fifty-three controls. The shopper only ever sees the handful that matter for what they have already chosen.</p>
<p>Every choice is wired to the 3D model. Behind the scenes the chair carries 277 prepared material finishes and 126 textures, and each colour swatch simply tells the model which finish to show on which part. The result is millions of possible chairs, and every one of them renders correctly.</p>
<p>The panel is also full of Gamechanger's own voice. Short texts sit between the options - "81% choose the additional memory foam padding", "people over 193 cm should choose the high gas spring", "we embroider your initials in the stitching colour" - and some of them appear only once the option they explain has been chosen. These are ordinary text elements dropped into the layout, and they turn a form into a sales conversation.</p>
<div class="grid_hCdv" style="grid-template-columns:repeat(1, 1fr);gap:1rem"><img src="https://learn.bitbybit.dev/img/blog/gamechanger/gamechanger-custom-gaming-chair-3d-configurator-on-shopify-4.webp" alt="Gamechanger configurator upgrades and helper texts 1" loading="lazy" decoding="async" class="thumbnail_bKFe"><img src="https://learn.bitbybit.dev/img/blog/gamechanger/gamechanger-custom-gaming-chair-3d-configurator-on-shopify-5.webp" alt="Gamechanger configurator upgrades and helper texts 2" loading="lazy" decoding="async" class="thumbnail_bKFe"></div>
<h3 class="anchor anchorTargetStickyNavbar_Vzrq" id="styled-to-match-the-store">Styled to Match the Store<a href="https://learn.bitbybit.dev/blog/gamechanger-furniture-custom-gaming-chair-3d-configurator-on-shopify-with-3d-bits#styled-to-match-the-store" class="hash-link" aria-label="Direct link to Styled to Match the Store" title="Direct link to Styled to Match the Store" translate="no">​</a></h3>
<p>The panel's look - a soft grey background, rounded corners, a slight blur, the accordion borders, the heading weights - was set in Composer's Style tab. The add-to-cart button carries Gamechanger's pink-to-purple gradient and pulses when an item is added. The built-in texts that 3D Bits shows on its own ("show price details", "almost done", "your document is being prepared") were translated into German in the Translations tab, so the whole page speaks one language.</p>
<h2 class="anchor anchorTargetStickyNavbar_Vzrq" id="prices-that-follow-every-choice">Prices That Follow Every Choice<a href="https://learn.bitbybit.dev/blog/gamechanger-furniture-custom-gaming-chair-3d-configurator-on-shopify-with-3d-bits#prices-that-follow-every-choice" class="hash-link" aria-label="Direct link to Prices That Follow Every Choice" title="Direct link to Prices That Follow Every Choice" translate="no">​</a></h2>
<p>Gamechanger's chair has a starting price, and most upgrades add to it: the XL size, real leather on any zone, the breathable faux leather colours, padded armrests, the aluminium armrest supports, memory foam, the adjustable lumbar support, a different gas spring, the polished base, lockable castors, and each embroidery.</p>
<p>All of that is authored in the same place as the options. Each option simply has an amount next to it. The price element at the bottom of the panel updates live as the shopper clicks, and can unfold into an itemised breakdown - starting price, then every choice that added something - so the total is never a mystery.</p>
<div class="grid_hCdv" style="grid-template-columns:repeat(2, 1fr);gap:1rem"><img src="https://learn.bitbybit.dev/img/blog/gamechanger/gamechanger-custom-gaming-chair-3d-configurator-on-shopify-6.webp" alt="Gamechanger configurator live price breakdown and Composer pricing setup 1" loading="lazy" decoding="async" class="thumbnail_bKFe"><img src="https://learn.bitbybit.dev/img/blog/gamechanger/gamechanger-custom-gaming-chair-3d-configurator-on-shopify-6-1.webp" alt="Gamechanger configurator live price breakdown and Composer pricing setup 2" loading="lazy" decoding="async" class="thumbnail_bKFe"></div>
<p>The important part is what happens next. When the shopper adds the chair to the cart, Shopify charges exactly the amount that was shown. Taxes, shipping, discount codes, payment and refunds all stay with Shopify as they always have. 3D Bits decides what the configured chair costs; Shopify collects it. There is no separate pricing app, no spreadsheet of variant combinations, and no risk of the panel saying one number and the checkout another.</p>
<h2 class="anchor anchorTargetStickyNavbar_Vzrq" id="your-name-on-the-chair-projections-and-decals">Your Name, on the Chair: Projections and Decals<a href="https://learn.bitbybit.dev/blog/gamechanger-furniture-custom-gaming-chair-3d-configurator-on-shopify-with-3d-bits#your-name-on-the-chair-projections-and-decals" class="hash-link" aria-label="Direct link to Your Name, on the Chair: Projections and Decals" title="Direct link to Your Name, on the Chair: Projections and Decals" translate="no">​</a></h2>
<p>This is the part of the configurator that makes people stop and play with it, so it deserves a proper explanation.</p>
<p>Gamechanger embroiders initials, short text or a logo onto the front and back of the headrest, and short text onto the left and right side panels. On the product page, the shopper types their letters or uploads their logo - and it appears on the chair, following the curve of the padding, exactly where it will be stitched.</p>
<p>We call these <strong>decals</strong>, and the way they work is easiest to picture as a small slide projector pointed at the chair. Whatever is on the slide - the letters the shopper typed, the image they uploaded - is beamed onto the surface in front of it. Because it is projected rather than pasted on flat, the artwork wraps around the curved headrest the way real embroidery would, instead of floating in front of it.</p>
<div class="grid_hCdv" style="grid-template-columns:repeat(2, 1fr);gap:1rem"><img src="https://learn.bitbybit.dev/img/blog/gamechanger/gamechanger-custom-gaming-chair-3d-configurator-on-shopify-7.webp" alt="Gamechanger chair with embroidered initials and uploaded logo projected onto the headrest 1" loading="lazy" decoding="async" class="thumbnail_bKFe"><img src="https://learn.bitbybit.dev/img/blog/gamechanger/gamechanger-custom-gaming-chair-3d-configurator-on-shopify-8.webp" alt="Gamechanger chair with embroidered initials and uploaded logo projected onto the headrest 2" loading="lazy" decoding="async" class="thumbnail_bKFe"></div>
<p>In Composer, that projector is a box you can see and drag around the model: where it sits, how big it is, which way it points and how deep it reaches. Get the direction right and the artwork wraps correctly; then a single angle value levels the lettering. The chair has nine of them:</p>
<ul>
<li class=""><strong>Front of the headrest</strong> - a text decal for initials (up to six characters), an image decal for an uploaded logo, and an image decal that shows the Gamechanger logo itself</li>
<li class=""><strong>Back of the headrest</strong> - the same three</li>
<li class=""><strong>Left and right side panels</strong> - a text decal each, up to eleven characters</li>
<li class=""><strong>The floor</strong> - one more image decal projects the Gamechanger logo onto the ground under the chair, a small branding touch that costs nothing</li>
</ul>
<p>Only the right decal shows at any moment. Choose "your logo" on the front and the upload field appears with its decal; choose "initials" and the text field and font picker take its place. That is the same condition mechanism the colour lists use.</p>
<div class="grid_hCdv" style="grid-template-columns:repeat(2, 1fr);gap:1rem"><img src="https://learn.bitbybit.dev/img/blog/gamechanger/gamechanger-custom-gaming-chair-3d-configurator-on-shopify-composer-4.webp" alt="Composer Personalisation tab showing the decal projection box on the chair 1" loading="lazy" decoding="async" class="thumbnail_bKFe"><img src="https://learn.bitbybit.dev/img/blog/gamechanger/gamechanger-custom-gaming-chair-3d-configurator-on-shopify-composer-5.webp" alt="Composer Personalisation tab showing the decal projection box on the chair 2" loading="lazy" decoding="async" class="thumbnail_bKFe"></div>
<h3 class="anchor anchorTargetStickyNavbar_Vzrq" id="eight-fonts-and-stitching-that-matches">Eight Fonts, and Stitching That Matches<a href="https://learn.bitbybit.dev/blog/gamechanger-furniture-custom-gaming-chair-3d-configurator-on-shopify-with-3d-bits#eight-fonts-and-stitching-that-matches" class="hash-link" aria-label="Direct link to Eight Fonts, and Stitching That Matches" title="Direct link to Eight Fonts, and Stitching That Matches" translate="no">​</a></h3>
<p>Text decals render in real fonts. Eight script and display typefaces were registered once, in the Style tab, and every text field in the panel offers the shopper the same list. Change the font and the lettering on the chair changes with it.</p>
<p>The detail we like most is the colour. Gamechanger embroiders in the stitching colour of the chair, so on the product page the letters and the logo are drawn in whatever stitching colour the shopper picked. Choose red seams and your initials are red; switch to sand and they follow. This is done with a handful of small <strong>logic rules</strong> in Composer: when the stitching swatch changes, the rule passes the matching colour to the decals. The white Gamechanger logo is recoloured the same way, so even the brand mark is stitched in the shopper's thread colour. What is on screen is what the workshop will make.</p>
<p>Uploaded logos are shown as they are, and a text next to the upload field says that a proof will be sent for approval before anything is stitched. The uploaded file travels with the order, so the workshop has the original.</p>
<h2 class="anchor anchorTargetStickyNavbar_Vzrq" id="a-camera-that-knows-where-to-look">A Camera That Knows Where to Look<a href="https://learn.bitbybit.dev/blog/gamechanger-furniture-custom-gaming-chair-3d-configurator-on-shopify-with-3d-bits#a-camera-that-knows-where-to-look" class="hash-link" aria-label="Direct link to A Camera That Knows Where to Look" title="Direct link to A Camera That Knows Where to Look" translate="no">​</a></h2>
<p>A chair has a lot of surface, and most of the options change a small part of it. If the shopper picks a castor colour while looking at the headrest, nothing they can see changes and the feature feels broken.</p>
<p><strong>Focals</strong> solve this. A focal is a camera move that fires on its own when a shopper does something. This configurator has eighteen of them, roughly one per group of options:</p>
<ul>
<li class="">Change the main colour and the camera settles on the seat and backrest</li>
<li class="">Change the appliqués, the outer edge or the back, and it turns to show that zone</li>
<li class="">Switch on the padded armrests, or pick their colour, and it swings round to the armrest</li>
<li class="">Touch the gas spring, the base or the castors and it drops down to the base</li>
<li class="">Toggle the lumbar support or the memory foam and it shows you where they go</li>
<li class="">Start typing on the left side panel and it flies there so you can watch the letters appear; the right panel, the front and the back each have their own</li>
</ul>
<p>A "show the whole chair" button pulls back to the full view, and a reset button restores every option to its default. Alongside these there are seven <strong>points of interest</strong> - clickable markers for top, side, front, back, seat, armrest and overall view - which the shopper can switch on with a toggle in the corner of the 3D view. A second toggle switches shadows on for a more realistic look.</p>
<div class="grid_hCdv" style="grid-template-columns:repeat(2, 1fr);gap:1rem"><img src="https://learn.bitbybit.dev/img/blog/gamechanger/gamechanger-custom-gaming-chair-3d-configurator-on-shopify-9.webp" alt="Gamechanger configurator focal camera views of armrest, base, castors and side panel 1" loading="lazy" decoding="async" class="thumbnail_bKFe"><img src="https://learn.bitbybit.dev/img/blog/gamechanger/gamechanger-custom-gaming-chair-3d-configurator-on-shopify-10.webp" alt="Gamechanger configurator focal camera views of armrest, base, castors and side panel 2" loading="lazy" decoding="async" class="thumbnail_bKFe"><img src="https://learn.bitbybit.dev/img/blog/gamechanger/gamechanger-custom-gaming-chair-3d-configurator-on-shopify-11.webp" alt="Gamechanger configurator focal camera views of armrest, base, castors and side panel 3" loading="lazy" decoding="async" class="thumbnail_bKFe"><img src="https://learn.bitbybit.dev/img/blog/gamechanger/gamechanger-custom-gaming-chair-3d-configurator-on-shopify-12.webp" alt="Gamechanger configurator focal camera views of armrest, base, castors and side panel 4" loading="lazy" decoding="async" class="thumbnail_bKFe"></div>
<p>The effect on the shopper is hard to overstate. They never have to hunt for what changed. They change something and they are shown, every time, and then they are free to spin the chair themselves.</p>
<h2 class="anchor anchorTargetStickyNavbar_Vzrq" id="upgrades-that-swap-real-parts">Upgrades That Swap Real Parts<a href="https://learn.bitbybit.dev/blog/gamechanger-furniture-custom-gaming-chair-3d-configurator-on-shopify-with-3d-bits#upgrades-that-swap-real-parts" class="hash-link" aria-label="Direct link to Upgrades That Swap Real Parts" title="Direct link to Upgrades That Swap Real Parts" translate="no">​</a></h2>
<p>Not everything is a colour. The memory foam upgrade replaces the seat cushions with thicker ones. The padded 4D armrests replace the hard armrests with upholstered ones that get their own material and top-and-bottom colour choice. The adjustable lumbar support adds its knob to the backrest. Each of these is a part of the 3D model that shows or hides based on the switch in the panel, so the shopper sees the actual thing they are paying for.</p>
<h2 class="anchor anchorTargetStickyNavbar_Vzrq" id="the-buy-panel-lives-on-the-3d-view">The Buy Panel Lives on the 3D View<a href="https://learn.bitbybit.dev/blog/gamechanger-furniture-custom-gaming-chair-3d-configurator-on-shopify-with-3d-bits#the-buy-panel-lives-on-the-3d-view" class="hash-link" aria-label="Direct link to The Buy Panel Lives on the 3D View" title="Direct link to The Buy Panel Lives on the 3D View" translate="no">​</a></h2>
<p>One layout decision worth copying: the price and the add-to-cart button do not sit at the bottom of a long list of options. They float in a card over the bottom-right corner of the 3D view, together with the delivery promise, "at your home in 14 to 21 days". A second card in the bottom-left corner holds the small tools - the viewpoint toggle, the shadow toggle and the three icon buttons for the full view, reset and PDF.</p>
<p>These are Composer's <strong>areas</strong>: parts of the panel that can be placed over the 3D canvas instead of beside it. On a desktop screen the shopper always sees the price and the buy button, however deep they are in the options, while the tools card starts folded away and opens on a tap, so the chair keeps the screen.</p>
<h3 class="anchor anchorTargetStickyNavbar_Vzrq" id="built-for-phones">Built for Phones<a href="https://learn.bitbybit.dev/blog/gamechanger-furniture-custom-gaming-chair-3d-configurator-on-shopify-with-3d-bits#built-for-phones" class="hash-link" aria-label="Direct link to Built for Phones" title="Direct link to Built for Phones" translate="no">​</a></h3>
<p>Most shoppers will meet this chair on a phone, and a layout that works on a wide screen can turn into one long scroll on a small one. 3D Bits handles this on its own. On a phone the page splits in two: the <strong>3D view takes the top of the screen</strong>, and the <strong>options live in a panel below it that scrolls on its own</strong>. The shopper works down through size, materials, upgrades and lettering while the chair stays exactly where it is - it never jumps or shrinks as the panel scrolls, and it can still be spun and zoomed at any point. The two cards that float over the 3D view on a desktop cannot float on a phone, so they join the scrollable part below the panel instead, with the price and the buy button where a shopper expects to find them at the end.</p>
<p>None of this needed configuring. The panel is built once in Composer, and the app adapts it to the screen. The only choice a merchant makes is how much of the phone screen the 3D view should take, and that is set separately for desktop and mobile in the app's display settings - a view that fills three quarters of a laptop screen would swallow a whole phone, so the two get different answers.</p>
<p>Readers of the Strength Shop case study will recognise the pattern - 3D view fixed on top, options scrolling below - which their team built by hand for their custom interface. Here it comes built in.</p>
<div class="grid_hCdv" style="grid-template-columns:repeat(3, 1fr);gap:1rem"><img src="https://learn.bitbybit.dev/img/blog/gamechanger/gamechanger-custom-gaming-chair-3d-configurator-on-shopify-mobile-1.webp" alt="Gamechanger gaming chair configurator on mobile 1" loading="lazy" decoding="async" class="thumbnail_bKFe"><img src="https://learn.bitbybit.dev/img/blog/gamechanger/gamechanger-custom-gaming-chair-3d-configurator-on-shopify-mobile-2.webp" alt="Gamechanger gaming chair configurator on mobile 2" loading="lazy" decoding="async" class="thumbnail_bKFe"><img src="https://learn.bitbybit.dev/img/blog/gamechanger/gamechanger-custom-gaming-chair-3d-configurator-on-shopify-mobile-3.webp" alt="Gamechanger gaming chair configurator on mobile 3" loading="lazy" decoding="async" class="thumbnail_bKFe"></div>
<h2 class="anchor anchorTargetStickyNavbar_Vzrq" id="one-pdf-for-the-shopper-another-for-the-workshop">One PDF for the Shopper, Another for the Workshop<a href="https://learn.bitbybit.dev/blog/gamechanger-furniture-custom-gaming-chair-3d-configurator-on-shopify-with-3d-bits#one-pdf-for-the-shopper-another-for-the-workshop" class="hash-link" aria-label="Direct link to One PDF for the Shopper, Another for the Workshop" title="Direct link to One PDF for the Shopper, Another for the Workshop" translate="no">​</a></h2>
<p>A chair that costs this much is rarely bought on the first visit. People want to think about it, show it to someone, or compare two versions. So the <strong>customer PDF</strong> is switched on. One click on the PDF button and the shopper downloads a branded document with a cover, eight rendered pictures of their chair - overall, front, back, both sides, top, and two close-ups taken from the same camera positions the focals use for the seat and the armrest - a table of every choice with its colour swatch and its price, and a price summary.</p>
<div class="grid_hCdv" style="grid-template-columns:repeat(3, 1fr);gap:1rem"><img src="https://learn.bitbybit.dev/img/blog/gamechanger/gamechanger-stuhl-konfiguration-pdf-1.webp" alt="Gamechanger customer PDF with rendered chair views and configuration table 1" loading="lazy" decoding="async" class="thumbnail_bKFe"><img src="https://learn.bitbybit.dev/img/blog/gamechanger/gamechanger-stuhl-konfiguration-pdf-2.webp" alt="Gamechanger customer PDF with rendered chair views and configuration table 2" loading="lazy" decoding="async" class="thumbnail_bKFe"><img src="https://learn.bitbybit.dev/img/blog/gamechanger/gamechanger-stuhl-konfiguration-pdf-3.webp" alt="Gamechanger customer PDF with rendered chair views and configuration table 3" loading="lazy" decoding="async" class="thumbnail_bKFe"></div>
<div class="grid_hCdv" style="grid-template-columns:repeat(2, 1fr);gap:1rem"><img src="https://learn.bitbybit.dev/img/blog/gamechanger/gamechanger-stuhl-konfiguration-pdf-4.webp" alt="Gamechanger customer PDF with rendered chair views and configuration table 1" loading="lazy" decoding="async" class="thumbnail_bKFe"><img src="https://learn.bitbybit.dev/img/blog/gamechanger/gamechanger-stuhl-konfiguration-pdf-5.webp" alt="Gamechanger customer PDF with rendered chair views and configuration table 2" loading="lazy" decoding="async" class="thumbnail_bKFe"></div>
<p>A second document, the <strong>order PDF</strong>, is generated when the chair is added to the cart and attached to the order. This one is for the people who make the chair: the product description on the cover, one picture of the configured chair, and a numbered table of every choice with its swatch and the colour code the workshop needs. Prices are left out, because the workshop does not need them. A rendered "configuration preview" image is also saved with the order, so anyone opening it in Shopify sees the chair at a glance.</p>
<div class="grid_hCdv" style="grid-template-columns:repeat(1, 1fr);gap:1rem"><img src="https://learn.bitbybit.dev/img/blog/gamechanger/gamechanger-custom-gaming-chair-3d-configurator-on-shopify-13.webp" alt="Gamechanger order PDF for the workshop 1" loading="lazy" decoding="async" class="thumbnail_bKFe"><img src="https://learn.bitbybit.dev/img/blog/gamechanger/gamechanger-custom-gaming-chair-3d-configurator-on-shopify-14.webp" alt="Gamechanger order PDF for the workshop 2" loading="lazy" decoding="async" class="thumbnail_bKFe"><img src="https://learn.bitbybit.dev/img/blog/gamechanger/gamechanger-custom-gaming-chair-3d-configurator-on-shopify-15.webp" alt="Gamechanger order PDF for the workshop 3" loading="lazy" decoding="async" class="thumbnail_bKFe"></div>
<p>Finally, every configuration can be shared as a link - uploads included - so a shopper can send their exact chair to a friend, or come back to it a week later.
Try it yourself, <a href="https://gamechanger-germany.de/products/gaming-stuhl-konfigurator-gamechanger?bb-config=eyJjdHJsXzYxIjoic20iLCJjdHJsXzIzIjoicmVhbC1sZWF0aGVyIiwiY3RybF8zMCI6InNjaHdhcnoiLCJjdHJsXzMxIjoiYXRtLXNjaHdhcnoiLCJjdHJsXzMyIjoiYm9yZGVhdXgiLCJjdHJsXzI0IjoicmVhbC1sZWF0aGVyIiwiY3RybF8zNiI6InNlbmZnZWxiIiwiY3RybF8zNCI6InNjaHdhcnoiLCJjdHJsXzM3IjoiZ3JhdSIsImN0cmxfMjciOiJyZWFsLWxlYXRoZXIiLCJjdHJsXzQxIjoic2VuZmdlbGIiLCJjdHJsXzM5Ijoic2Nod2FyeiIsImN0cmxfNDIiOiJzY2h3YXJ6IiwiY3RybF8yOCI6InJlYWwtbGVhdGhlciIsImN0cmxfNDYiOiJzZW5mZ2VsYiIsImN0cmxfNDQiOiJnZWxiIiwiY3RybF80NyI6ImJvcmRlYXV4IiwiY3RybF82MiI6IndlaXMiLCJjdHJsXzI2Ijp0cnVlLCJjdHJsXzI1IjoicmVhbC1sZWF0aGVyIiwiY3RybF82OCI6InNjaHdhcnoiLCJjdHJsXzU0Ijoic2VuZmdlbGIiLCJjdHJsXzY3IjoiYXRtLXNjaG9rbyIsImN0cmxfNTIiOiJ3ZWlzIiwiY3RybF81NSI6ImdyYXUiLCJjdHJsXzY5Ijoic2Nod2FyeiIsImN0cmxfNjAiOnRydWUsImN0cmxfNTgiOnRydWUsImN0cmxfNTciOnRydWUsImN0cmxfNjMiOiJrbGVpbiIsImN0cmxfNTkiOiJwbGFzdGljIiwiY3RybF82NCI6ImRlc2lnbiIsImN0cmxfNjUiOiJ3ZWlzIiwiY3RybF8yMiI6ImdjLWxvZ28tZnJvbnQiLCJjdHJsXzIiOiIiLCJjdHJsXzIwIjoiTWF0YXMiLCJjdHJsXzE5IjoiU2NyaXB0IE1UOjpSZWd1bGFyIiwiY3RybF9uYWh0X2hleCI6IiNmMGVkZTYiLCJjdHJsXzYiOiJlbmdyYXZpbmciLCJjdHJsXzE4IjoiIiwiY3RybF8xNiI6IkdhbWUiLCJjdHJsXzE3IjoiRWRpc29uOjpSZWd1bGFyIiwiY3RybF8xMyI6dHJ1ZSwiY3RybF8xMSI6IjNEIEJpdHMiLCJjdHJsXzciOiJTY3JpcHQgTVQ6OlJlZ3VsYXIiLCJjdHJsXzE0Ijp0cnVlLCJjdHJsXzEyIjoiQml0YnliaXQiLCJjdHJsXzgiOiJTY3JpcHQgTVQ6OlJlZ3VsYXIiLCJjdHJsXzU2IjpmYWxzZSwiY3RybF9mb2N1c19hbGwiOjAsImN0cmxfcGRmIjowLCJjdHJsX3Jlc2V0X2FsbCI6MCwiY181NSI6dHJ1ZX0" target="_blank" rel="noopener noreferrer" class="">click this link</a></p>
<h2 class="anchor anchorTargetStickyNavbar_Vzrq" id="what-gamechanger-says">What Gamechanger Says<a href="https://learn.bitbybit.dev/blog/gamechanger-furniture-custom-gaming-chair-3d-configurator-on-shopify-with-3d-bits#what-gamechanger-says" class="hash-link" aria-label="Direct link to What Gamechanger Says" title="Direct link to What Gamechanger Says" translate="no">​</a></h2>
<div class="testimonial-item"><div class="testimonial-quote"><p>"We use 3D Bits for our gaming chair configurator and we're really happy with it. It's an all-in-one solution: 3D, UI and pricing in one app, no patchwork of plugins. Our customers can now configure the chair down to the smallest detail and see every change live in 3D.</p><p>The real highlight is Matas. We had some very specific requirements, e.g. individual colors with their own surcharge, which simply wasn't possible before. He made it happen, and fast. Every change request we sent was implemented quickly, and the new projection features are a nice bonus on top. If you need a configurator that actually adapts to your product instead of the other way around, give it a try."</p></div><p><strong>Gamechanger Germany</strong><br>
<!-- -->🇩🇪 Germany<br>
<a href="https://gamechanger-germany.com/" target="_blank" rel="noopener noreferrer" class=""><img decoding="async" loading="lazy" alt="Gamechanger" src="https://learn.bitbybit.dev/assets/images/gamechanger-logo-b757490168a0b34e45637bc89f8e6c37.webp" width="500" height="250" class="img_ev3q"></a></p></div>
<h2 class="anchor anchorTargetStickyNavbar_Vzrq" id="key-takeaways">Key Takeaways<a href="https://learn.bitbybit.dev/blog/gamechanger-furniture-custom-gaming-chair-3d-configurator-on-shopify-with-3d-bits#key-takeaways" class="hash-link" aria-label="Direct link to Key Takeaways" title="Direct link to Key Takeaways" translate="no">​</a></h2>
<p>Gamechanger's configurator shows what a merchant can build today with 3D Bits alone:</p>
<ol>
<li class=""><strong>Everything in one app</strong> - the option panel, the prices, the personalisation and the PDFs were all set up in Composer, with no options app, no pricing app and no custom development</li>
<li class=""><strong>Conditions keep a big panel small</strong> - fifty-three controls, and the shopper only ever sees the ones that apply to what they have chosen</li>
<li class=""><strong>Projected decals sell personalisation</strong> - initials and logos wrap onto the headrest the way embroidery does, in the thread colour the shopper picked, so the screen matches the finished chair</li>
<li class=""><strong>Focals do the guiding</strong> - eighteen automatic camera moves mean the shopper is always looking at the part they just changed</li>
<li class=""><strong>Two PDFs, two audiences</strong> - a branded document the shopper takes away, and a production document the workshop works from</li>
<li class=""><strong>Shopify stays Shopify</strong> - the configured price is charged exactly at checkout, and shipping, tax, discounts and payment are untouched</li>
</ol>
<h2 class="anchor anchorTargetStickyNavbar_Vzrq" id="ready-to-build-your-own-configurator">Ready to Build Your Own Configurator?<a href="https://learn.bitbybit.dev/blog/gamechanger-furniture-custom-gaming-chair-3d-configurator-on-shopify-with-3d-bits#ready-to-build-your-own-configurator" class="hash-link" aria-label="Direct link to Ready to Build Your Own Configurator?" title="Direct link to Ready to Build Your Own Configurator?" translate="no">​</a></h2>
<p>If you sell products that customers want to make their own, 3D Bits can give them the page Gamechanger's shoppers have. Personalisation, PDF documents and parts lists are part of the <strong>Pro plan</strong>, which also includes hands-on help from us when you set up your first configurator. Guided camera moves and points of interest start on the <strong>Standard plan</strong>, and the option panel with live pricing is included on every plan.</p>
<p><strong>Interested in exploring what's possible? <a href="mailto:info@bitbybit.dev" target="_blank" rel="noopener noreferrer" class="">Reach out to us</a>.</strong></p>
<p><a href="https://apps.shopify.com/3d-bits-1" target="_blank" rel="noopener noreferrer" class="">Get started with 3D Bits</a></p>]]></content>
        <author>
            <name>Matas Ubarevičius</name>
            <uri>https://www.linkedin.com/in/matas-ubarevicius/</uri>
        </author>
        <category label="Bitbybit" term="Bitbybit"/>
        <category label="Client" term="Client"/>
        <category label="Customer" term="Customer"/>
        <category label="B2C" term="B2C"/>
        <category label="Case Study" term="Case Study"/>
        <category label="Furniture" term="Furniture"/>
        <category label="Gaming Chair" term="Gaming Chair"/>
        <category label="Shopify" term="Shopify"/>
        <category label="3D Bits" term="3D Bits"/>
        <category label="Germany" term="Germany"/>
        <category label="GLTF" term="GLTF"/>
        <category label="Personalization" term="Personalization"/>
        <category label="Pricing" term="Pricing"/>
        <category label="PDF" term="PDF"/>
    </entry>
    <entry>
        <title type="html"><![CDATA[The Browser Is the New CAD: From Code to Configurable Products]]></title>
        <id>https://learn.bitbybit.dev/blog/browser-is-the-new-cad-from-code-to-configurable-products</id>
        <link href="https://learn.bitbybit.dev/blog/browser-is-the-new-cad-from-code-to-configurable-products"/>
        <updated>2026-05-22T00:00:00.000Z</updated>
        <summary type="html"><![CDATA[An introduction to the talk delivered at Hannover Messe 2026 and featured by CAE-Forum: how browser-based CAD configurators extend professional tools into scalable, production-ready web experiences.]]></summary>
        <content type="html"><![CDATA[<p><img decoding="async" loading="lazy" alt="Matas Ubarevičius at Hannover Messe 2026" src="https://learn.bitbybit.dev/assets/images/bitbybit-dev-hannover-newsletter-cae-forum-0a3fc4bc6862d8aed049b2bf3039bbb4.webp" title="The Browser Is the New CAD - Hannover Messe 2026" width="1920" height="1080" class="img_ev3q"></p>
<p><em>In April 2026 Bitbybit travelled to Hannover, where Matas Ubarevičius delivered the <a href="https://www.hannovermesse.de/event/the-browser-is-the-new-cad-from-code-to-configurable-products/tal/97742" target="_blank" rel="noopener noreferrer" class="">presentation titled "The Browser Is the New CAD: From Code to Configurable Products"</a> at <a href="https://www.hannovermesse.de/" target="_blank" rel="noopener noreferrer" class="">Hannover Messe</a>, the world's leading trade fair for the manufacturing industry. The talk was accepted by <a href="https://cae-forum.com/" target="_blank" rel="noopener noreferrer" class="">CAE-Forum</a> for their curated presentation stage and featured in their newsletter. In this blog post he shares his experience from the event and explains why this discourse matters for the manufacturing industry today.</em></p>
<h2 class="anchor anchorTargetStickyNavbar_Vzrq" id="open-the-live-presentation">Open the Live Presentation<a href="https://learn.bitbybit.dev/blog/browser-is-the-new-cad-from-code-to-configurable-products#open-the-live-presentation" class="hash-link" aria-label="Direct link to Open the Live Presentation" title="Direct link to Open the Live Presentation" translate="no">​</a></h2>
<p>The full Hannover Messe 2026 presentation runs as a browser app. Press <strong>Start Script</strong> below to load it inline, or use the <strong>Fullscreen</strong> button in the embedded toolbar to view it edge-to-edge.</p>
<div style="position:relative;width:100%;height:700px;overflow:hidden;margin-bottom:20px;background-color:var(--ifm-background-color, #ffffff)" class="bitbybit-canvas-container"><div style="width:100%;height:100%;display:flex;flex-direction:column;justify-content:center;align-items:center;background-image:url(https://bitbybit.dev/landscape.jpeg);background-size:cover;background-position:center;text-align:center;padding:20px;box-sizing:border-box"><a href="https://bitbybit.dev/" target="_blank" rel="noopener noreferrer"><img src="https://learn.bitbybit.dev/img/logo-gold-small.png" alt="Bitbybit Platform" style="width:80px;margin-bottom:15px"></a><h2 style="color:white;font-size:24px;font-weight:bold;text-shadow:1px 1px 3px rgba(0,0,0,0.7);margin-bottom:20px">The Browser Is the New CAD - Hannover Messe 2026 Presentation</h2><button style="padding:12px 24px;font-size:18px;font-weight:bold;cursor:pointer;background-color:var(--ifm-color-primary);color:var(--ifm-button-color, white);border:none;border-radius:var(--ifm-button-border-radius);box-shadow:var(--ifm-global-shadow-lw);margin-bottom:15px">Enter Presentation</button></div></div>
<h2 class="anchor anchorTargetStickyNavbar_Vzrq" id="a-strange-thing-happened-to-cad">A Strange Thing Happened to CAD<a href="https://learn.bitbybit.dev/blog/browser-is-the-new-cad-from-code-to-configurable-products#a-strange-thing-happened-to-cad" class="hash-link" aria-label="Direct link to A Strange Thing Happened to CAD" title="Direct link to A Strange Thing Happened to CAD" translate="no">​</a></h2>
<p>For most of its history, CAD lived in a very specific place: on a powerful workstation, behind a license dongle, operated by someone with years of training and a deep mental map of menus, modifiers, and shortcuts. That world is not going away. The engineers, architects, and product designers who shape our physical reality still need professional desktop tools, and they will continue to need them for the foreseeable future.</p>
<p>But something quieter has been happening in parallel, and at <a class="" href="https://learn.bitbybit.dev/blog/hannover-messe-2026">Hannover Messe 2026</a> I had the opportunity to talk about it directly to the people who care most: the manufacturers, technology leaders, and industrial innovators who already know how hard it is to translate engineering intent into something a customer can actually use. The <a href="https://www.hannovermesse.de/event/the-browser-is-the-new-cad-from-code-to-configurable-products/tal/97742" target="_blank" rel="noopener noreferrer" class="">official talk page</a> is still on the Hannover Messe site. I am grateful to <a href="https://cae-forum.com/" target="_blank" rel="noopener noreferrer" class=""><strong>CAE-Forum</strong></a>, who curated the presentation stage and selected this talk to be featured in their newsletter.</p>
<p>The shift is this. <strong>The browser has quietly become capable enough to be a serious CAD environment.</strong> Not a viewer. Not a thin client streaming pixels from a server. An actual environment where geometry is created, modified, evaluated, and rendered - in real time, on a device almost everyone already owns, behind a URL anyone can open.</p>
<p>That single change has consequences that ripple through how products are sold, configured, manufactured, and supported. And it is what the entire talk was built around.</p>
<h2 class="anchor anchorTargetStickyNavbar_Vzrq" id="who-this-talk-was-for">Who This Talk Was For<a href="https://learn.bitbybit.dev/blog/browser-is-the-new-cad-from-code-to-configurable-products#who-this-talk-was-for" class="hash-link" aria-label="Direct link to Who This Talk Was For" title="Direct link to Who This Talk Was For" translate="no">​</a></h2>
<p>Hannover Messe is not a CAD conference. It is the world's leading trade fair for the manufacturing industry, and the crowd reflects that: people who build machines, run factories, integrate systems, and ship physical products at scale. The motto of the 2026 edition was <strong>"Think Tech Forward,"</strong> and the program leaned heavily into industrial AI, automation, energy infrastructure, and digital manufacturing.</p>
<p>In that context, "CAD for everyone" is the kind of phrase that can earn an eye-roll from a room full of experts - and rightly so. Real engineering is not democratized by sliders and dropdowns. There are tolerances, materials, load paths, regulations, and edge cases that cannot be hidden behind a friendly UI without consequences.</p>
<p>So the talk was not about handing professional CAD to amateurs. It was about something more useful: <strong>how to take the parametric expertise that already exists inside a company and project it outward, into the hands of customers, dealers, sales teams, and end users - without losing control of the engineering intent behind it.</strong></p>
<p>Most industrial companies recognize that problem immediately. They have configurators, product variants, CPQ systems, order forms, PDFs full of options. What they often do not have is a way to let a customer <em>see</em> and <em>manipulate</em> the actual product they are buying, in 3D, in the browser, bound to the same rules their engineers already use.</p>
<h2 class="anchor anchorTargetStickyNavbar_Vzrq" id="opening-with-the-demos">Opening With the Demos<a href="https://learn.bitbybit.dev/blog/browser-is-the-new-cad-from-code-to-configurable-products#opening-with-the-demos" class="hash-link" aria-label="Direct link to Opening With the Demos" title="Direct link to Opening With the Demos" translate="no">​</a></h2>
<p>Rather than build up to the demos slowly, I opened the talk with them. Before any architecture diagrams, before any platform pitch, I wanted the audience to see what browser-based, configurable CAD actually feels like when it is solving a real commercial problem. Each demo was chosen to illustrate a <em>different</em> shape of that problem.</p>
<h3 class="anchor anchorTargetStickyNavbar_Vzrq" id="the-shim-shack---real-time-cad-kernel-in-the-browser">The Shim Shack - real-time CAD kernel in the browser<a href="https://learn.bitbybit.dev/blog/browser-is-the-new-cad-from-code-to-configurable-products#the-shim-shack---real-time-cad-kernel-in-the-browser" class="hash-link" aria-label="Direct link to The Shim Shack - real-time CAD kernel in the browser" title="Direct link to The Shim Shack - real-time CAD kernel in the browser" translate="no">​</a></h3>
<p><a class="" href="https://learn.bitbybit.dev/blog/the-shim-shack-build-your-parts-3d-configurators-bitbybit-use-case"><img decoding="async" loading="lazy" alt="The Shim Shack 3D configurators powered by Bitbybit Runner" src="https://learn.bitbybit.dev/assets/images/the-shim-shack-build-your-parts-3d-configurators-bitbybit-use-case-b217ba6a6cf212e6f19eca38f8cb3de3.webp" title="The Shim Shack - parametric 3D configurators" width="4032" height="2268" class="img_ev3q"></a></p>
<p><strong><a class="" href="https://learn.bitbybit.dev/blog/the-shim-shack-build-your-parts-3d-configurators-bitbybit-use-case">The Shim Shack</a></strong> is a real-time, CAD-kernel-driven configurator running fully in the browser. Every change a user makes flows through an actual geometry kernel and produces a precise, manufacturable result on the spot - with STEP and DXF export at the end. This is the case where the browser is doing serious CAD work, not just visualization.</p>
<h3 class="anchor anchorTargetStickyNavbar_Vzrq" id="strength-shop---3d-bits-for-shopify-tuned-for-modular-products">Strength Shop - 3D Bits for Shopify, tuned for modular products<a href="https://learn.bitbybit.dev/blog/browser-is-the-new-cad-from-code-to-configurable-products#strength-shop---3d-bits-for-shopify-tuned-for-modular-products" class="hash-link" aria-label="Direct link to Strength Shop - 3D Bits for Shopify, tuned for modular products" title="Direct link to Strength Shop - 3D Bits for Shopify, tuned for modular products" translate="no">​</a></h3>
<p><a class="" href="https://learn.bitbybit.dev/blog/strength-shop-riot-mrr-75-power-rack-3d-bits-configurator-on-shopify"><img decoding="async" loading="lazy" alt="Strength Shop Pro Power Rack 3D Bits configurator on Shopify" src="https://learn.bitbybit.dev/assets/images/strength-shop-riot-mrr-75-power-rack-3d-bits-configurator-on-shopify-da2e4a02f88a853c634897de531bdb02.webp" title="Strength Shop - 3D Bits configurator on Shopify" width="3840" height="2160" class="img_ev3q"></a></p>
<p><strong><a class="" href="https://learn.bitbybit.dev/blog/strength-shop-riot-mrr-75-power-rack-3d-bits-configurator-on-shopify">Strength Shop</a></strong> illustrates something quite different: a 3D Bits for Shopify experience, built with Bitbybit's no-code editor and tuned for modular, performant products that need to feel native inside an e-commerce flow. The goal here is not to expose a full kernel - it is to deliver a fast, beautiful, conversion-friendly configurator embedded directly into the webshop.</p>
<h3 class="anchor anchorTargetStickyNavbar_Vzrq" id="stock-mhs---a-fully-custom-configurator-for-internal-sales">Stock MHS - a fully custom configurator for internal sales<a href="https://learn.bitbybit.dev/blog/browser-is-the-new-cad-from-code-to-configurable-products#stock-mhs---a-fully-custom-configurator-for-internal-sales" class="hash-link" aria-label="Direct link to Stock MHS - a fully custom configurator for internal sales" title="Direct link to Stock MHS - a fully custom configurator for internal sales" translate="no">​</a></h3>
<p><a class="" href="https://learn.bitbybit.dev/blog/stockmhs-uhmw-spiral-chute-3d-configurator"><img decoding="async" loading="lazy" alt="Stock MHS UHMW spiral chute 3D configurator" src="https://learn.bitbybit.dev/assets/images/stockmhs-uhmw-spiral-chute-3d-configurator-324aae8ccb0bf513bda6981cba2ee80b.webp" title="Stock MHS - UHMW spiral chute 3D configurator" width="1920" height="1080" class="img_ev3q"></a></p>
<p><strong><a class="" href="https://learn.bitbybit.dev/blog/stockmhs-uhmw-spiral-chute-3d-configurator">Stock MHS</a></strong> sits at yet another end of the spectrum: a fully custom configurator built and tuned to support internal sales processes. The interface, the rules, and the workflow are all shaped to how a specific team sells, quotes, and hands work over to production - the configurator is part of their operational toolchain, not a public storefront feature.</p>
<p>Three demos, three very different problem shapes, one underlying platform. That contrast was the point. Browser-based CAD is not a single product category; it is a foundation flexible enough to power a quick Shopify add-on <em>and</em> a deep, customer-specific sales tool.</p>
<h2 class="anchor anchorTargetStickyNavbar_Vzrq" id="extend-do-not-replace---usually">Extend, Do Not Replace - Usually<a href="https://learn.bitbybit.dev/blog/browser-is-the-new-cad-from-code-to-configurable-products#extend-do-not-replace---usually" class="hash-link" aria-label="Direct link to Extend, Do Not Replace - Usually" title="Direct link to Extend, Do Not Replace - Usually" translate="no">​</a></h2>
<p>The framing I used to tie those demos together is this: <strong>we are extending CAD, not replacing it.</strong></p>
<p>Professional desktop tools remain the place where complex parametric logic, manufacturing detail, and engineering judgment are encoded. They are excellent at this and, even as AI becomes more capable inside them, they will keep needing to be understandable to humans - because the people accountable for the engineering still need to read, review, and trust what is being produced. AI accelerates the expert; it does not relieve them of the need to comprehend what is on the screen. That constraint is not going away.</p>
<p>What the browser adds is a second surface - an outward-facing one - where the parametric logic encoded by experts can be <em>consumed</em> by people who do not need to (and should not have to) understand it.</p>
<p>In this model:</p>
<ul>
<li class=""><strong>The expertise stays with you.</strong> Engineers still own the rules, the constraints, the families, the manufacturing data.</li>
<li class=""><strong>The interface becomes approachable for your customers.</strong> What ends up in the browser is a carefully chosen subset: the parameters that matter to the buyer, the visual feedback that helps them decide, and the validation that prevents them from configuring something you cannot make.</li>
</ul>
<p>That said, "extend" is the common case, not the universal one. Modern CAD kernels running in the browser and in the cloud are powerful enough that, in some projects, they genuinely <strong>replace</strong> parts of the traditional pipeline - generating parametric models end-to-end without a desktop tool in the loop at all. That is not necessary for most use cases, but it is on the table for more complex applications where it makes sense, and we have shipped projects where it does.</p>
<h2 class="anchor anchorTargetStickyNavbar_Vzrq" id="where-these-configurators-actually-live">Where These Configurators Actually Live<a href="https://learn.bitbybit.dev/blog/browser-is-the-new-cad-from-code-to-configurable-products#where-these-configurators-actually-live" class="hash-link" aria-label="Direct link to Where These Configurators Actually Live" title="Direct link to Where These Configurators Actually Live" translate="no">​</a></h2>
<p>A common misunderstanding about browser-based CAD is that it produces standalone tools - little 3D playgrounds that live on their own subdomain and do not connect to anything important. In practice the opposite is true. The configurators shown during the talk live exactly where commerce and operations happen:</p>
<ul>
<li class="">Inside <strong>e-commerce platforms and webshops</strong>, where the 3D model is part of the buying flow.</li>
<li class="">Inside <strong>ERP and PIM systems</strong>, so the configured product maps directly to a SKU, a BOM, and an order.</li>
<li class="">Inside <strong>service portals and dealer tools</strong>, so partners can configure on behalf of customers using the same engine.</li>
<li class="">Inside <strong>internal sales applications</strong>, so quoting and visualization are no longer disconnected.</li>
</ul>
<p>A configurator that updates the cart, the price, the lead time, and the production order is not a demo. It is infrastructure.</p>
<h2 class="anchor anchorTargetStickyNavbar_Vzrq" id="client-side-and-server-side-together">Client-Side and Server-Side, Together<a href="https://learn.bitbybit.dev/blog/browser-is-the-new-cad-from-code-to-configurable-products#client-side-and-server-side-together" class="hash-link" aria-label="Direct link to Client-Side and Server-Side, Together" title="Direct link to Client-Side and Server-Side, Together" translate="no">​</a></h2>
<p>Can the browser really do all of this? The browser alone, sometimes. The browser plus the cloud, almost always.</p>
<p>The architecture I walked through is deliberately hybrid:</p>
<ul>
<li class=""><strong>Client-side</strong>, the browser handles interaction, visualization, real-time geometry updates, and immediate feedback. When a user drags a slider, rotates the model, or toggles an option, they should not be waiting on a network round-trip. WebGPU, WebAssembly, and SharedArrayBuffer-driven multithreading make this responsiveness possible even for non-trivial geometry.</li>
<li class=""><strong>Server-side</strong>, heavier computation runs where it belongs. This is what <a class="" href="https://learn.bitbybit.dev/blog/introducing-managed-bitbybit-3d-cad-cloud-rest-api">Bitbybit CAD Cloud</a> is for: long-running geometry computations, large parametric assembly generation, complex boolean operations, mesh preparation for manufacturing, and any workload that depends on data the browser should not have direct access to. Those jobs are offloaded to scalable cloud workers and streamed back as results.</li>
</ul>
<p>The point is not to pick a side. It is to put each piece of work where it makes sense, and make the boundary invisible to the end user. From their perspective, they are using a fast, capable 3D tool in a tab. Behind the scenes, the system is quietly deciding what to compute locally and what to delegate to CAD Cloud, and scaling the remote side up or down based on demand.</p>
<p>This is what makes it realistic to serve thousands of concurrent users without compromising on either performance or fidelity - and what makes the same underlying platform suitable for everything from a Shopify-embedded configurator to a heavy internal engineering tool.</p>
<h2 class="anchor anchorTargetStickyNavbar_Vzrq" id="what-makes-this-possible-now">What Makes This Possible Now<a href="https://learn.bitbybit.dev/blog/browser-is-the-new-cad-from-code-to-configurable-products#what-makes-this-possible-now" class="hash-link" aria-label="Direct link to What Makes This Possible Now" title="Direct link to What Makes This Possible Now" translate="no">​</a></h2>
<p>It is worth pausing on <em>why</em> this is achievable in 2026 specifically. Several independent curves had to cross:</p>
<ul>
<li class=""><strong>WebAssembly</strong> matured to where CAD kernels and geometry libraries that used to require native binaries now run in the browser at near-native speed.</li>
<li class=""><strong>WebGPU</strong> gave browsers direct, modern access to the GPU, closing most of the visual gap between web and desktop 3D.</li>
<li class=""><strong>Browser-based CAD kernels</strong> - including ports of well-known geometry engines - became stable enough to power production applications, not just demos.</li>
<li class=""><strong>Cloud compute</strong> became cheap and elastic enough that the server side of the hybrid architecture is just an implementation detail.</li>
<li class=""><strong>Modern frontend frameworks and 3D engines</strong> made it practical to build configurators that feel like first-class applications.</li>
</ul>
<p>None of these on their own would be enough. Together, they make browser-based CAD a genuinely viable layer in an industrial software stack.</p>
<h2 class="anchor anchorTargetStickyNavbar_Vzrq" id="where-bitbybit-fits-in">Where Bitbybit Fits In<a href="https://learn.bitbybit.dev/blog/browser-is-the-new-cad-from-code-to-configurable-products#where-bitbybit-fits-in" class="hash-link" aria-label="Direct link to Where Bitbybit Fits In" title="Direct link to Where Bitbybit Fits In" translate="no">​</a></h2>
<p>The platform behind every demo in the talk is <a href="https://bitbybit.dev/" target="_blank" rel="noopener noreferrer" class="">bitbybit.dev</a>.</p>
<p>Bitbybit is built for developers and CAD professionals who want to bring advanced geometry and parametric workflows to the web. It combines an open-source core with proprietary apps and cloud services, and it exposes that capability through three complementary surfaces:</p>
<ul>
<li class=""><strong>Visual programming</strong>, for people who think in nodes and flows and want to assemble parametric logic without writing code.</li>
<li class=""><strong>TypeScript</strong>, for developers who want full control, version-controlled scripts, and integration with the rest of their stack.</li>
<li class=""><strong>No-code interfaces</strong>, for the end-user side of the equation - the configurators themselves, where the underlying complexity is hidden behind clean, purpose-built UI.</li>
</ul>
<p>Parallel to all that sits <strong>Bitbybit CAD Cloud</strong>, which carries the heavier loads: long-running geometry computations and parametric assembly generation that would be impractical to run entirely in a browser tab.</p>
<p>The same geometry engine runs across all of these surfaces. A model authored visually can be wrapped in TypeScript, deployed into a webshop, served through the cloud, and exposed to AI agents without doing heavy rewriting on the underlying logic at each step. The same algorithms are accessible throughout the ecosystem.</p>
<h2 class="anchor anchorTargetStickyNavbar_Vzrq" id="where-ai-actually-helps-today">Where AI Actually Helps Today<a href="https://learn.bitbybit.dev/blog/browser-is-the-new-cad-from-code-to-configurable-products#where-ai-actually-helps-today" class="hash-link" aria-label="Direct link to Where AI Actually Helps Today" title="Direct link to Where AI Actually Helps Today" translate="no">​</a></h2>
<p>AI shows up in this picture in two distinct places, and it is worth being precise about which is which.</p>
<p>The place where it already pays off is on the <strong>building side</strong>. Bitbybit exposes <a class="" href="https://learn.bitbybit.dev/blog/ai-prompt-contexts">AI agent prompt contexts</a> that let coding agents work against its API directly - so developers building configurators can let an AI assistant write, refactor, and extend Bitbybit code with real awareness of how the platform actually works. This meaningfully shortens the path from "we want a configurator that does X" to a working prototype.</p>
<p>The other place AI will matter is on the <strong>design side</strong> - actually shaping the parametric product itself. That is still finding its footing, and an expert needs to stay close to the loop while it does. What is already clear, though, is the second-order effect: as agents make it easier to build configurators and generate parametric models, the volume of geometry that needs to be computed, assembled, and served goes up sharply. That is exactly where <strong>Bitbybit CAD Cloud</strong> comes in - and where we see our own future. The configurators still have to be meant for humans at the end of the line, but the compute behind them is going to need a lot more room to run.</p>
<h2 class="anchor anchorTargetStickyNavbar_Vzrq" id="why-this-matters-for-manufacturing">Why This Matters for Manufacturing<a href="https://learn.bitbybit.dev/blog/browser-is-the-new-cad-from-code-to-configurable-products#why-this-matters-for-manufacturing" class="hash-link" aria-label="Direct link to Why This Matters for Manufacturing" title="Direct link to Why This Matters for Manufacturing" translate="no">​</a></h2>
<p>For the Hannover Messe audience, and for the wider CAE-Forum readership, the practical takeaway is this. The companies that figure out how to <strong>expose their parametric expertise through the browser, safely and at scale</strong>, are going to have a structural advantage in how they sell and support configurable products.</p>
<p>That advantage shows up in several places at once: shorter sales cycles, because customers can self-configure with confidence; fewer errors, because the configurator enforces the same rules as the engineers; better data, because every configuration is captured as structured input; stronger customer relationships, because the buying experience itself becomes a tool customers actually want to use; and more leverage from engineering, because the parametric work done once gets reused across web, sales, and production. The pipeline behind all of this has to stay <strong>deterministic</strong>, though - hallucinated products cannot be manufactured.</p>
<p>None of this requires abandoning the desktop tools that already work. It requires building a thin, well-designed layer on top of them - and putting that layer where the customer already is, which is the browser.</p>
<p>The shift worth paying attention to is not that engineering becomes easier. It is that the value of engineering becomes visible and usable in places it has never quite reached before. Configurators are unforgiving about gaps in logic, and that turns out to be a useful side effect: they push teams to enforce standards and structure their workflows whether they planned to or not. <strong>The browser is not replacing CAD. It is extending its reach - and, where it makes sense, quietly taking on parts of the job itself.</strong></p>
<hr>
<p>My thanks to <a href="https://cae-forum.com/" target="_blank" rel="noopener noreferrer" class=""><strong>CAE-Forum</strong></a> for featuring this talk in their newsletter, and to everyone who stopped by at <a href="https://www.hannovermesse.de/event/the-browser-is-the-new-cad-from-code-to-configurable-products/tal/97742" target="_blank" rel="noopener noreferrer" class="">Hannover Messe 2026</a> to continue the conversation. For questions or to discuss a configurator project, <a href="mailto:info@bitbybit.dev" target="_blank" rel="noopener noreferrer" class="">get in touch</a>.</p>]]></content>
        <author>
            <name>Matas Ubarevičius</name>
            <uri>https://www.linkedin.com/in/matas-ubarevicius/</uri>
        </author>
        <category label="Bitbybit" term="Bitbybit"/>
        <category label="CAD" term="CAD"/>
        <category label="Enterprise" term="Enterprise"/>
        <category label="Cloud" term="Cloud"/>
        <category label="Configurator" term="Configurator"/>
        <category label="Hannover Messe" term="Hannover Messe"/>
        <category label="AI" term="AI"/>
    </entry>
    <entry>
        <title type="html"><![CDATA[Bitbybit v1.0.0: New Base for Cloud and Web CAD]]></title>
        <id>https://learn.bitbybit.dev/blog/bitbybit-v1-release</id>
        <link href="https://learn.bitbybit.dev/blog/bitbybit-v1-release"/>
        <updated>2026-05-10T00:00:00.000Z</updated>
        <summary type="html"><![CDATA[Bitbybit v1.0.0 introduces a native OCCT 8 kernel, complete assembly support, and the Managed CAD Cloud infrastructure.]]></summary>
        <content type="html"><![CDATA[<p><img decoding="async" loading="lazy" alt="Bitbybit v1.0.0" src="https://learn.bitbybit.dev/assets/images/bitbybit-v1-new-base-for-cloud-and-web-cad-4603f97be5a01504e3b03da51d95dc24.webp" title="Bitbybit v1.0.0" width="1920" height="1080" class="img_ev3q"></p>
<p>After nearly <strong>100 releases</strong> in the 0.x.x range and a release candidate phase, <strong>Bitbybit v1.0.0</strong> is officially here. This release brings our new CAD foundation, cloud infrastructure, and an expanded toolkit for developers.</p>
<p>This post outlines the major architectural changes and new capabilities available across our NPM packages, TypeScript SDK, Bitbybit Studio, and the Managed CAD Cloud.</p>
<div class="grid_hCdv" style="grid-template-columns:repeat(1, 1fr);gap:1rem"><img src="https://learn.bitbybit.dev/img/bitbybit-dev-cad-platform.webp" alt="BITBYBIT CAD PLATFORM OVERVIEW 1" loading="lazy" decoding="async" class="thumbnail_bKFe"></div>
<p>Check out this in-depth dive into Bitbybit platform. Matas shows how various parts of Bitbybit can be used in your websites.</p>
<div class="responsive-video-container"><iframe width="560" height="315" src="https://www.youtube.com/embed/vz1v18qoxC0" title="Bitbybit v1.0.0 - New Base for Cloud and Web CAD" frameborder="0" allow="accelerometer; autoplay; clipboard-write; encrypted-media; gyroscope; picture-in-picture; web-share; fullscreen" allowfullscreen=""></iframe></div>
<h2 class="anchor anchorTargetStickyNavbar_Vzrq" id="native-occt-8-kernel">Native OCCT 8 Kernel<a href="https://learn.bitbybit.dev/blog/bitbybit-v1-release#native-occt-8-kernel" class="hash-link" aria-label="Direct link to Native OCCT 8 Kernel" title="Direct link to Native OCCT 8 Kernel" translate="no">​</a></h2>
<p>The biggest change in v1.0.0 happens under the hood. We have transitioned away from our OpenCascade.js dependency and rebuilt Bitbybit's core directly on top of the native <a href="https://github.com/Open-Cascade-SAS/OCCT" target="_blank" rel="noopener noreferrer" class="">OCCT C++ library</a>. By compiling directly to WebAssembly with bindings customized for Bitbybit, we've improved overall performance and maintainability.</p>
<p>Powered first by <strong>OCCT v8.0</strong> (<a href="https://github.com/Open-Cascade-SAS/OCCT/discussions/1275" target="_blank" rel="noopener noreferrer" class="">Release Notes</a> from April 8'th 2026), this new kernel provides clear performance improvements in boolean operations and filleting, and ensures the architecture remains fully under our control.</p>
<p>To accommodate different deployment needs, Bitbybit now offers three WebAssembly builds:</p>
<ul>
<li class=""><strong>32-bit:</strong> Compatible with mobile browsers and older hardware.</li>
<li class=""><strong>64-bit:</strong> Handles larger models with up to 16 GB of memory allocation.</li>
<li class=""><strong>64-bit multi-threaded:</strong> Designed for higher throughput and parallel operations.</li>
</ul>
<p>You can select your preferred variant when scaffolding a project via <code>npx @bitbybit-dev/create-app</code>.</p>
<h2 class="anchor anchorTargetStickyNavbar_Vzrq" id="step-assembly-support">STEP Assembly Support<a href="https://learn.bitbybit.dev/blog/bitbybit-v1-release#step-assembly-support" class="hash-link" aria-label="Direct link to STEP Assembly Support" title="Direct link to STEP Assembly Support" translate="no">​</a></h2>
<div class="grid_hCdv" style="grid-template-columns:repeat(1, 1fr);gap:1rem"><img src="https://bitbybit.dev/files/site/blog/step-assembly-support/step-to-gltf-in-bitbybit-rete-editor.webp" alt="STEP to GLTF Assembly conversion in Bitbybit Studio Rete editor 1" loading="lazy" decoding="async" class="thumbnail_bKFe"></div>
<p>Bitbybit can now handle assemblies natively in the browser, preserving part hierarchies, positioning data, and colors.</p>
<p>The expanded <code>occt.assembly</code> module is split into two workflows:</p>
<p><strong>Assembly Management:</strong> Construct and export documents. Group shapes, assign names and colors, and position instances using translation, rotation, and scale. Import existing STEP files (including compressed STEP-Z), modify their structures, and export them back with colors preserved, or convert them directly to GLTF/GLB formats for web and AR applications.</p>
<p><strong>Assembly Querying:</strong> Inspect your assemblies. Extract the complete hierarchy tree, isolate specific shapes by label, retrieve transforms, and parse metadata.</p>
<p><a class="" href="https://learn.bitbybit.dev/learn/code/common/occt/assembly/create-assembly"><strong>Learn How To Create Assembly</strong></a></p>
<p>We've also added three IO methods:</p>
<ul>
<li class=""><code>convertStepToGltf</code>: One-call conversion preserving hierarchy, colors, and transforms.</li>
<li class=""><code>convertStepToGltfAdvanced</code>: Conversion with fine-grained meshing and export controls.</li>
<li class=""><code>parseStepToJson</code>: JSON inspection without full geometry processing.</li>
</ul>
<p><em>A brief note on colors:</em> Standard STEP exporters frequently strip visual data. Bitbybit uses OCCT's XCAF framework to embed color information, so models exported from Bitbybit retain their appearance when imported into tools like FreeCAD.</p>
<h2 class="anchor anchorTargetStickyNavbar_Vzrq" id="the-managed-cad-cloud">The Managed CAD Cloud<a href="https://learn.bitbybit.dev/blog/bitbybit-v1-release#the-managed-cad-cloud" class="hash-link" aria-label="Direct link to The Managed CAD Cloud" title="Direct link to The Managed CAD Cloud" translate="no">​</a></h2>
<div class="grid_hCdv" style="grid-template-columns:repeat(1, 1fr);gap:1rem"><img src="https://learn.bitbybit.dev/img/blog/bitbybit-3d-cad-cloud.webp" alt="Managed Bitbybit CAD Cloud architecture 1" loading="lazy" decoding="async" class="thumbnail_bKFe"></div>
<p>While Bitbybit remains browser-first, enterprise deployments often require server-side computing. The <a class="" href="https://learn.bitbybit.dev/api/cloud-api"><strong>Managed Bitbybit CAD Cloud</strong></a> provides a RESTful API designed to offload heavy geometry computations to our server infrastructure.</p>
<p>The CAD Cloud is the ideal solution if you want to avoid bundling heavy CAD libraries into your website, need to execute complex parametric scripts that take a long time to compute, or are looking to process batches of CAD operations in parallel.</p>
<div class="grid_hCdv" style="grid-template-columns:repeat(2, 1fr);gap:1rem"><img src="https://learn.bitbybit.dev/img/cad-cloud/bitbybit-cad-cloud-batch-compound-task-processing.webp" alt="Managed Bitbybit CAD Cloud processing and model generation 1" loading="lazy" decoding="async" class="thumbnail_bKFe"><img src="https://learn.bitbybit.dev/img/cad-cloud/bitbybit-cad-cloud-batch-model-generation.webp" alt="Managed Bitbybit CAD Cloud processing and model generation 2" loading="lazy" decoding="async" class="thumbnail_bKFe"></div>
<p>Importantly, all Bitbybit algorithms - from the base and OCCT packages to other libraries - are  available on our managed CAD Cloud. Because it provides a standard REST API, it can be seamlessly called from any backend programming language. You can execute parametric algorithms on the server, manage your API keys, and receive the results to your backend. This infrastructure is now production-ready and handles active workflows.</p>
<p>Furthermore, when custom pipelines are not enough, enterprise customers can contact us to implement and run custom tenant workflows on our managed infrastructure.</p>
<h2 class="anchor anchorTargetStickyNavbar_Vzrq" id="the-cad-cloud-typescript-sdk">The CAD Cloud TypeScript SDK<a href="https://learn.bitbybit.dev/blog/bitbybit-v1-release#the-cad-cloud-typescript-sdk" class="hash-link" aria-label="Direct link to The CAD Cloud TypeScript SDK" title="Direct link to The CAD Cloud TypeScript SDK" translate="no">​</a></h2>
<p>To help integrate the cloud capabilities into your backend, we're introducing <a href="https://www.npmjs.com/package/@bitbybit-dev/cad-cloud-sdk" target="_blank" rel="noopener noreferrer" class=""><code>@bitbybit-dev/cad-cloud-sdk</code></a>. This standalone npm package connects your TypeScript infrastructure to our engine.</p>
<p>Key coverage areas include:</p>
<table><thead><tr><th>Namespace</th><th>Functionality</th></tr></thead><tbody><tr><td><code>client.models</code></td><td>Run single or batch parametric model jobs and retrieve results.</td></tr><tr><td><code>client.cad</code></td><td>Execute native CAD operations, compounds, and pipelines.</td></tr><tr><td><code>client.convert</code></td><td>Convert STEP to glTF with advanced controls.</td></tr><tr><td><code>client.files</code></td><td>Upload assets via presigned URLs.</td></tr><tr><td><code>client.tasks</code></td><td>Monitor, list, and manage task execution.</td></tr></tbody></table>
<h3 class="anchor anchorTargetStickyNavbar_Vzrq" id="pipelines"><a class="" href="https://learn.bitbybit.dev/api/sdk/typescript/pipelines">Pipelines</a><a href="https://learn.bitbybit.dev/blog/bitbybit-v1-release#pipelines" class="hash-link" aria-label="Direct link to pipelines" title="Direct link to pipelines" translate="no">​</a></h3>
<p>The SDK lets you chain multiple CAD operations into single request. Reference prior outputs (<code>$ref:N</code>), inject external data (<code>$file:N</code>), iterate over collections (<code>map</code>), and use logic branching (<code>choice</code>). Build pipelines programmatically or design them visually in Bitbybit Studio.</p>
<h3 class="anchor anchorTargetStickyNavbar_Vzrq" id="client-side-validation">Client-Side Validation<a href="https://learn.bitbybit.dev/blog/bitbybit-v1-release#client-side-validation" class="hash-link" aria-label="Direct link to Client-Side Validation" title="Direct link to Client-Side Validation" translate="no">​</a></h3>
<p>Requests feature built-in JSON Schema validation. The SDK catches parameter errors before leaving your server, returning a <code>BitbybitValidationError</code> to save API round-trips.</p>
<p><em>(Ready-to-use backend examples are provided for Hono, Express 5, and ASP.NET Core).</em></p>
<h2 class="anchor anchorTargetStickyNavbar_Vzrq" id="bitbybit-studio">Bitbybit Studio<a href="https://learn.bitbybit.dev/blog/bitbybit-v1-release#bitbybit-studio" class="hash-link" aria-label="Direct link to Bitbybit Studio" title="Direct link to Bitbybit Studio" translate="no">​</a></h2>
<p><a href="https://studio.bitbybit.dev/" target="_blank" rel="noopener noreferrer" class="">Bitbybit Studio</a> is your homepage and playground for the CAD Cloud API. It's a place to experiment with parametric models, STEP file conversions, and CAD pipelines - capable of composing serious workloads, using your STEP and other file types as inputs. Generate production-ready models, fine-tune conversion settings, chain multi-step operations, manage tasks, and preview results in 3D - all from your browser, without writing code or making raw API calls.</p>
<div class="grid_hCdv" style="grid-template-columns:repeat(1, 1fr);gap:1rem"><img src="https://learn.bitbybit.dev/img/cad-cloud/bitbybit-cad-cloud-viewer-phone-nest.webp" alt="Bitbybit Studio CAD Cloud 3D Model Generation 1" loading="lazy" decoding="async" class="thumbnail_bKFe"></div>
<div class="grid_hCdv" style="grid-template-columns:repeat(2, 1fr);gap:1rem"><img src="https://learn.bitbybit.dev/img/cad-cloud/bitbybit-cad-cloud-pipeline-function-selector.webp" alt="Bitbybit Studio CAD Cloud environment and pipeline selector 1" loading="lazy" decoding="async" class="thumbnail_bKFe"><img src="https://learn.bitbybit.dev/img/cad-cloud/bitbybit-cad-cloud-pipeline-union-and-fillet.webp" alt="Bitbybit Studio CAD Cloud environment and pipeline selector 2" loading="lazy" decoding="async" class="thumbnail_bKFe"></div>
<p>Studio now also functions as an interactive pipeline builder. You can design multi-step workflows visually and deploy them to the API. For example, the images below illustrate a custom pipeline that creates a box, translates it in space, models a union between the original and the translated box, and finally applies a fillet to the edges of the resulting shape.</p>
<div class="grid_hCdv" style="grid-template-columns:repeat(2, 1fr);gap:1rem"><img src="https://learn.bitbybit.dev/img/cad-cloud/bitbybit-cad-cloud-pipeline-task-computing.webp" alt="Bitbybit Studio pipeline computing and computation result 1" loading="lazy" decoding="async" class="thumbnail_bKFe"><img src="https://learn.bitbybit.dev/img/cad-cloud/bitbybit-cad-cloud-pipeline-union-result.webp" alt="Bitbybit Studio pipeline computing and computation result 2" loading="lazy" decoding="async" class="thumbnail_bKFe"></div>
<h2 class="anchor anchorTargetStickyNavbar_Vzrq" id="upgraded-rendering-engines">Upgraded Rendering Engines<a href="https://learn.bitbybit.dev/blog/bitbybit-v1-release#upgraded-rendering-engines" class="hash-link" aria-label="Direct link to Upgraded Rendering Engines" title="Direct link to Upgraded Rendering Engines" translate="no">​</a></h2>
<p>We have updated our 3D engine integrations to their latest major releases:</p>
<ul>
<li class=""><strong>BabylonJS 9.6.0:</strong> A major update delivering significant performance improvements.</li>
<li class=""><strong>Three.js 0.185.0:</strong> Updated to the latest ecosystem standards.</li>
<li class=""><strong>PlayCanvas 2.20.0:</strong> Enhanced integration for web experiences.</li>
</ul>
<h2 class="anchor anchorTargetStickyNavbar_Vzrq" id="additional-features">Additional Features<a href="https://learn.bitbybit.dev/blog/bitbybit-v1-release#additional-features" class="hash-link" aria-label="Direct link to Additional Features" title="Direct link to Additional Features" translate="no">​</a></h2>
<ul>
<li class=""><strong>Secure Arithmetic Evaluator:</strong> Safe string expression evaluation (e.g., <code>(3+2)*4</code>) via the shunting-yard algorithm, without using <code>eval()</code>.</li>
<li class=""><strong>Advanced Spirals and Primitives:</strong> Generate springs and volumetric features with <code>createTaperedHelixWire</code>, <code>createHelixWireByTurns</code>, <code>createFlatSpiralWire</code> and our new <strong>Torus</strong> solid geometry.</li>
<li class=""><strong>Custom CDN URL Propagation:</strong> Maintain control over WebAssembly loading for self-hosted deployments using the <code>cdnUrl</code> flag.</li>
<li class=""><strong>Standalone Conversion Runner:</strong> A lightweight HTML example for converting STEP files to GLB without a rendering engine.</li>
</ul>
<h2 class="anchor anchorTargetStickyNavbar_Vzrq" id="breaking-changes">Breaking Changes<a href="https://learn.bitbybit.dev/blog/bitbybit-v1-release#breaking-changes" class="hash-link" aria-label="Direct link to Breaking Changes" title="Direct link to Breaking Changes" translate="no">​</a></h2>
<ul>
<li class=""><strong>Zero-Based Edge Indexing:</strong> Edge indexing now begins at <code>0</code> instead of <code>1</code>. Existing code referencing edges by index will need updating.</li>
<li class=""><strong>Direct WASM API Adjustments:</strong> The low-level OCCT WASM API has changed significantly. Use the official <code>@bitbybit-dev/occt-worker</code> or engine-specific packages for stability.</li>
</ul>
<h2 class="anchor anchorTargetStickyNavbar_Vzrq" id="published-packages">Published Packages<a href="https://learn.bitbybit.dev/blog/bitbybit-v1-release#published-packages" class="hash-link" aria-label="Direct link to Published Packages" title="Direct link to Published Packages" translate="no">​</a></h2>
<ul>
<li class=""><a href="https://www.npmjs.com/package/@bitbybit-dev/base" target="_blank" rel="noopener noreferrer" class=""><code>@bitbybit-dev/base</code></a></li>
<li class=""><a href="https://www.npmjs.com/package/@bitbybit-dev/occt" target="_blank" rel="noopener noreferrer" class=""><code>@bitbybit-dev/occt</code></a></li>
<li class=""><a href="https://www.npmjs.com/package/@bitbybit-dev/occt-worker" target="_blank" rel="noopener noreferrer" class=""><code>@bitbybit-dev/occt-worker</code></a></li>
<li class=""><a href="https://www.npmjs.com/package/@bitbybit-dev/manifold-worker" target="_blank" rel="noopener noreferrer" class=""><code>@bitbybit-dev/manifold-worker</code></a></li>
<li class=""><a href="https://www.npmjs.com/package/@bitbybit-dev/jscad-worker" target="_blank" rel="noopener noreferrer" class=""><code>@bitbybit-dev/jscad-worker</code></a></li>
<li class=""><a href="https://www.npmjs.com/package/@bitbybit-dev/core" target="_blank" rel="noopener noreferrer" class=""><code>@bitbybit-dev/core</code></a></li>
<li class=""><a href="https://www.npmjs.com/package/@bitbybit-dev/babylonjs" target="_blank" rel="noopener noreferrer" class=""><code>@bitbybit-dev/babylonjs</code></a></li>
<li class=""><a href="https://www.npmjs.com/package/@bitbybit-dev/threejs" target="_blank" rel="noopener noreferrer" class=""><code>@bitbybit-dev/threejs</code></a></li>
<li class=""><a href="https://www.npmjs.com/package/@bitbybit-dev/playcanvas" target="_blank" rel="noopener noreferrer" class=""><code>@bitbybit-dev/playcanvas</code></a></li>
<li class=""><a href="https://www.npmjs.com/package/@bitbybit-dev/cad-cloud-sdk" target="_blank" rel="noopener noreferrer" class=""><code>@bitbybit-dev/cad-cloud-sdk</code></a> <em>(New)</em></li>
<li class=""><a href="https://www.npmjs.com/package/@bitbybit-dev/create-app" target="_blank" rel="noopener noreferrer" class=""><code>@bitbybit-dev/create-app</code></a></li>
</ul>
<h2 class="anchor anchorTargetStickyNavbar_Vzrq" id="getting-started">Getting Started<a href="https://learn.bitbybit.dev/blog/bitbybit-v1-release#getting-started" class="hash-link" aria-label="Direct link to Getting Started" title="Direct link to Getting Started" translate="no">​</a></h2>
<p>Try Bitbybit v1.0.0 today. Scaffold a project with your choice of engine and OCCT build:</p>
<div class="language-bash codeBlockContainer_Ckt0 theme-code-block" style="--prism-color:#F8F8F2;--prism-background-color:#282A36"><div class="codeBlockContent_QJqH"><pre tabindex="0" class="prism-code language-bash codeBlock_bY9V thin-scrollbar" style="color:#F8F8F2;background-color:#282A36"><code class="codeBlockLines_e6Vv"><div class="token-line" style="color:#F8F8F2"><span class="token plain">npx @bitbybit-dev/create-app my-project</span><br></div></code></pre></div></div>
<p>Or inject the new Cloud SDK into your existing backend:</p>
<div class="language-bash codeBlockContainer_Ckt0 theme-code-block" style="--prism-color:#F8F8F2;--prism-background-color:#282A36"><div class="codeBlockContent_QJqH"><pre tabindex="0" class="prism-code language-bash codeBlock_bY9V thin-scrollbar" style="color:#F8F8F2;background-color:#282A36"><code class="codeBlockLines_e6Vv"><div class="token-line" style="color:#F8F8F2"><span class="token plain">npm install @bitbybit-dev/cad-cloud-sdk</span><br></div></code></pre></div></div>
<p>For tutorials, API references, and example repositories, visit our <a href="https://learn.bitbybit.dev/" target="_blank" rel="noopener noreferrer" class="">Learning Center</a> and <a class="" href="https://learn.bitbybit.dev/api/openapi-docs/bitbybit-cad-cloud-api">API Reference</a>.</p>]]></content>
        <author>
            <name>Matas Ubarevičius</name>
            <uri>https://www.linkedin.com/in/matas-ubarevicius/</uri>
        </author>
        <category label="Bitbybit" term="Bitbybit"/>
        <category label="CAD" term="CAD"/>
        <category label="OCCT" term="OCCT"/>
        <category label="Cloud" term="Cloud"/>
        <category label="SDK" term="SDK"/>
        <category label="Studio" term="Studio"/>
        <category label="Release" term="Release"/>
    </entry>
    <entry>
        <title type="html"><![CDATA[Parametric 3D Spiral Chute Configurator for STOCKMHS]]></title>
        <id>https://learn.bitbybit.dev/blog/stockmhs-uhmw-spiral-chute-3d-configurator</id>
        <link href="https://learn.bitbybit.dev/blog/stockmhs-uhmw-spiral-chute-3d-configurator"/>
        <updated>2026-04-27T00:00:00.000Z</updated>
        <summary type="html"><![CDATA[Discover how STOCKMHS and Bitbybit built a browser-based 3D configurator for UHMW spiral chutes - with parametric geometry, real-time BOM generation, branded PDF reports, and offline support as an installable app.]]></summary>
        <content type="html"><![CDATA[<p><img decoding="async" loading="lazy" alt="STOCKMHS UHMW Spiral Chute 3D Configurator" src="https://learn.bitbybit.dev/assets/images/stockmhs-uhmw-spiral-chute-3d-configurator-324aae8ccb0bf513bda6981cba2ee80b.webp" title="STOCKMHS UHMW Spiral Chute 3D Configurator" width="1920" height="1080" class="img_ev3q"></p>
<p>Demand for customizable products that don't need to be redesigned from scratch for every unique customer or situation is growing across the manufacturing industry. STOCKMHS recognized this early and created the modular EZ~FLO 2.0 Chute System (Patent Pending), which gives their team the freedom to adapt a proven product to any situation. Through our collaboration, we built a browser-based 3D configurator that serves as a digital twin for the entire spiral chute product line - letting the sales and engineering teams explore configurations, generate bills of materials, and produce branded PDF reports without ever leaving their browser.</p>
<div class="responsive-video-container"><iframe width="560" height="315" src="https://www.youtube.com/embed/Z8vo9D1224A" title="STOCKMHS UHMW Spiral Chute 3D Configurator - Live Demo" frameborder="0" allow="accelerometer; autoplay; clipboard-write; encrypted-media; gyroscope; picture-in-picture; web-share; fullscreen" allowfullscreen=""></iframe></div>
<h2 class="anchor anchorTargetStickyNavbar_Vzrq" id="the-client-stockmhs">The Client: STOCKMHS<a href="https://learn.bitbybit.dev/blog/stockmhs-uhmw-spiral-chute-3d-configurator#the-client-stockmhs" class="hash-link" aria-label="Direct link to The Client: STOCKMHS" title="Direct link to The Client: STOCKMHS" translate="no">​</a></h2>
<img src="https://learn.bitbybit.dev/img/blog/stockmhs/stockmhs-logo.webp" alt="STOCKMHS logo" style="max-width:280px;display:block;margin:2rem 0">
<p><a href="https://stockmhs.com/" target="_blank" rel="noopener noreferrer" class="">STOCKMHS</a> (Stock Material Handling Systems) is a United States-based company headquartered in Ohio that has been manufacturing conveyor systems, chutes, and other material handling solutions for more than 50 years. Their philosophy sounds straightforward - apply innovation so that quality and speed don't come at a huge cost to customers - but executing on that idea consistently is what makes them competitive.</p>
<p>The EZ~FLO 2.0 UHMW spiral chute is a perfect example of this mindset. Instead of engineering a one-off chute for every installation, STOCKMHS invested in making the product modular and configurable from the start. The spiral widths, pitch, entry and exit heights, rotation, terminal orientation, and handing direction can all be adjusted to suit different warehouse and production floor layouts. This means engineering time is dramatically reduced for each order, products don't need to be redesigned from the ground up, and the sales team can respond faster to inquiries. Combining quality with affordability becomes much more realistic when this kind of smart product design is in place.</p>
<div class="grid_hCdv" style="grid-template-columns:repeat(1, 1fr);gap:1rem"><img src="https://learn.bitbybit.dev/img/blog/stockmhs/stockmhs-uhmw-spiral-chute-3d-configurator-clean.webp" alt="STOCKMHS UHMW spiral chute full 3D assembly view 1" loading="lazy" decoding="async" class="thumbnail_bKFe"></div>
<h2 class="anchor anchorTargetStickyNavbar_Vzrq" id="why-build-a-3d-configurator">Why Build a 3D Configurator?<a href="https://learn.bitbybit.dev/blog/stockmhs-uhmw-spiral-chute-3d-configurator#why-build-a-3d-configurator" class="hash-link" aria-label="Direct link to Why Build a 3D Configurator?" title="Direct link to Why Build a 3D Configurator?" translate="no">​</a></h2>
<p>Another important part of this process is understanding how the product actually behaves once all those parameters come together - but that's hard to do without the right tools. Designing flexibility into a modular product is not straightforward. The key question engineering teams need to answer is how much flexibility the product should support. Offer too many options and the product becomes very difficult to maintain and manufacture. Offer too few and you still end up falling back to custom designs for every other project.</p>
<p>Digitizing the process by building an actual digital twin takes the guesswork out of this equation. The design and sales teams get immediate visual and practical feedback from the 3D configurator, which helps them understand the product's design space better - what works, what looks right, what combinations might cause issues. A configurator like this can be used to discuss ideas with stakeholders, validate configurations on the spot, and move internal conversations forward faster.</p>
<p>For STOCKMHS, the configurator needed to be more than a 3D viewer. It had to function as a professional internal tool - one that the team could use to configure and document a spiral chute from start to finish.</p>
<div class="grid_hCdv" style="grid-template-columns:repeat(2, 1fr);gap:1rem"><img src="https://learn.bitbybit.dev/img/blog/stockmhs/stockmhs-uhmw-spiral-chute-3d-configurator-app-1.webp" alt="STOCKMHS spiral chute configurator user interface 1" loading="lazy" decoding="async" class="thumbnail_bKFe"><img src="https://learn.bitbybit.dev/img/blog/stockmhs/stockmhs-uhmw-spiral-chute-3d-configurator-app-2.webp" alt="STOCKMHS spiral chute configurator user interface 2" loading="lazy" decoding="async" class="thumbnail_bKFe"></div>
<h2 class="anchor anchorTargetStickyNavbar_Vzrq" id="runs-entirely-in-the-browser">Runs Entirely in the Browser<a href="https://learn.bitbybit.dev/blog/stockmhs-uhmw-spiral-chute-3d-configurator#runs-entirely-in-the-browser" class="hash-link" aria-label="Direct link to Runs Entirely in the Browser" title="Direct link to Runs Entirely in the Browser" translate="no">​</a></h2>
<p>One of the defining decisions for this project was to build the entire configurator as a client-side web application. There is no backend server required for any of the core functionality. Everything - the 3D rendering, the parametric geometry, the BOM calculations, the PDF generation - runs entirely in the browser.</p>
<p>The application is also installable as a standalone app with full offline support, meaning it can be used anywhere - on the factory floor, in a meeting room, or at a trade show - without needing a reliable internet connection.</p>
<h2 class="anchor anchorTargetStickyNavbar_Vzrq" id="parametric-spiral-geometry-in-real-time">Parametric Spiral Geometry in Real Time<a href="https://learn.bitbybit.dev/blog/stockmhs-uhmw-spiral-chute-3d-configurator#parametric-spiral-geometry-in-real-time" class="hash-link" aria-label="Direct link to Parametric Spiral Geometry in Real Time" title="Direct link to Parametric Spiral Geometry in Real Time" translate="no">​</a></h2>
<p>At the heart of the configurator is the parametric spiral geometry engine. When a user adjusts any parameter - width, drop per panel, entry height, exit height, terminal configuration, or handing direction - the entire spiral is recomputed and redrawn in real time.</p>
<p>The system works with a set of predefined spiral widths (24", 30", 36", 42", and 48") and two pitch options (3" and 4" drop per panel). Entry and exit heights can be set independently up to 600 inches, and the rotation is automatically calculated based on the available vertical drop. The configurator snaps the rotation to valid increments that match the selected terminal configuration (A, B, C, or D), each corresponding to a different exit angle - 90°, 180°, 270°, or 360°. Left-hand and right-hand spiral orientations are both supported and switch the entire assembly accordingly.</p>
<div class="grid_hCdv" style="grid-template-columns:repeat(2, 1fr);gap:1rem"><img src="https://learn.bitbybit.dev/img/blog/stockmhs/stockmhs-uhmw-spiral-chute-3d-configurator-app-3.webp" alt="STOCKMHS spiral chute terminal configuration 1" loading="lazy" decoding="async" class="thumbnail_bKFe"><img src="https://learn.bitbybit.dev/img/blog/stockmhs/stockmhs-uhmw-spiral-chute-3d-configurator-app-4.webp" alt="STOCKMHS spiral chute terminal configuration 2" loading="lazy" decoding="async" class="thumbnail_bKFe"><img src="https://learn.bitbybit.dev/img/blog/stockmhs/stockmhs-uhmw-spiral-chute-3d-configurator-app-5.webp" alt="STOCKMHS spiral chute terminal configuration 3" loading="lazy" decoding="async" class="thumbnail_bKFe"><img src="https://learn.bitbybit.dev/img/blog/stockmhs/stockmhs-uhmw-spiral-chute-3d-configurator-app-6.webp" alt="STOCKMHS spiral chute terminal configuration 4" loading="lazy" decoding="async" class="thumbnail_bKFe"></div>
<p>What makes this more than a simple slider-driven preview is the engineering math running underneath. The system calculates the vertical drop for a given rotation using pitch-specific gain-per-degree formulas, determines the optimal rotation from target heights, and snaps that rotation to the nearest valid configuration. If the available drop between entry and exit isn't sufficient for the minimum rotation required by the chosen terminal config, the viewer flags the configuration as invalid rather than rendering something that couldn't be built.</p>
<div class="grid_hCdv" style="grid-template-columns:repeat(1, 1fr);gap:1rem"><img src="https://learn.bitbybit.dev/img/blog/stockmhs/stockmhs-uhmw-spiral-chute-3d-configurator-validation-error.webp" alt="STOCKMHS configurator invalid configuration error 1" loading="lazy" decoding="async" class="thumbnail_bKFe"></div>
<h2 class="anchor anchorTargetStickyNavbar_Vzrq" id="high-fidelity-3d-models">High-Fidelity 3D Models<a href="https://learn.bitbybit.dev/blog/stockmhs-uhmw-spiral-chute-3d-configurator#high-fidelity-3d-models" class="hash-link" aria-label="Direct link to High-Fidelity 3D Models" title="Direct link to High-Fidelity 3D Models" translate="no">​</a></h2>
<p>The configurator doesn't just show abstract geometry - it renders the actual chute assembly with realistic materials and proportions. We prepared detailed 3D models in Blender for each combination of width, pitch, and handing direction, paying close attention to the visual quality of the surfaces. The galvanized steel arms and structural components have a convincing metallic finish with natural reflections, while the black UHMW-PE slide panels are clearly distinguishable with their matte surface. Different materials - the painted center post, the galvanized supports, the polyethylene chute segments - are easy to tell apart at a glance, which helps the team quickly assess a configuration and communicate it to others.</p>
<div class="grid_hCdv" style="grid-template-columns:repeat(1, 1fr);gap:1rem"><img src="https://learn.bitbybit.dev/img/blog/stockmhs/stockmhs-uhmw-spiral-chute-3d-configurator-app-7.webp" alt="STOCKMHS spiral chute 3D model detail 1" loading="lazy" decoding="async" class="thumbnail_bKFe"></div>
<p>As the spiral geometry updates in response to parameter changes, the 3D assembly follows - entry sections, intermediate arms, exit terminals, base plates, and top caps all move into their correct positions along the spiral path. Even for tall configurations with dozens of segments, the viewer stays responsive and smooth. The 3D models are optimised and compressed, so the entire asset library loads quickly without compromising visual quality.</p>
<p>The viewport itself supports orbit controls for free rotation, preset camera angles (top, front, right, back, left), and a fullscreen mode for focused inspection. Dimension callouts - entry height, exit height, extension delta, total height, width, and depth - are drawn directly in the 3D scene as labeled measurement lines, giving precise spatial context without leaving the viewport.</p>
<h2 class="anchor anchorTargetStickyNavbar_Vzrq" id="automatic-bill-of-materials">Automatic Bill of Materials<a href="https://learn.bitbybit.dev/blog/stockmhs-uhmw-spiral-chute-3d-configurator#automatic-bill-of-materials" class="hash-link" aria-label="Direct link to Automatic Bill of Materials" title="Direct link to Automatic Bill of Materials" translate="no">​</a></h2>
<p>Every time the configuration changes, the application recalculates a complete bill of materials. The BOM includes the center post weldment, the primary entry assembly, intermediate UHMW panel support assemblies, the terminal exit assembly, and UHMW-PE slide segments. Each line item gets an automatically generated part number following STOCKMHS's naming convention - encoding width, pitch, direction, rotation, and elevation into a structured format.</p>
<p>The architecture is designed to support rule-based pricing in the future, so that cost estimates can update instantly as parameters change - giving the team immediate visibility during the configuration process.</p>
<p>The BOM is displayed in a dedicated sidebar on desktop and as a slide-in drawer on mobile, with each line item rendered as a card showing the part number, description, material, and quantity. Users can export the full BOM and configuration as JSON for integration with third party procurement or ERP systems.</p>
<h2 class="anchor anchorTargetStickyNavbar_Vzrq" id="branded-pdf-reports">Branded PDF Reports<a href="https://learn.bitbybit.dev/blog/stockmhs-uhmw-spiral-chute-3d-configurator#branded-pdf-reports" class="hash-link" aria-label="Direct link to Branded PDF Reports" title="Direct link to Branded PDF Reports" translate="no">​</a></h2>
<p>Once a configuration is finalized, the save workflow guides the user through a multi-step dialog. They enter project details - name, email, company, phone, planned installation date, and any notes - and the system captures screenshots of the 3D model from multiple orthographic views: front, back, left, right, and top, plus a close-up perspective shot.</p>
<div class="grid_hCdv" style="grid-template-columns:repeat(2, 1fr);gap:1rem"><img src="https://learn.bitbybit.dev/img/blog/stockmhs/stockmhs-uhmw-spiral-chute-3d-configurator-save-dialog-2.webp" alt="STOCKMHS configurator save project dialog 1" loading="lazy" decoding="async" class="thumbnail_bKFe"><img src="https://learn.bitbybit.dev/img/blog/stockmhs/stockmhs-uhmw-spiral-chute-3d-configurator-save-dialog-1.webp" alt="STOCKMHS configurator save project dialog 2" loading="lazy" decoding="async" class="thumbnail_bKFe"></div>
<p>The resulting PDF is a polished, multi-page engineering document branded with STOCKMHS's identity. It includes a cover page, a configuration summary with all spiral parameters, the full BOM table, annotated 3D views of the chute assembly, and project metadata. Headers carry STOCKMHS contact information and the "Fabricating the Future" tagline. Footers include the generation date and confidentiality notice.</p>
<div class="grid_hCdv" style="grid-template-columns:repeat(2, 1fr);gap:1rem"><img src="https://learn.bitbybit.dev/img/blog/stockmhs/stockmhs-uhmw-spiral-chute-pdf-example-cover-page.webp" alt="STOCKMHS spiral chute PDF report 1" loading="lazy" decoding="async" class="thumbnail_bKFe"><img src="https://learn.bitbybit.dev/img/blog/stockmhs/stockmhs-uhmw-spiral-chute-pdf-example-config-summary.webp" alt="STOCKMHS spiral chute PDF report 2" loading="lazy" decoding="async" class="thumbnail_bKFe"><img src="https://learn.bitbybit.dev/img/blog/stockmhs/stockmhs-uhmw-spiral-chute-pdf-example-isometric.webp" alt="STOCKMHS spiral chute PDF report 3" loading="lazy" decoding="async" class="thumbnail_bKFe"><img src="https://learn.bitbybit.dev/img/blog/stockmhs/stockmhs-uhmw-spiral-chute-pdf-example-side-views.webp" alt="STOCKMHS spiral chute PDF report 4" loading="lazy" decoding="async" class="thumbnail_bKFe"></div>
<p>The PDF downloads as a file and can be shared with clients or other stakeholders. This gives the team a way to configure a chute, generate a professional-looking document, and share it immediately - whether that's with a colleague, a stakeholder, or during a presentation.</p>
<h2 class="anchor anchorTargetStickyNavbar_Vzrq" id="shareable-deep-links">Shareable Deep Links<a href="https://learn.bitbybit.dev/blog/stockmhs-uhmw-spiral-chute-3d-configurator#shareable-deep-links" class="hash-link" aria-label="Direct link to Shareable Deep Links" title="Direct link to Shareable Deep Links" translate="no">​</a></h2>
<p>Every configuration parameter is synced bidirectionally with the browser's URL. When a user adjusts the width, pitch, heights, terminal config, or handing direction, the URL updates in real time. This means any configuration can be shared as a simple link - paste it into an email or a message and the recipient opens the configurator with exactly the same settings.</p>
<p>This is a small feature in terms of implementation, but it has a big impact on how the team collaborates around configurations. Someone can tweak a spiral setup, copy the URL, and send it to a colleague for review without needing to export files or schedule a screen share.</p>
<h2 class="anchor anchorTargetStickyNavbar_Vzrq" id="works-offline-anywhere">Works Offline, Anywhere<a href="https://learn.bitbybit.dev/blog/stockmhs-uhmw-spiral-chute-3d-configurator#works-offline-anywhere" class="hash-link" aria-label="Direct link to Works Offline, Anywhere" title="Direct link to Works Offline, Anywhere" translate="no">​</a></h2>
<p>Because the configurator may be used in environments where internet access isn't guaranteed - factory floors, warehouses, trade show booths - the application is built to work offline. It can be installed on any device as a standalone app and functions fully without a network connection once the initial assets are cached.</p>
<p>All core functionality - 3D visualization, parametric configuration, BOM generation, and PDF export - works offline. This makes the tool practical wherever it's needed, not just at a desk with a stable connection.</p>
<div class="grid_hCdv" style="grid-template-columns:repeat(2, 1fr);gap:1rem"><img src="https://learn.bitbybit.dev/img/blog/stockmhs/stockmhs-uhmw-spiral-chute-3d-configurator-mobile-view-1.webp" alt="STOCKMHS spiral chute configurator mobile view 1" loading="lazy" decoding="async" class="thumbnail_bKFe"><img src="https://learn.bitbybit.dev/img/blog/stockmhs/stockmhs-uhmw-spiral-chute-3d-configurator-mobile-view-2.webp" alt="STOCKMHS spiral chute configurator mobile view 2" loading="lazy" decoding="async" class="thumbnail_bKFe"><img src="https://learn.bitbybit.dev/img/blog/stockmhs/stockmhs-uhmw-spiral-chute-3d-configurator-mobile-view-3.webp" alt="STOCKMHS spiral chute configurator mobile view 3" loading="lazy" decoding="async" class="thumbnail_bKFe"><img src="https://learn.bitbybit.dev/img/blog/stockmhs/stockmhs-uhmw-spiral-chute-3d-configurator-mobile-view-4.webp" alt="STOCKMHS spiral chute configurator mobile view 4" loading="lazy" decoding="async" class="thumbnail_bKFe"></div>
<h2 class="anchor anchorTargetStickyNavbar_Vzrq" id="live-at-modex-2026">Live at MODEX 2026<a href="https://learn.bitbybit.dev/blog/stockmhs-uhmw-spiral-chute-3d-configurator#live-at-modex-2026" class="hash-link" aria-label="Direct link to Live at MODEX 2026" title="Direct link to Live at MODEX 2026" translate="no">​</a></h2>
<p>The configurator had its public debut at <strong><a href="https://www.modexshow.com/" target="_blank" rel="noopener noreferrer" class="">MODEX 2026</a></strong> in Atlanta - one of the largest supply chain and material handling trade shows in the world. STOCKMHS showcased it in their beautifully designed booth, where the team used it to walk visitors through different spiral chute configurations in real time - adjusting parameters, showing how the assembly changes, and demonstrating the product's flexibility on the spot.</p>
<p>Seeing the tool used in a live trade show environment was a strong validation of the concept. The STOCKMHS team used it naturally throughout conversations, spinning the 3D model, changing widths and heights, and letting the configurator answer questions visually that would otherwise require lengthy explanations or static drawings. It turned what would normally be a brochure conversation into an interactive, hands-on product demonstration.</p>
<div class="grid_hCdv" style="grid-template-columns:repeat(2, 1fr);gap:1rem"><img src="https://learn.bitbybit.dev/img/blog/stockmhs/stockmhs-uhmw-spiral-chute-3d-configurator-at-modex-2026.webp" alt="STOCKMHS booth at MODEX 2026 1" loading="lazy" decoding="async" class="thumbnail_bKFe"><img src="https://learn.bitbybit.dev/img/blog/stockmhs/stockmhs-uhmw-spiral-chute-3d-configurator-at-modex-2026-close-up.webp" alt="STOCKMHS booth at MODEX 2026 2" loading="lazy" decoding="async" class="thumbnail_bKFe"></div>
<h2 class="anchor anchorTargetStickyNavbar_Vzrq" id="what-this-project-demonstrates">What This Project Demonstrates<a href="https://learn.bitbybit.dev/blog/stockmhs-uhmw-spiral-chute-3d-configurator#what-this-project-demonstrates" class="hash-link" aria-label="Direct link to What This Project Demonstrates" title="Direct link to What This Project Demonstrates" translate="no">​</a></h2>
<p>This collaboration with STOCKMHS reinforces a pattern we see across many of our projects: when a product is modular and configurable, a well-built 3D configurator becomes a force multiplier for the entire business. It helps the sales team communicate product options more effectively. It reduces engineering back-and-forth because configurations are validated before they reach the shop floor. And it gives the design team a feedback loop - a way to test the boundaries of their modular system and understand where the flexibility works and where it might need refinement.</p>
<p>Building the configurator as a fully client-side application with no backend dependency made it simpler to deploy, easier to maintain, and more reliable in the field. Modern browsers are more than capable of handling professional engineering workflows - real-time 3D rendering, parametric geometry, document generation - entirely on the client side.</p>
<h2 class="anchor anchorTargetStickyNavbar_Vzrq" id="ready-to-build-your-own-configurator">Ready to Build Your Own Configurator?<a href="https://learn.bitbybit.dev/blog/stockmhs-uhmw-spiral-chute-3d-configurator#ready-to-build-your-own-configurator" class="hash-link" aria-label="Direct link to Ready to Build Your Own Configurator?" title="Direct link to Ready to Build Your Own Configurator?" translate="no">​</a></h2>
<p>Every project is different, and we work closely with each client to find the right approach - from the technology stack to the level of parametric control to the integration with existing systems.</p>
<p><strong>Interested in exploring what's possible? <a href="mailto:info@bitbybit.dev" target="_blank" rel="noopener noreferrer" class="">Reach out to us</a>.</strong></p>
<p><a href="https://bitbybit.dev/" target="_blank" rel="noopener noreferrer" class="">Learn more about Bitbybit</a></p>]]></content>
        <author>
            <name>Matas Ubarevičius</name>
            <uri>https://www.linkedin.com/in/matas-ubarevicius/</uri>
        </author>
        <category label="Bitbybit" term="Bitbybit"/>
        <category label="Client" term="Client"/>
        <category label="Customer" term="Customer"/>
        <category label="B2B" term="B2B"/>
        <category label="Case Study" term="Case Study"/>
        <category label="Manufacturing" term="Manufacturing"/>
        <category label="Material Handling" term="Material Handling"/>
        <category label="United States of America" term="United States of America"/>
        <category label="GLTF" term="GLTF"/>
        <category label="Blender" term="Blender"/>
        <category label="MODEX" term="MODEX"/>
    </entry>
    <entry>
        <title type="html"><![CDATA[Strength Shop Launched Riot MRR 75 Power Rack Configurator on Shopify With 3D Bits App]]></title>
        <id>https://learn.bitbybit.dev/blog/strength-shop-riot-mrr-75-power-rack-3d-bits-configurator-on-shopify</id>
        <link href="https://learn.bitbybit.dev/blog/strength-shop-riot-mrr-75-power-rack-3d-bits-configurator-on-shopify"/>
        <updated>2026-04-26T00:00:00.000Z</updated>
        <summary type="html"><![CDATA[Discover how Strength Shop built a fully custom 3D Power Rack configurator on Shopify using 3D Bits app - with bespoke UI, dynamic dimensions, and optimised 3D assets under 4 MB.]]></summary>
        <content type="html"><![CDATA[<p><img decoding="async" loading="lazy" alt="Strength Shop Launched Riot MRR 75 Power Rack 3D Configurator on Shopify With 3D Bits App" src="https://learn.bitbybit.dev/assets/images/strength-shop-riot-mrr-75-power-rack-3d-bits-configurator-on-shopify-da2e4a02f88a853c634897de531bdb02.webp" title="Strength Shop Launched Riot MRR 75 Power Rack 3D Configurator on Shopify With 3D Bits App" width="3840" height="2160" class="img_ev3q"></p>
<p>How do you sell a modular power rack online when every customer wants a different combination of uprights, crossbars, pull-up bars, and accessories - and needs to see the result before committing? Strength Shop answered that question by building a fully interactive 3D configurator powered by 3D Bits, with a completely custom user interface designed and developed by their own team.</p>
<h2 class="anchor anchorTargetStickyNavbar_Vzrq" id="the-client-strength-shop">The Client: Strength Shop<a href="https://learn.bitbybit.dev/blog/strength-shop-riot-mrr-75-power-rack-3d-bits-configurator-on-shopify#the-client-strength-shop" class="hash-link" aria-label="Direct link to The Client: Strength Shop" title="Direct link to The Client: Strength Shop" translate="no">​</a></h2>
<img src="https://learn.bitbybit.dev/img/blog/strengthshop/strengthshop-logo.webp" alt="Strength Shop logo" style="max-width:280px;display:block;margin:2rem 0">
<p><a href="https://strengthshop.eu/" target="_blank" rel="noopener noreferrer" class="">Strength Shop</a> is a leading gym equipment company that was incorporated in Edinburgh, Scotland and soon after opened their headquarters in Berlin, Germany. This dual presence laid the foundations for them to become a top brand serving the European Union market with innovative, high-quality products - including the modular Riot MRR 75 Power Rack featured in this case study.</p>
<div class="grid_hCdv" style="grid-template-columns:repeat(1, 1fr);gap:1rem"><img src="https://learn.bitbybit.dev/img/blog/strengthshop/strength-shop-riot-mrr-75-power-rack-3d-bits-configurator-on-shopify-7.webp" alt="Strength Shop Riot MRR 75 Power Rack 3D configurator on Shopify 1" loading="lazy" decoding="async" class="thumbnail_bKFe"></div>
<h2 class="anchor anchorTargetStickyNavbar_Vzrq" id="close-collaboration-from-day-one">Close Collaboration From Day One<a href="https://learn.bitbybit.dev/blog/strength-shop-riot-mrr-75-power-rack-3d-bits-configurator-on-shopify#close-collaboration-from-day-one" class="hash-link" aria-label="Direct link to Close Collaboration From Day One" title="Direct link to Close Collaboration From Day One" translate="no">​</a></h2>
<p>Building a 3D product configurator involves many moving parts - web integration, 3D expertise, asset preparation, a working understanding of boolean logic, and often parametric design thinking. From experience, clients who are open to collaboration and willing to lean on guidance tend to launch their configurators faster and with fewer headaches. Strength Shop was exactly that kind of partner. From the very first conversation, the collaboration was trust-based - ideas flowed freely and decisions were made quickly, without wasting anyone's time.</p>
<div class="grid_hCdv" style="grid-template-columns:repeat(2, 1fr);gap:1rem"><img src="https://learn.bitbybit.dev/img/blog/strengthshop/strength-shop-riot-mrr-75-power-rack-3d-bits-configurator-on-shopify-4.webp" alt="Strength Shop Riot MRR 75 Power Rack configurator 1" loading="lazy" decoding="async" class="thumbnail_bKFe"><img src="https://learn.bitbybit.dev/img/blog/strengthshop/strength-shop-riot-mrr-75-power-rack-3d-bits-configurator-on-shopify-5.webp" alt="Strength Shop Riot MRR 75 Power Rack configurator 2" loading="lazy" decoding="async" class="thumbnail_bKFe"></div>
<p>Bitbybit developed this configurator in close collaboration with Strength Shop. As a <strong>Pro plan</strong> subscriber of our <a href="https://apps.shopify.com/3d-bits-1" target="_blank" rel="noopener noreferrer" class="">3D Bits app for Shopify</a>, they took advantage of the hands-on support that comes included with the plan for setting up the first configurator. But the collaboration didn't stop at configuration logic.</p>
<p>On top of the included Pro plan support, Strength Shop commissioned our <strong>3D model preparation services</strong> to convert, set up and optimise their CAD models for the web. Working in Blender, the assembly was built with careful attention to material variants, textures, and GPU-based optimisations. The result: <strong>the total weight of all 3D assets you see in the video below is just ~4 MB</strong>. That ensures the configurator loads fast, performs well even on mobile devices, and runs smoothly as customers interact with it.</p>
<div class="responsive-video-container"><iframe width="560" height="315" src="https://www.youtube.com/embed/-PUKG5EIdHs" title="Strength Shop 3D Power Rack Configurator - Built with 3D Bits App for Shopify" frameborder="0" allow="accelerometer; autoplay; clipboard-write; encrypted-media; gyroscope; picture-in-picture; web-share; fullscreen" allowfullscreen=""></iframe></div>
<div class="grid_hCdv" style="grid-template-columns:repeat(1, 1fr);gap:1rem"><img src="https://learn.bitbybit.dev/img/blog/strengthshop/strength-shop-riot-mrr-75-power-rack-3d-bits-configurator-on-shopify-8.webp" alt="Strength Shop Riot MRR 75 Power Rack configurator top view 1" loading="lazy" decoding="async" class="thumbnail_bKFe"></div>
<h2 class="anchor anchorTargetStickyNavbar_Vzrq" id="a-fully-custom-user-interface">A Fully Custom User Interface<a href="https://learn.bitbybit.dev/blog/strength-shop-riot-mrr-75-power-rack-3d-bits-configurator-on-shopify#a-fully-custom-user-interface" class="hash-link" aria-label="Direct link to A Fully Custom User Interface" title="Direct link to A Fully Custom User Interface" translate="no">​</a></h2>
<p>3D Bits typically integrates seamlessly with standard Shopify variants and popular third-party option apps. But Strength Shop had a different vision. Due to their unique sales pipeline and product complexity, they decided to develop their <strong>own user interface system, pricing logic, and checkout flow</strong> from scratch.</p>
<p>When they asked whether 3D Bits could interpret and communicate with a fully custom-built UI, the answer was yes - as long as their developers followed the web standards and HTML input guidelines outlined in our <a class="" href="https://learn.bitbybit.dev/learn/3d-bits/how-it-works">documentation</a>. 3D Bits is designed to listen for changes on standard HTML inputs (<code>&lt;input&gt;</code>, <code>&lt;select&gt;</code>, etc.), which means any front-end framework or custom implementation can drive the 3D scene without special adapters.</p>
<h3 class="anchor anchorTargetStickyNavbar_Vzrq" id="custom-buttons-indicators-and-interactions">Custom Buttons, Indicators, and Interactions<a href="https://learn.bitbybit.dev/blog/strength-shop-riot-mrr-75-power-rack-3d-bits-configurator-on-shopify#custom-buttons-indicators-and-interactions" class="hash-link" aria-label="Direct link to Custom Buttons, Indicators, and Interactions" title="Direct link to Custom Buttons, Indicators, and Interactions" translate="no">​</a></h3>
<p>Strength Shop's developers went well beyond basic dropdowns. They crafted a polished, brand-consistent UI with:</p>
<ul>
<li class=""><strong>Custom-styled option buttons</strong> that match Strength Shop's design language, giving customers a clean, intuitive way to toggle between rack configurations, accessory packages, and color options</li>
<li class=""><strong>A custom 360° rotation indicator</strong> - their own visual cue that encourages customers to interact with the 3D model, spin it around, and explore the rack from every angle</li>
<li class=""><strong>Smooth transitions and hover states</strong> that make the configurator feel like a native part of their store rather than an embedded third-party widget</li>
</ul>
<p>This is a great example of what's possible when a merchant's development team takes ownership of the UI layer while 3D Bits handles the heavy lifting of 3D rendering, assembly logic, and variant switching behind the scenes. The integration was seamless - after Strength Shop developed their interface, it was simply a matter of ensuring their input names pointed to the correct geometry nodes, activating the right logic gates in 3D Bits. The configurator was ready to ship.</p>
<p>Because the entire front-end is theirs, Strength Shop has full control over the product page going forward. They can redesign the layout, add new options, adjust the checkout flow, or restyle the configurator whenever they want - without waiting on a third party or being locked into someone else's component library. The 3D layer stays connected through standard HTML inputs, so as long as those conventions are followed, the UI can evolve freely.</p>
<div class="grid_hCdv" style="grid-template-columns:repeat(2, 1fr);gap:1rem"><img src="https://learn.bitbybit.dev/img/blog/strengthshop/strength-shop-riot-mrr-75-power-rack-3d-bits-configurator-on-shopify-1.webp" alt="Strength Shop custom UI with 3D configurator 1" loading="lazy" decoding="async" class="thumbnail_bKFe"><img src="https://learn.bitbybit.dev/img/blog/strengthshop/strength-shop-riot-mrr-75-power-rack-3d-bits-configurator-on-shopify-2.webp" alt="Strength Shop custom UI with 3D configurator 2" loading="lazy" decoding="async" class="thumbnail_bKFe"><img src="https://learn.bitbybit.dev/img/blog/strengthshop/strength-shop-riot-mrr-75-power-rack-3d-bits-configurator-on-shopify-13.webp" alt="Strength Shop custom UI with 3D configurator 3" loading="lazy" decoding="async" class="thumbnail_bKFe"><img src="https://learn.bitbybit.dev/img/blog/strengthshop/strength-shop-riot-mrr-75-power-rack-3d-bits-configurator-on-shopify-15.webp" alt="Strength Shop custom UI with 3D configurator 4" loading="lazy" decoding="async" class="thumbnail_bKFe"></div>
<h3 class="anchor anchorTargetStickyNavbar_Vzrq" id="mobile-first-layout">Mobile-First Layout<a href="https://learn.bitbybit.dev/blog/strength-shop-riot-mrr-75-power-rack-3d-bits-configurator-on-shopify#mobile-first-layout" class="hash-link" aria-label="Direct link to Mobile-First Layout" title="Direct link to Mobile-First Layout" translate="no">​</a></h3>
<p>Strength Shop's mobile layout is a great reference for anyone building a 3D configurator. The screen is split into two clear zones: the <strong>3D viewport stays fixed at the top</strong>, while all configuration options sit in a <strong>scrollable panel below</strong>. This means customers can freely rotate, zoom, and inspect the rack without the view jumping or resizing as they scroll through options. The 3D model remains stable and fully interactive at all times, even as the options list extends well beyond the visible area. It's a simple pattern, but it makes a big difference - especially for a complex product with many configuration choices.</p>
<div class="grid_hCdv" style="grid-template-columns:repeat(2, 1fr);gap:1rem"><img src="https://learn.bitbybit.dev/img/blog/strengthshop/strength-shop-riot-mrr-75-power-rack-3d-bits-configurator-on-shopify-mobile-1.webp" alt="Strength Shop Riot MRR 75 Power Rack configurator mobile view 1" loading="lazy" decoding="async" class="thumbnail_bKFe"><img src="https://learn.bitbybit.dev/img/blog/strengthshop/strength-shop-riot-mrr-75-power-rack-3d-bits-configurator-on-shopify-mobile-2.webp" alt="Strength Shop Riot MRR 75 Power Rack configurator mobile view 2" loading="lazy" decoding="async" class="thumbnail_bKFe"></div>
<h2 class="anchor anchorTargetStickyNavbar_Vzrq" id="dynamic-dimensions-see-the-real-size">Dynamic Dimensions: See the Real Size<a href="https://learn.bitbybit.dev/blog/strength-shop-riot-mrr-75-power-rack-3d-bits-configurator-on-shopify#dynamic-dimensions-see-the-real-size" class="hash-link" aria-label="Direct link to Dynamic Dimensions: See the Real Size" title="Direct link to Dynamic Dimensions: See the Real Size" translate="no">​</a></h2>
<p>One of the standout features Strength Shop took advantage of is our <strong>Dynamic Dimensions</strong> capability, available on the Pro plan. This feature automatically scans the complete bounding box of the current assembly and displays its real-world dimensions - height, width, and depth - directly in the 3D viewport.</p>
<p>As customers add or remove components, the displayed dimensions update in real time to reflect the actual size of their configured rack. This gives shoppers a clear, immediate understanding of how much space the rack will occupy in their gym - no guesswork, no tape measure needed. For a product that can stand over 2 meters tall and vary significantly depending on the chosen configuration, this kind of spatial awareness is invaluable.</p>
<div class="grid_hCdv" style="grid-template-columns:repeat(2, 1fr);gap:1rem"><img src="https://learn.bitbybit.dev/img/blog/strengthshop/strength-shop-riot-mrr-75-power-rack-3d-bits-configurator-on-shopify-6.webp" alt="Strength Shop Riot MRR 75 Power Rack dynamic dimensions view 1" loading="lazy" decoding="async" class="thumbnail_bKFe"><img src="https://learn.bitbybit.dev/img/blog/strengthshop/strength-shop-riot-mrr-75-power-rack-3d-bits-configurator-on-shopify-11.webp" alt="Strength Shop Riot MRR 75 Power Rack dynamic dimensions view 2" loading="lazy" decoding="async" class="thumbnail_bKFe"></div>
<h2 class="anchor anchorTargetStickyNavbar_Vzrq" id="from-cad-to-web-optimised-for-performance">From CAD to Web: Optimised for Performance<a href="https://learn.bitbybit.dev/blog/strength-shop-riot-mrr-75-power-rack-3d-bits-configurator-on-shopify#from-cad-to-web-optimised-for-performance" class="hash-link" aria-label="Direct link to From CAD to Web: Optimised for Performance" title="Direct link to From CAD to Web: Optimised for Performance" translate="no">​</a></h2>
<p>Like many manufacturers, Strength Shop's original models came from professional CAD software. These models are built for engineering precision, not web performance. Translating them into fast-loading, visually rich 3D assets required careful optimisation.</p>
<p>The full conversion pipeline included:</p>
<ul>
<li class=""><strong>Mesh optimisation</strong> - Reducing polygon counts while preserving the visual detail that makes the rack look convincing</li>
<li class=""><strong>Material variants</strong> - Setting up colour and finish options efficiently in Blender so they can be switched at runtime without loading separate models</li>
<li class=""><strong>Texture optimisation</strong> - Compressing textures to strike the right balance between visual quality and file size</li>
</ul>
<p>The end result is a complete, configurable power rack assembly that weighs in at roughly <strong>4 MB total</strong> - light enough to load quickly on any connection while still looking sharp and realistic.</p>
<h3 class="anchor anchorTargetStickyNavbar_Vzrq" id="realistic-materials-that-sell">Realistic Materials That Sell<a href="https://learn.bitbybit.dev/blog/strength-shop-riot-mrr-75-power-rack-3d-bits-configurator-on-shopify#realistic-materials-that-sell" class="hash-link" aria-label="Direct link to Realistic Materials That Sell" title="Direct link to Realistic Materials That Sell" translate="no">​</a></h3>
<p>A configurator only builds buying confidence if the product on screen looks like the real thing. That's why special attention was paid to the materials. The steel uprights and crossbars have a convincing metallic finish with reflections that react naturally to the lighting environment. Different surface types - matte powder-coat, polished chrome on J-hooks - are clearly distinguishable at a glance, helping customers understand exactly what they're getting. All of this is achieved with carefully authored PBR (Physically Based Rendering) materials that keep the file size low while the visual quality stays high.</p>
<div class="grid_hCdv" style="grid-template-columns:repeat(1, 1fr);gap:1rem"><img src="https://learn.bitbybit.dev/img/blog/strengthshop/strength-shop-riot-mrr-75-power-rack-3d-bits-configurator-on-shopify-14.webp" alt="Strength Shop Riot MRR 75 Power Rack realistic metal materials close-up 1" loading="lazy" decoding="async" class="thumbnail_bKFe"></div>
<div class="grid_hCdv" style="grid-template-columns:repeat(2, 1fr);gap:1rem"><img src="https://learn.bitbybit.dev/img/blog/strengthshop/strength-shop-riot-mrr-75-power-rack-3d-bits-configurator-on-shopify-3.webp" alt="Strength Shop Riot MRR 75 Power Rack close-up detail 1" loading="lazy" decoding="async" class="thumbnail_bKFe"><img src="https://learn.bitbybit.dev/img/blog/strengthshop/strength-shop-riot-mrr-75-power-rack-3d-bits-configurator-on-shopify-9.webp" alt="Strength Shop Riot MRR 75 Power Rack close-up detail 2" loading="lazy" decoding="async" class="thumbnail_bKFe"><img src="https://learn.bitbybit.dev/img/blog/strengthshop/strength-shop-riot-mrr-75-power-rack-3d-bits-configurator-on-shopify-10.webp" alt="Strength Shop Riot MRR 75 Power Rack close-up detail 3" loading="lazy" decoding="async" class="thumbnail_bKFe"><img src="https://learn.bitbybit.dev/img/blog/strengthshop/strength-shop-riot-mrr-75-power-rack-3d-bits-configurator-on-shopify-12.webp" alt="Strength Shop Riot MRR 75 Power Rack close-up detail 4" loading="lazy" decoding="async" class="thumbnail_bKFe"></div>
<h2 class="anchor anchorTargetStickyNavbar_Vzrq" id="what-strength-shop-says">What Strength Shop Says<a href="https://learn.bitbybit.dev/blog/strength-shop-riot-mrr-75-power-rack-3d-bits-configurator-on-shopify#what-strength-shop-says" class="hash-link" aria-label="Direct link to What Strength Shop Says" title="Direct link to What Strength Shop Says" translate="no">​</a></h2>
<div class="testimonial-item"><div class="testimonial-quote"><p>"We're very happy with how 3D Bits helped us build our first 3D product configurator. The platform has exceeded our expectations.</p><p>For the Strength Shop Power Racks configurator, we needed to handle complex assembly logic, various UI edge cases, and heavy 3D CAD models with multiple variants. The platform integrated well with the custom product page and the custom variant selector UI we created for the configurator.</p><p>As customers click through options, the 3D assembly updates immediately, so what they see always stays in sync with the configuration. Even as configurations become more complex, performance has remained fast, with stable FPS. What we appreciate most is the platform's flexibility. It integrates well with our Shopify setup, works with standard web technologies, and leaves plenty of room to customize the experience.</p><p>We've also had a very positive experience with the Pro plan. Matas has been very helpful with hands-on support and practical guidance while we built and launched our first configurator. His team at Bit by Bit also supported us with high-quality 3D model preparation. Thanks to that work, our full rack assembly is only ~4 MB, which helps it load quickly and run smoothly even on mobile devices.</p><p>If you're trying to build a serious product configurator on Shopify (or you're not sure where to start), I'd recommend 3D Bits and encourage you to reach out to Matas for guidance."</p></div><p><strong>Valentijn Vermeer, E-Commerce &amp; Systems Specialist</strong><br>
<!-- -->🇩🇪 Germany<br>
<a href="https://strengthshop.eu/" target="_blank" rel="noopener noreferrer" class=""><img decoding="async" loading="lazy" src="https://bitbybit.dev/files/site/clients/strengthshop.webp" alt="Strength Shop" class="img_ev3q"></a></p></div>
<h2 class="anchor anchorTargetStickyNavbar_Vzrq" id="key-takeaways">Key Takeaways<a href="https://learn.bitbybit.dev/blog/strength-shop-riot-mrr-75-power-rack-3d-bits-configurator-on-shopify#key-takeaways" class="hash-link" aria-label="Direct link to Key Takeaways" title="Direct link to Key Takeaways" translate="no">​</a></h2>
<p>Strength Shop's configurator demonstrates several important points for merchants considering 3D product experiences:</p>
<ol>
<li class=""><strong>Custom UI is fully supported</strong> - 3D Bits doesn't force you into a predefined interface. If your team has the front-end skills, you can build any UI you want and have it drive the 3D scene through standard HTML inputs</li>
<li class=""><strong>Optimisation is everything</strong> - A complete modular rack assembly at ~4 MB proves that complex products can load fast when models are properly prepared</li>
<li class=""><strong>Dynamic Dimensions build confidence</strong> - Showing real-time physical dimensions helps customers understand exactly what they're buying, reducing returns and support questions</li>
<li class=""><strong>Pro plan includes hands-on support</strong> - Guidance during the setup of your first configurator is included, so you're not figuring everything out alone. Additional services like 3D model optimisation are available separately for an extra cost</li>
</ol>
<h2 class="anchor anchorTargetStickyNavbar_Vzrq" id="ready-to-build-your-own-configurator">Ready to Build Your Own Configurator?<a href="https://learn.bitbybit.dev/blog/strength-shop-riot-mrr-75-power-rack-3d-bits-configurator-on-shopify#ready-to-build-your-own-configurator" class="hash-link" aria-label="Direct link to Ready to Build Your Own Configurator?" title="Direct link to Ready to Build Your Own Configurator?" translate="no">​</a></h2>
<p>If you're selling configurable products on Shopify, 3D Bits can power the experience your customers deserve. The <strong>Pro plan</strong> includes direct access to Bitbybit for hands-on support when setting up your first configurator, plus features like Dynamic Dimensions. Need help with 3D model optimisation or custom setup beyond the first configurator? We offer additional services tailored to your project's needs.</p>
<p><strong>Interested in exploring what's possible? <a href="mailto:info@bitbybit.dev" target="_blank" rel="noopener noreferrer" class="">Reach out to us</a>.</strong></p>
<p><a href="https://apps.shopify.com/3d-bits-1" target="_blank" rel="noopener noreferrer" class="">Get started with 3D Bits</a></p>]]></content>
        <author>
            <name>Matas Ubarevičius</name>
            <uri>https://www.linkedin.com/in/matas-ubarevicius/</uri>
        </author>
        <category label="Bitbybit" term="Bitbybit"/>
        <category label="Client" term="Client"/>
        <category label="Customer" term="Customer"/>
        <category label="B2B" term="B2B"/>
        <category label="Case Study" term="Case Study"/>
        <category label="Fitness" term="Fitness"/>
        <category label="Gym" term="Gym"/>
        <category label="Shopify" term="Shopify"/>
        <category label="3D Bits" term="3D Bits"/>
        <category label="Germany" term="Germany"/>
        <category label="GLTF" term="GLTF"/>
        <category label="Blender" term="Blender"/>
    </entry>
    <entry>
        <title type="html"><![CDATA[How We Helped The Shim Shack Integrate Parametric 3D Configurators Into Their WooCommerce Store]]></title>
        <id>https://learn.bitbybit.dev/blog/the-shim-shack-build-your-parts-3d-configurators-bitbybit-use-case</id>
        <link href="https://learn.bitbybit.dev/blog/the-shim-shack-build-your-parts-3d-configurators-bitbybit-use-case"/>
        <updated>2026-04-25T00:00:00.000Z</updated>
        <summary type="html"><![CDATA[Discover how The Shim Shack transformed their WooCommerce store with parametric 3D shim configurators powered by Bitbybit Runner and the OCCT kernel. Customers configure custom shims with real-time validation, 3D preview, and STEP/DXF export.]]></summary>
        <content type="html"><![CDATA[<p><img decoding="async" loading="lazy" alt="The Shim Shack 3D Configurators powered by Bitbybit Runner" src="https://learn.bitbybit.dev/assets/images/the-shim-shack-build-your-parts-3d-configurators-bitbybit-use-case-b217ba6a6cf212e6f19eca38f8cb3de3.webp" title="The Shim Shack parametric 3D shim configurators on WooCommerce" width="4032" height="2268" class="img_ev3q"></p>
<p>How do you let customers design their own precision-cut metal parts online - with exact dimensions, real manufacturing constraints, and instant visual feedback? That was the challenge facing The Shim Shack. Through our collaboration, we delivered a suite of parametric 3D configurators that run directly inside their existing WordPress store. You can try them yourself at <a href="https://buildyourparts.theshimshack.com/" target="_blank" rel="noopener noreferrer" class="">buildyourparts.theshimshack.com</a>.</p>
<div class="responsive-video-container"><iframe width="560" height="315" src="https://www.youtube.com/embed/QcgT-yNfDD0" title="The Shim Shack 3D Configurators - Parametric Shim Design on WooCommerce" frameborder="0" allow="accelerometer; autoplay; clipboard-write; encrypted-media; gyroscope; picture-in-picture; web-share; fullscreen" allowfullscreen=""></iframe></div>
<h2 class="anchor anchorTargetStickyNavbar_Vzrq" id="the-client-the-shim-shack">The Client: The Shim Shack<a href="https://learn.bitbybit.dev/blog/the-shim-shack-build-your-parts-3d-configurators-bitbybit-use-case#the-client-the-shim-shack" class="hash-link" aria-label="Direct link to The Client: The Shim Shack" title="Direct link to The Client: The Shim Shack" translate="no">​</a></h2>
<p><a href="https://theshimshack.com/" target="_blank" rel="noopener noreferrer" class="">The Shim Shack</a> is a United States based manufacturer specializing in custom shims, brackets, spacers, washers, mounting plates, and other precision metal parts. They laser-cut every piece to exact specifications - any dimension, any configuration, any tolerance their customers need. Their <a href="https://buildyourparts.theshimshack.com/" target="_blank" rel="noopener noreferrer" class="">Build Your Parts</a> portal lets customers design and order custom shims online.</p>
<p>The parts they produce may seem small, but they solve critical problems in industries where precision tolerances matter. When a fraction of a millimeter determines whether machinery runs smoothly or fails, the right shim makes all the difference.</p>
<img src="https://learn.bitbybit.dev/img/blog/the-shim-shack/the-shim-shack-part-top-view-shadows-and-points-of-interest.webp" alt="The Shim Shack part top view with shadows and points of interest" style="max-width:100%;border-radius:8px;margin:1rem 0">
<p>We paid close attention to the visual presentation. Shadows give a convincing sense of depth even from a top-down perspective, and metallic reflections bring the geometry to life - making the parts feel tangible rather than flat. We also added points of interest for Side View, Tilted Front, and Top View, each with smooth animated transitions, so customers can inspect the model from the most useful angles without having to navigate the 3D scene manually.</p>
<h2 class="anchor anchorTargetStickyNavbar_Vzrq" id="the-challenge-parametric-geometry-for-custom-manufacturing">The Challenge: Parametric Geometry for Custom Manufacturing<a href="https://learn.bitbybit.dev/blog/the-shim-shack-build-your-parts-3d-configurators-bitbybit-use-case#the-challenge-parametric-geometry-for-custom-manufacturing" class="hash-link" aria-label="Direct link to The Challenge: Parametric Geometry for Custom Manufacturing" title="Direct link to The Challenge: Parametric Geometry for Custom Manufacturing" translate="no">​</a></h2>
<p>Unlike typical e-commerce products, shims aren't picked from a catalog. Every customer needs different dimensions - different thicknesses, diameters, slot widths, hole positions. The geometry must be generated on the fly, validated against real manufacturing constraints, and presented clearly enough that anyone can use it.</p>
<p>That meant we needed fully parametric 3D models, produced in real time from customer inputs rather than assembled from static assets. Every configuration had to be checked for producibility before it could be ordered. The configurators had to live inside the existing WooCommerce store without disrupting what was already there. And customers needed to walk away with professional STEP and DXF files they could take straight into their own CAD workflows.</p>
<h2 class="anchor anchorTargetStickyNavbar_Vzrq" id="why-bitbybit-runner-was-the-right-fit">Why Bitbybit Runner Was the Right Fit<a href="https://learn.bitbybit.dev/blog/the-shim-shack-build-your-parts-3d-configurators-bitbybit-use-case#why-bitbybit-runner-was-the-right-fit" class="hash-link" aria-label="Direct link to Why Bitbybit Runner Was the Right Fit" title="Direct link to Why Bitbybit Runner Was the Right Fit" translate="no">​</a></h2>
<p>From the very beginning, we identified that our <a class="" href="https://learn.bitbybit.dev/learn/runners/intro"><strong>Runner</strong></a> technology was the ideal foundation for this project. Runner allows Bitbybit scripts to be embedded and executed on any website - including WordPress with WooCommerce.</p>
<p>The beauty of this approach is that we could preserve The Shim Shack's existing infrastructure entirely. There was no need to migrate away from WordPress or rebuild the storefront. Instead, we layered 3D capabilities on top of what already worked - each configurator running as a self-contained script inside their product pages, easy to update and maintain independently. This saved significant time and let us focus entirely on what mattered most: building a great configurator experience.</p>
<h2 class="anchor anchorTargetStickyNavbar_Vzrq" id="parametric-design-powered-by-occt">Parametric Design Powered by OCCT<a href="https://learn.bitbybit.dev/blog/the-shim-shack-build-your-parts-3d-configurators-bitbybit-use-case#parametric-design-powered-by-occt" class="hash-link" aria-label="Direct link to Parametric Design Powered by OCCT" title="Direct link to Parametric Design Powered by OCCT" translate="no">​</a></h2>
<p>This project is fundamentally different from some of the other case studies, where configurators combine pre-made glTF assets representing modular parts. The Shim Shack configurators don't assemble static models - they <strong>generate geometry from scratch</strong> based on user inputs.</p>
<p>This is made possible by Bitbybit's CAD layer, built on the <a class="" href="https://learn.bitbybit.dev/learn/code/common/occt/what-is-occt"><strong>OpenCascade (OCCT) kernel</strong></a> - the same technology behind professional desktop CAD applications. When a customer enters dimensions for their shim, the OCCT kernel constructs the geometry parametrically - building profiles, extruding shapes, cutting holes and slots. It then validates every constraint, checking wall thicknesses, hole spacing, and laser-cutting tolerances. If everything passes, the result is rendered in 3D so the customer can inspect their design from every angle, and production-ready STEP and DXF files can be exported directly in the browser.</p>
<p>All of this happens client-side, in real time, with no server round-trips required.</p>
<h2 class="anchor anchorTargetStickyNavbar_Vzrq" id="a-rich-variety-of-shim-configurators">A Rich Variety of Shim Configurators<a href="https://learn.bitbybit.dev/blog/the-shim-shack-build-your-parts-3d-configurators-bitbybit-use-case#a-rich-variety-of-shim-configurators" class="hash-link" aria-label="Direct link to A Rich Variety of Shim Configurators" title="Direct link to A Rich Variety of Shim Configurators" translate="no">​</a></h2>
<p>The Shim Shack offers a wide range of shim types, and we built dedicated configurators for each one. Every configurator is tailored to the specific geometry and constraints of its shim type while sharing a consistent user experience across the board.</p>
<div class="grid_hCdv" style="grid-template-columns:repeat(2, 1fr);gap:1rem"><img src="https://learn.bitbybit.dev/img/blog/the-shim-shack/the-shim-shack-1.webp" alt="The Shim Shack configurator variant 1" loading="lazy" decoding="async" class="thumbnail_bKFe"><img src="https://learn.bitbybit.dev/img/blog/the-shim-shack/the-shim-shack-2.webp" alt="The Shim Shack configurator variant 2" loading="lazy" decoding="async" class="thumbnail_bKFe"><img src="https://learn.bitbybit.dev/img/blog/the-shim-shack/the-shim-shack-3.webp" alt="The Shim Shack configurator variant 3" loading="lazy" decoding="async" class="thumbnail_bKFe"><img src="https://learn.bitbybit.dev/img/blog/the-shim-shack/the-shim-shack-4.webp" alt="The Shim Shack configurator variant 4" loading="lazy" decoding="async" class="thumbnail_bKFe"><img src="https://learn.bitbybit.dev/img/blog/the-shim-shack/the-shim-shack-5.webp" alt="The Shim Shack configurator variant 5" loading="lazy" decoding="async" class="thumbnail_bKFe"><img src="https://learn.bitbybit.dev/img/blog/the-shim-shack/the-shim-shack-6.webp" alt="The Shim Shack configurator variant 6" loading="lazy" decoding="async" class="thumbnail_bKFe"><img src="https://learn.bitbybit.dev/img/blog/the-shim-shack/the-shim-shack-7.webp" alt="The Shim Shack configurator variant 7" loading="lazy" decoding="async" class="thumbnail_bKFe"><img src="https://learn.bitbybit.dev/img/blog/the-shim-shack/the-shim-shack-8.webp" alt="The Shim Shack configurator variant 8" loading="lazy" decoding="async" class="thumbnail_bKFe"><img src="https://learn.bitbybit.dev/img/blog/the-shim-shack/the-shim-shack-9.webp" alt="The Shim Shack configurator variant 9" loading="lazy" decoding="async" class="thumbnail_bKFe"><img src="https://learn.bitbybit.dev/img/blog/the-shim-shack/the-shim-shack-10.webp" alt="The Shim Shack configurator variant 10" loading="lazy" decoding="async" class="thumbnail_bKFe"><img src="https://learn.bitbybit.dev/img/blog/the-shim-shack/the-shim-shack-11.webp" alt="The Shim Shack configurator variant 11" loading="lazy" decoding="async" class="thumbnail_bKFe"><img src="https://learn.bitbybit.dev/img/blog/the-shim-shack/the-shim-shack-12.webp" alt="The Shim Shack configurator variant 12" loading="lazy" decoding="async" class="thumbnail_bKFe"></div>
<p>Customers enter precise dimensions for every parameter, then rotate, zoom, and inspect the resulting 3D model from any angle. A full-screen mode offers a focused, distraction-free design environment. And when the design is ready, STEP and DXF files can be exported for use in other CAD software or shared directly with engineering teams. It's worth noting that the dimensions shown in the 3D viewer are currently represented as wires in the STEP export and as polylines in the DXF export - they are visual annotations rather than editable parametric dimensions. The screenshots below show an exported part opened in FreeCAD (STEP) and LibreCAD (DXF) - two popular open-source CAD tools that customers can use to inspect and work with the exported files.</p>
<div class="grid_hCdv" style="grid-template-columns:repeat(1, 1fr);gap:1rem"><img src="https://learn.bitbybit.dev/img/blog/the-shim-shack/the-shim-shack-part-in-freecad-exported-as-step.webp" alt="The Shim Shack part exported and opened in 1" loading="lazy" decoding="async" class="thumbnail_bKFe"><img src="https://learn.bitbybit.dev/img/blog/the-shim-shack/the-shim-shack-part-in-librecad-exported-as-dxf.webp" alt="The Shim Shack part exported and opened in 2" loading="lazy" decoding="async" class="thumbnail_bKFe"></div>
<h2 class="anchor anchorTargetStickyNavbar_Vzrq" id="built-in-manufacturing-validation">Built-In Manufacturing Validation<a href="https://learn.bitbybit.dev/blog/the-shim-shack-build-your-parts-3d-configurators-bitbybit-use-case#built-in-manufacturing-validation" class="hash-link" aria-label="Direct link to Built-In Manufacturing Validation" title="Direct link to Built-In Manufacturing Validation" translate="no">​</a></h2>
<p>Users of these configurators are not necessarily CAD engineers. They might be maintenance technicians, facility managers, or procurement specialists who need a specific part but don't work in 3D modeling software daily.</p>
<p>That's why <strong>every configurator validates inputs against real manufacturing constraints</strong> before generating geometry. When a customer enters dimensions that would produce an invalid part, the system responds with clear, specific error messages - whether that's self-intersecting geometry where holes or slots would overlap, insufficient material between features that doesn't respect laser-cutting tolerances, or dimensions that simply fall outside what can be reliably manufactured.</p>
<p>This guided approach ensures that every configuration a customer submits is actually producible - reducing back-and-forth with The Shim Shack's engineering team and speeding up the path from design to delivery.</p>
<h2 class="anchor anchorTargetStickyNavbar_Vzrq" id="the-details-that-matter">The Details That Matter<a href="https://learn.bitbybit.dev/blog/the-shim-shack-build-your-parts-3d-configurators-bitbybit-use-case#the-details-that-matter" class="hash-link" aria-label="Direct link to The Details That Matter" title="Direct link to The Details That Matter" translate="no">​</a></h2>
<p>Building these configurators was a rewarding process, and we enjoyed adding touches that go beyond pure functionality. For instance, when customers enter the full-screen 3D environment, they're greeted by <strong>The Shim Shack's logo</strong> - a small detail that reinforces brand presence and makes the experience feel polished and professional, rather than like a generic embedded widget.</p>
<img src="https://learn.bitbybit.dev/img/blog/the-shim-shack/top-view-build-your-parts-the-shim-shack.webp" alt="Top view of Build Your Parts - The Shim Shack 3D configurator" style="max-width:100%;border-radius:8px;margin:1rem 0">
<p>These details reflect our approach: the configurators aren't just tools, they're an extension of The Shim Shack's brand and customer experience.</p>
<h2 class="anchor anchorTargetStickyNavbar_Vzrq" id="what-this-project-taught-us">What This Project Taught Us<a href="https://learn.bitbybit.dev/blog/the-shim-shack-build-your-parts-3d-configurators-bitbybit-use-case#what-this-project-taught-us" class="hash-link" aria-label="Direct link to What This Project Taught Us" title="Direct link to What This Project Taught Us" translate="no">​</a></h2>
<p>This collaboration reinforced something we deeply believe in: parametric CAD technology and e-commerce are a natural pairing. When products are defined by dimensions rather than catalog selections, the OCCT kernel opens the door to true custom manufacturing workflows online. Real-time validation builds trust - errors are caught before they happen, saving time for both customers and manufacturers. And by integrating with Runner, we brought all of this into an existing WordPress and WooCommerce environment without requiring a platform migration. The ability to export STEP and DXF files closes the loop entirely, bridging the gap between a web configurator and the production floor.</p>
<h2 class="anchor anchorTargetStickyNavbar_Vzrq" id="what-the-shim-shack-says">What The Shim Shack Says<a href="https://learn.bitbybit.dev/blog/the-shim-shack-build-your-parts-3d-configurators-bitbybit-use-case#what-the-shim-shack-says" class="hash-link" aria-label="Direct link to What The Shim Shack Says" title="Direct link to What The Shim Shack Says" translate="no">​</a></h2>
<div class="testimonial-item"><div class="testimonial-quote"><p>"Working with Matas and the Bit By Bit team was an exceptional experience from start to finish. Matas brought a rare combination of deep technical expertise in parametric geometry and web-based 3D modeling, along with outstanding communication and professionalism. He was proactive, highly responsive, and consistently willing to share ideas, progress, and insights early and often, which made the entire development process smooth and collaborative. He truly went above and beyond to understand our vision for this project and turn it into a powerful, interactive 3D configurator. I would gladly work with Matas and Bit By Bit again and highly recommend them to anyone looking to build advanced, high-quality engineering or CAD-driven web applications."</p></div><p><strong>Brandon S., Owner</strong><br>
<!-- -->🇺🇸 United States<br>
<a href="https://theshimshack.com/" target="_blank" rel="noopener noreferrer" class=""><img decoding="async" loading="lazy" src="https://bitbybit.dev/files/site/clients/theshimshack.webp" alt="The Shim Shack" class="img_ev3q"></a></p></div>
<h2 class="anchor anchorTargetStickyNavbar_Vzrq" id="ready-to-build-your-own-configurators">Ready to Build Your Own Configurators?<a href="https://learn.bitbybit.dev/blog/the-shim-shack-build-your-parts-3d-configurators-bitbybit-use-case#ready-to-build-your-own-configurators" class="hash-link" aria-label="Direct link to Ready to Build Your Own Configurators?" title="Direct link to Ready to Build Your Own Configurators?" translate="no">​</a></h2>
<p>If you manufacture custom parts and want to let your customers design them online - with real parametric geometry, manufacturing validation, and CAD export - we'd love to hear from you.</p>
<p>Whether you're on WordPress, Shopify, or a custom platform, Bitbybit Runner can bring parametric 3D configurators to your existing store. Every project is different, and we work closely with each client to find the right approach.</p>
<p><strong>Interested in exploring what's possible? <a href="mailto:info@bitbybit.dev" target="_blank" rel="noopener noreferrer" class="">Reach out to us</a>.</strong></p>
<p><a class="" href="https://learn.bitbybit.dev/learn/runners/intro">Learn more about Bitbybit Runner</a></p>]]></content>
        <author>
            <name>Matas Ubarevičius</name>
            <uri>https://www.linkedin.com/in/matas-ubarevicius/</uri>
        </author>
        <category label="Bitbybit" term="Bitbybit"/>
        <category label="Client" term="Client"/>
        <category label="Customer" term="Customer"/>
        <category label="B2B" term="B2B"/>
        <category label="Case Study" term="Case Study"/>
        <category label="Manufacturing" term="Manufacturing"/>
        <category label="Laser Cutting" term="Laser Cutting"/>
        <category label="Shims" term="Shims"/>
        <category label="WooCommerce" term="WooCommerce"/>
        <category label="WordPress" term="WordPress"/>
        <category label="Runner" term="Runner"/>
        <category label="United States of America" term="United States of America"/>
        <category label="FreeCAD" term="FreeCAD"/>
        <category label="LibreCAD" term="LibreCAD"/>
        <category label="STEP" term="STEP"/>
        <category label="DXF" term="DXF"/>
    </entry>
    <entry>
        <title type="html"><![CDATA[Bitbybit at Hannover Messe 2026: The Browser Is the New CAD]]></title>
        <id>https://learn.bitbybit.dev/blog/hannover-messe-2026</id>
        <link href="https://learn.bitbybit.dev/blog/hannover-messe-2026"/>
        <updated>2026-04-09T00:00:00.000Z</updated>
        <summary type="html"><![CDATA[Join us at Hannover Messe on April 24 for a live presentation on how browser-based CAD configurators extend professional tools into scalable, production-ready web experiences.]]></summary>
        <content type="html"><![CDATA[<p><img decoding="async" loading="lazy" alt="Matas Ubarevičius at Hannover Messe 2026" src="https://learn.bitbybit.dev/assets/images/hannover-messe-matas-ubarevicius-05920eb972dbd0b93302d887c401662f.jpeg" title="Bitbybit at Hannover Messe 2026" width="3840" height="2160" class="img_ev3q"></p>
<p><strong>Bitbybit is heading to Hannover Messe 2026.</strong> On <strong>April 24</strong>, founder Matas Ubarevičius will be giving a 30-minute presentation titled:</p>
<blockquote>
<p><strong>The Browser Is the New CAD: From Code to Configurable Products</strong></p>
</blockquote>
<p>Here is what the talk will cover and why it matters.</p>
<h2 class="anchor anchorTargetStickyNavbar_Vzrq" id="about-hannover-messe">About Hannover Messe<a href="https://learn.bitbybit.dev/blog/hannover-messe-2026#about-hannover-messe" class="hash-link" aria-label="Direct link to About Hannover Messe" title="Direct link to About Hannover Messe" translate="no">​</a></h2>
<p><a href="https://www.hannovermesse.de/en/" target="_blank" rel="noopener noreferrer" class="">Hannover Messe</a> is the world's leading trade fair for the manufacturing industry, running from <strong>April 20 to 24, 2026</strong> in Hannover, Germany. The event brings together technology leaders, industrial manufacturers, and innovators around topics like industrial AI, automation, energy infrastructure, and digital manufacturing. This year's motto is <strong>"Think Tech Forward."</strong></p>
<h2 class="anchor anchorTargetStickyNavbar_Vzrq" id="what-this-talk-is-about">What This Talk Is About<a href="https://learn.bitbybit.dev/blog/hannover-messe-2026#what-this-talk-is-about" class="hash-link" aria-label="Direct link to What This Talk Is About" title="Direct link to What This Talk Is About" translate="no">​</a></h2>
<p>"CAD for everyone" can sound like an oversimplification - especially in a room full of experts. This talk does not propose replacing professional desktop tools. It proposes <strong>extending them</strong>: translating complex parametric logic into accessible, browser-based configurators.</p>
<p>The expertise stays with you. The interface becomes approachable for your customers. End users do not need to understand the underlying complexity - they interact with intuitive tools built on the rules and systems you define.</p>
<p>AI can support both sides of this process, helping experts work more efficiently and guiding users through configuration.</p>
<h2 class="anchor anchorTargetStickyNavbar_Vzrq" id="where-configurators-live">Where Configurators Live<a href="https://learn.bitbybit.dev/blog/hannover-messe-2026#where-configurators-live" class="hash-link" aria-label="Direct link to Where Configurators Live" title="Direct link to Where Configurators Live" translate="no">​</a></h2>
<p>These configurators are not standalone tools. They are embedded directly into <strong>e-commerce platforms, webshops, ERP systems, and service portals</strong> - where products are configured, ordered, and managed.</p>
<p>Combined with modern 3D game engines, they present complex models in a responsive, high-quality interactive environment that runs natively in the browser.</p>
<h2 class="anchor anchorTargetStickyNavbar_Vzrq" id="client-side-and-server-side-together">Client-Side and Server-Side, Together<a href="https://learn.bitbybit.dev/blog/hannover-messe-2026#client-side-and-server-side-together" class="hash-link" aria-label="Direct link to Client-Side and Server-Side, Together" title="Direct link to Client-Side and Server-Side, Together" translate="no">​</a></h2>
<p>Under the hood, computation can run both in the browser and in the cloud:</p>
<ul>
<li class=""><strong>Lightweight interactions and visualization</strong> happen client-side - fast, responsive, instant feedback.</li>
<li class=""><strong>Demanding geometry processing and parametric logic</strong> can be handled on the server - allowing for scalable, production-ready workflows.</li>
</ul>
<p>This hybrid approach makes it possible to serve complex configurators to thousands of users simultaneously without compromising on performance or fidelity.</p>
<h2 class="anchor anchorTargetStickyNavbar_Vzrq" id="what-makes-this-possible">What Makes This Possible<a href="https://learn.bitbybit.dev/blog/hannover-messe-2026#what-makes-this-possible" class="hash-link" aria-label="Direct link to What Makes This Possible" title="Direct link to What Makes This Possible" translate="no">​</a></h2>
<p>Advances in <strong>WebGPU</strong>, <strong>WebAssembly</strong>, and <strong>browser-based CAD kernels</strong> make it possible to run complex geometry directly in the browser, extending CAD beyond the desktop into connected, user-facing environments.</p>
<p><a href="https://bitbybit.dev/" target="_blank" rel="noopener noreferrer" class="">bitbybit.dev</a> is built for developers and CAD professionals who want to bring advanced geometry and parametric workflows to the web. By combining open-source foundations with proprietary layers, it enables the creation of robust 3D configurators and browser-based CAD applications using visual tools, TypeScript, or no-code interfaces.</p>
<h2 class="anchor anchorTargetStickyNavbar_Vzrq" id="real-world-examples">Real-World Examples<a href="https://learn.bitbybit.dev/blog/hannover-messe-2026#real-world-examples" class="hash-link" aria-label="Direct link to Real-World Examples" title="Direct link to Real-World Examples" translate="no">​</a></h2>
<p>The presentation will include real-world examples of configurable systems developed with clients, showing how parametric products can be exposed in a controlled way while preserving engineering intent.</p>
<p>The browser is not replacing CAD - it is extending its reach.</p>
<hr>
<p><strong>See you at Hannover Messe on April 24.</strong></p>
<p>📍 Hannover Messe 2026 - <a href="https://www.hannovermesse.de/event/the-browser-is-the-new-cad-from-code-to-configurable-products/tal/97742" target="_blank" rel="noopener noreferrer" class="">Talk details &amp; schedule</a></p>
<p>Have questions or want to arrange a meeting at the event? <a href="mailto:info@bitbybit.dev" target="_blank" rel="noopener noreferrer" class=""><strong>Get in touch</strong></a>.</p>]]></content>
        <author>
            <name>Matas Ubarevičius</name>
            <uri>https://www.linkedin.com/in/matas-ubarevicius/</uri>
        </author>
        <category label="Bitbybit" term="Bitbybit"/>
        <category label="CAD" term="CAD"/>
        <category label="Enterprise" term="Enterprise"/>
        <category label="Cloud" term="Cloud"/>
        <category label="Germany" term="Germany"/>
        <category label="Hannover Messe" term="Hannover Messe"/>
    </entry>
    <entry>
        <title type="html"><![CDATA[Introducing Managed Bitbybit CAD Cloud with RESTful API]]></title>
        <id>https://learn.bitbybit.dev/blog/introducing-managed-bitbybit-3d-cad-cloud-rest-api</id>
        <link href="https://learn.bitbybit.dev/blog/introducing-managed-bitbybit-3d-cad-cloud-rest-api"/>
        <updated>2026-02-12T00:00:00.000Z</updated>
        <summary type="html"><![CDATA[Learn how the Managed Bitbybit CAD Cloud and RESTful API empower enterprise users to run proprietary 3D algorithms on distributed server infrastructure. Scale your 3D configurators beyond the browser, secure your intellectual property, and automate complex geometry exports with our new managed cloud solutions.]]></summary>
        <content type="html"><![CDATA[<p><img decoding="async" loading="lazy" alt="Bitbybit CAD Cloud" src="https://learn.bitbybit.dev/assets/images/bitbybit-3d-cad-cloud-c5d7317830756ee5f961cd3d6b915751.webp" title="Bitbybit CAD Cloud" width="1920" height="1078" class="img_ev3q"></p>
<p><strong>Bit by bit developers</strong> has always championed the democratization of CAD. The platform empowers users to run complex 3D algorithms directly in the browser - zero installation, zero friction. But as customer ambitions grow, so must the infrastructure.</p>
<p>Today marks the next evolution of the Bitbybit ecosystem: <strong>Managed Bitbybit CAD Cloud</strong>, powered by a <strong>RESTful API</strong>.</p>
<p>This is a fundamental expansion designed for enterprise B2B customers who demand more compute power, better IP protection, and scalable workflows than a browser-only environment can provide.</p>
<h2 class="anchor anchorTargetStickyNavbar_Vzrq" id="the-need-for-power-beyond-the-browser">The Need for Power: Beyond the Browser<a href="https://learn.bitbybit.dev/blog/introducing-managed-bitbybit-3d-cad-cloud-rest-api#the-need-for-power-beyond-the-browser" class="hash-link" aria-label="Direct link to The Need for Power: Beyond the Browser" title="Direct link to The Need for Power: Beyond the Browser" translate="no">​</a></h2>
<p>Traditionally, Bitbybit has operated on a "client-side first" philosophy. When you run a script on the platform, your machine does the heavy lifting. This model is fantastic for accessibility - it mimics traditional CAD without the install bloat.</p>
<p>However, real-world enterprise scenarios often hit a ceiling:</p>
<ul>
<li class=""><strong>Device Limitations:</strong> Complex parametric objects and intense 3D configurators can bring mobile devices or lower-end laptops to a crawl.</li>
<li class=""><strong>Proprietary IP:</strong> B2B customers developing custom algorithms often need a secure environment where their code isn't exposed to the client-side browser.</li>
<li class=""><strong>Heavy Computation:</strong> Generating complex STEP, gLTF, or STL files for large assemblies requires distributed, parallel computing power that a single PC cannot offer.</li>
</ul>
<p>The new Cloud infrastructure addresses these tradeoffs head-on. By offloading heavy geometry processing to managed servers, it becomes possible to run long-lasting computations and manage massive data sets without freezing the user's interface.</p>
<hr>
<h2 class="anchor anchorTargetStickyNavbar_Vzrq" id="bridging-the-gap-how-cloud-enhances-the-experience">Bridging the Gap: How Cloud Enhances the Experience<a href="https://learn.bitbybit.dev/blog/introducing-managed-bitbybit-3d-cad-cloud-rest-api#bridging-the-gap-how-cloud-enhances-the-experience" class="hash-link" aria-label="Direct link to Bridging the Gap: How Cloud Enhances the Experience" title="Direct link to Bridging the Gap: How Cloud Enhances the Experience" translate="no">​</a></h2>
<p>How does this new server-side infrastructure tie into the Bitbybit you already know? Improvements will be rolling out steadily across four key areas:</p>
<h3 class="anchor anchorTargetStickyNavbar_Vzrq" id="1-supercharged-visual-programming">1. Supercharged Visual Programming<a href="https://learn.bitbybit.dev/blog/introducing-managed-bitbybit-3d-cad-cloud-rest-api#1-supercharged-visual-programming" class="hash-link" aria-label="Direct link to 1. Supercharged Visual Programming" title="Direct link to 1. Supercharged Visual Programming" translate="no">​</a></h3>
<p>Paying subscribers will gain access to cloud-capable components integrated directly into the visual programming editors (Blockly, Rete). Soon, drag-and-drop nodes that execute heavy tasks on the cloud will return results instantly to your canvas.</p>
<h3 class="anchor anchorTargetStickyNavbar_Vzrq" id="2-next-gen-3d-configurators">2. Next-Gen 3D Configurators<a href="https://learn.bitbybit.dev/blog/introducing-managed-bitbybit-3d-cad-cloud-rest-api#2-next-gen-3d-configurators" class="hash-link" aria-label="Direct link to 2. Next-Gen 3D Configurators" title="Direct link to 2. Next-Gen 3D Configurators" translate="no">​</a></h3>
<p>High-tier (Silver and Gold) parametric models are being actively migrated to the cloud. This migration means smoother performance for complex models and opens the door for <strong>intricate parametric configurators</strong> that were previously impossible to run in a browser.</p>
<h3 class="anchor anchorTargetStickyNavbar_Vzrq" id="3-enterprise-deployment--consulting">3. Enterprise Deployment &amp; Consulting<a href="https://learn.bitbybit.dev/blog/introducing-managed-bitbybit-3d-cad-cloud-rest-api#3-enterprise-deployment--consulting" class="hash-link" aria-label="Direct link to 3. Enterprise Deployment &amp; Consulting" title="Direct link to 3. Enterprise Deployment &amp; Consulting" translate="no">​</a></h3>
<p>Subscribers hitting scale or resource limits can now access paid consulting to deploy custom algorithms directly to tenant-based infrastructure. This makes it possible to scale workflows without building a separate server backend.</p>
<h3 class="anchor anchorTargetStickyNavbar_Vzrq" id="4-unified-architecture">4. Unified Architecture<a href="https://learn.bitbybit.dev/blog/introducing-managed-bitbybit-3d-cad-cloud-rest-api#4-unified-architecture" class="hash-link" aria-label="Direct link to 4. Unified Architecture" title="Direct link to 4. Unified Architecture" translate="no">​</a></h3>
<p>Internally, the cloud runs the same robust algorithms found in the open-source NPM packages and Runners. This ensures consistency: if it works in your browser prototype, it will work on the enterprise cloud.</p>
<h3 class="anchor anchorTargetStickyNavbar_Vzrq" id="a-new-workflow-for-complex-assemblies">A New Workflow for Complex Assemblies<a href="https://learn.bitbybit.dev/blog/introducing-managed-bitbybit-3d-cad-cloud-rest-api#a-new-workflow-for-complex-assemblies" class="hash-link" aria-label="Direct link to A New Workflow for Complex Assemblies" title="Direct link to A New Workflow for Complex Assemblies" translate="no">​</a></h3>
<p>This infrastructure enables a "Hybrid" approach to 3D configuration. Imagine building a product assembly with thousands of parts:</p>
<ol>
<li class=""><strong>Real-time Preview:</strong> The user interacts with a lightweight, abstracted preview in the browser (fast and responsive).</li>
<li class=""><strong>Cloud Compute:</strong> Once parameters are final, the user hits "Compute."</li>
<li class=""><strong>Delivery:</strong> The server processes the high-fidelity geometry and returns a link to detailed STEP file that might take a while to process.</li>
</ol>
<hr>
<p><img decoding="async" loading="lazy" alt="Bitbybit CAD Cloud" src="https://learn.bitbybit.dev/assets/images/enterprise-3d-cad-c6da4deb9363825d5e96a291b9b4f03a.webp" title="Bitbybit CAD Cloud" width="1920" height="1089" class="img_ev3q"></p>
<h2 class="anchor anchorTargetStickyNavbar_Vzrq" id="the-restful-api-integration-your-way">The RESTful API: Integration Your Way<a href="https://learn.bitbybit.dev/blog/introducing-managed-bitbybit-3d-cad-cloud-rest-api#the-restful-api-integration-your-way" class="hash-link" aria-label="Direct link to The RESTful API: Integration Your Way" title="Direct link to The RESTful API: Integration Your Way" translate="no">​</a></h2>
<p>Previously, integrating Bitbybit meant using NPM packages or Runners on the frontend. The new <strong>RESTful API</strong> opens up deep backend integration for B2B clients and third-party CAD software.</p>
<p>Three distinct ways to leverage this API are available:</p>
<table><thead><tr><th style="text-align:left">Access Type</th><th style="text-align:left">Description</th></tr></thead><tbody><tr><td style="text-align:left"><strong>Indirect</strong></td><td style="text-align:left">Premium applications powered by the API will be exposed directly. Users benefit from the speed and power without ever needing to touch code or manage keys.</td></tr><tr><td style="text-align:left"><strong>Direct (Public)</strong></td><td style="text-align:left">Clients can purchase <strong>API Keys</strong> to access ready-made cloud solutions. Pricing is flexible, based on the scope of access, compute time and storage requirements.</td></tr><tr><td style="text-align:left"><strong>Direct (Enterprise)</strong></td><td style="text-align:left">For clients with custom CAD workflows, <strong>Tenant-Based Infrastructure</strong> is available. A custom contract covers hosting, maintaining, and securing your proprietary algorithms, with API keys that point either to our general servers shared with others or exclusive to your dedicated server environment.</td></tr></tbody></table>
<hr>
<h2 class="anchor anchorTargetStickyNavbar_Vzrq" id="commitment-to-open-source">Commitment to Open Source<a href="https://learn.bitbybit.dev/blog/introducing-managed-bitbybit-3d-cad-cloud-rest-api#commitment-to-open-source" class="hash-link" aria-label="Direct link to Commitment to Open Source" title="Direct link to Commitment to Open Source" translate="no">​</a></h2>
<p>With all this talk of "proprietary algorithms" and "cloud infrastructure," you might wonder: <em>What about Open Source?</em></p>
<p><strong>Nothing changes.</strong></p>
<p>The commitment to open-sourcing fundamental core 3D algorithms remains steadfast. The tools you use to learn, experiment, and build - like the core NPM packages - will remain free and open. The Cloud API is an additive layer for those who need enterprise-grade scale and privacy, not a replacement for community tools.</p>
<p><a class="" href="https://learn.bitbybit.dev/learn/open-source-approach">Read More About Open Source Strategy</a></p>
<h2 class="anchor anchorTargetStickyNavbar_Vzrq" id="ready-to-scale">Ready to Scale?<a href="https://learn.bitbybit.dev/blog/introducing-managed-bitbybit-3d-cad-cloud-rest-api#ready-to-scale" class="hash-link" aria-label="Direct link to Ready to Scale?" title="Direct link to Ready to Scale?" translate="no">​</a></h2>
<p>First version of Managed Bitbybit CAD Cloud is live already. Whether you need to protect your IP, speed up your configurators, or generate massive 3D datasets, we have built the infrastructure for the task.</p>
<div class="theme-admonition theme-admonition-note admonition_xJq3 alert alert--secondary"><div class="admonitionHeading_Gvgb"><span class="admonitionIcon_Rf37"><svg viewBox="0 0 14 16"><path fill-rule="evenodd" d="M6.3 5.69a.942.942 0 0 1-.28-.7c0-.28.09-.52.28-.7.19-.18.42-.28.7-.28.28 0 .52.09.7.28.18.19.28.42.28.7 0 .28-.09.52-.28.7a1 1 0 0 1-.7.3c-.28 0-.52-.11-.7-.3zM8 7.99c-.02-.25-.11-.48-.31-.69-.2-.19-.42-.3-.69-.31H6c-.27.02-.48.13-.69.31-.2.2-.3.44-.31.69h1v3c.02.27.11.5.31.69.2.2.42.31.69.31h1c.27 0 .48-.11.69-.31.2-.19.3-.42.31-.69H8V7.98v.01zM7 2.3c-3.14 0-5.7 2.54-5.7 5.68 0 3.14 2.56 5.7 5.7 5.7s5.7-2.55 5.7-5.7c0-3.15-2.56-5.69-5.7-5.69v.01zM7 .98c3.86 0 7 3.14 7 7s-3.14 7-7 7-7-3.12-7-7 3.14-7 7-7z"></path></svg></span>note</div><div class="admonitionContent_BuS1"><p>Server infrastructure is exclusively managed by the Bit by bit developers company.</p></div></div>
<p><strong>Would you like to discuss a custom enterprise integration and request an API key?</strong></p>
<p><a href="mailto:info@bitbybit.dev" target="_blank" rel="noopener noreferrer" class=""><strong>Contact Us Today</strong></a></p>
<p><a href="https://bitbybit.dev/b2b" target="_blank" rel="noopener noreferrer" class=""><strong>Learn more about B2B offerings</strong></a></p>]]></content>
        <author>
            <name>Matas Ubarevičius</name>
            <uri>https://www.linkedin.com/in/matas-ubarevicius/</uri>
        </author>
        <category label="Cloud" term="Cloud"/>
        <category label="API" term="API"/>
        <category label="CAD" term="CAD"/>
        <category label="Enterprise" term="Enterprise"/>
        <category label="REST" term="REST"/>
        <category label="Architecture" term="Architecture"/>
    </entry>
    <entry>
        <title type="html"><![CDATA[STEP Assembly Support: Load, Parse, and Export Professional CAD Files]]></title>
        <id>https://learn.bitbybit.dev/blog/step-assembly-support-v1-rc1</id>
        <link href="https://learn.bitbybit.dev/blog/step-assembly-support-v1-rc1"/>
        <updated>2026-02-04T00:00:00.000Z</updated>
        <summary type="html"><![CDATA[Bitbybit v1.0.0 introduces STEP assembly support - load complex CAD files, parse part hierarchies, extract components, preserve colors, and export to GLTF or STEP formats.]]></summary>
        <content type="html"><![CDATA[<p><img decoding="async" loading="lazy" src="https://bitbybit.dev/files/site/blog/step-assembly-support/step-assembly-support-occt-bitbybit.webp" alt="Bitbybit STEP Assembly Support" title="Bitbybit STEP Assembly Support" class="img_ev3q"></p>
<!-- -->
<p>If you've ever tried to load, edit or create a complex STEP assembly in a web browser, you know how tricky it can be. STEP is the standard format engineers use to share CAD models, but browsers don't understand it natively. You usually need desktop software or a server to convert it.</p>
<p>With <strong>Bitbybit v1.0.0</strong>, that changes. You can now load STEP assemblies directly in the browser, explore their structure, extract individual parts, and export to web-friendly formats. Everything runs locally using Bitbybit OCCT WebAssembly.</p>
<h2 class="anchor anchorTargetStickyNavbar_Vzrq" id="what-can-you-do">What Can You Do?<a href="https://learn.bitbybit.dev/blog/step-assembly-support-v1-rc1#what-can-you-do" class="hash-link" aria-label="Direct link to What Can You Do?" title="Direct link to What Can You Do?" translate="no">​</a></h2>
<p>You can load a STEP file and see its full assembly tree, just like you would in FreeCAD or SolidWorks. Each part has a label (something like <code>0:1:1:3</code>) that you can use to extract that specific piece.</p>
<p><img decoding="async" loading="lazy" src="https://bitbybit.dev/files/site/blog/step-assembly-support/freecad-step-assembly.webp" alt="FarmBot STEP Assembly of Soil Sensor in FreeCAD" title="FarmBot STEP Assembly of Soil Sensor in FreeCAD" class="img_ev3q">
<img decoding="async" loading="lazy" src="https://bitbybit.dev/files/site/blog/step-assembly-support/farmbot-soil-sensor-step-assembly-in-bitbybit.webp" alt="FarmBot STEP Assembly of Soil Sensor in Bitbybit" title="FarmBot STEP Assembly of Soil Sensor in Bitbybit" class="img_ev3q"></p>
<p>Colors are parsed too. Regular STEP exports lose color data, but we use OCCT's XCAF format to embed colors into the assembly structure. This also works if users export a colored model from Bitbybit and open it in FreeCAD or other CAD software.</p>
<p>You can also convert assemblies to GLTF/GLB format for use in games, web viewers, or AR applications. And since everything happens in your browser, your files never leave your computer.</p>
<p><img decoding="async" loading="lazy" src="https://bitbybit.dev/files/site/blog/step-assembly-support/step-to-gltf-in-bitbybit-rete-editor.webp" alt="Simple Workflow to convert STEP to GLTF" title="Simple Workflow to convert STEP to GLTF" class="img_ev3q"></p>
<h2 class="anchor anchorTargetStickyNavbar_Vzrq" id="parametric-scripts-to-step-assemblies">Parametric Scripts to STEP Assemblies<a href="https://learn.bitbybit.dev/blog/step-assembly-support-v1-rc1#parametric-scripts-to-step-assemblies" class="hash-link" aria-label="Direct link to Parametric Scripts to STEP Assemblies" title="Direct link to Parametric Scripts to STEP Assemblies" translate="no">​</a></h2>
<p>This is where the workflow really shines. You can build parametric geometry in Bitbybit - using visual programming or TypeScript - and export it directly to STEP format with colors preserved. Change a parameter, re-run the script, and download a new STEP file ready for manufacturing or further CAD work.</p>
<p>Imagine a product configurator where customers adjust dimensions, then download a professional CAD file they can send to a machine shop. Or a design tool that generates custom brackets based on user inputs. The geometry is created algorithmically, but the output is the same format that engineers use in SolidWorks or Fusion 360.</p>
<p>Furthermore - part instances and colors are supported, so users of third party CAD applications will be able to load these optimized assets in efficient manner.</p>
<p><img decoding="async" loading="lazy" src="https://bitbybit.dev/files/site/blog/step-assembly-support/create-occt-step-assembly-in-bitbybit.webp" alt="Create OCCT STEP Assembly in Bitbybit" title="Create OCCT STEP Assembly in Bitbybit" class="img_ev3q"></p>
<p><img decoding="async" loading="lazy" src="https://bitbybit.dev/files/site/blog/step-assembly-support/bitbybit-assembly-opened-in-freecad-with-structure.webp" alt="Open Bitbybit OCCT STEP Assembly in FreeCAD" title="Open Bitbybit OCCT STEP Assembly in FreeCAD" class="img_ev3q"></p>
<h2 class="anchor anchorTargetStickyNavbar_Vzrq" id="why-does-this-matter">Why Does This Matter?<a href="https://learn.bitbybit.dev/blog/step-assembly-support-v1-rc1#why-does-this-matter" class="hash-link" aria-label="Direct link to Why Does This Matter?" title="Direct link to Why Does This Matter?" translate="no">​</a></h2>
<p>Real products aren't single shapes. A bicycle has wheels, a frame, handlebars. An electronic device has a case, buttons, internal components. Engineers design each part separately, then assemble them digitally.</p>
<p>STEP files preserve this structure. When you load one, you get the full hierarchy of parts and sub-assemblies, along with names, colors, and positions. This is useful for building product configurators, design review tools, or documentation systems where you need to work with individual components.</p>
<h2 class="anchor anchorTargetStickyNavbar_Vzrq" id="the-api">The API<a href="https://learn.bitbybit.dev/blog/step-assembly-support-v1-rc1#the-api" class="hash-link" aria-label="Direct link to The API" title="Direct link to The API" translate="no">​</a></h2>
<p>There are two groups of methods. The <strong>Manager</strong> methods let you build and export assemblies: <code>createPart</code>, <code>createAssemblyNode</code>, <code>createInstanceNode</code>, <code>combineStructure</code>, <code>buildAssemblyDocument</code>, <code>exportDocumentToStep</code>, and <code>exportDocumentToGltf</code>.</p>
<p>The <strong>Query</strong> methods let you inspect existing documents: <code>getDocumentParts</code>, <code>getAssemblyHierarchy</code>, <code>getShapeFromLabel</code>, <code>getLabelColor</code>, <code>getLabelTransform</code>, and <code>getLabelInfo</code>.</p>
<p><img decoding="async" loading="lazy" src="https://bitbybit.dev/files/site/blog/step-assembly-support/occt-step-assembly-creation-components.webp" alt="Create STEP Assemblies in Rete" title="Create STEP Assemblies in Rete" class="img_ev3q"></p>
<h2 class="anchor anchorTargetStickyNavbar_Vzrq" id="visual-programming">Visual Programming<a href="https://learn.bitbybit.dev/blog/step-assembly-support-v1-rc1#visual-programming" class="hash-link" aria-label="Direct link to Visual Programming" title="Direct link to Visual Programming" translate="no">​</a></h2>
<p>If you use Rete or Blockly, we've added components for all of this. The hierarchy preview is especially handy - it shows the assembly tree and lets you click on any item to see its label, which you can then use to extract that part.</p>
<h2 class="anchor anchorTargetStickyNavbar_Vzrq" id="your-files-stay-private">Your Files Stay Private<a href="https://learn.bitbybit.dev/blog/step-assembly-support-v1-rc1#your-files-stay-private" class="hash-link" aria-label="Direct link to Your Files Stay Private" title="Direct link to Your Files Stay Private" translate="no">​</a></h2>
<p>Everything runs in your browser. OCCT is compiled to WebAssembly, so parsing and exporting happens locally. Your files are never uploaded anywhere. This matters if you're working with proprietary designs.</p>
<div class="theme-admonition theme-admonition-warning admonition_xJq3 alert alert--warning"><div class="admonitionHeading_Gvgb"><span class="admonitionIcon_Rf37"><svg viewBox="0 0 16 16"><path fill-rule="evenodd" d="M8.893 1.5c-.183-.31-.52-.5-.887-.5s-.703.19-.886.5L.138 13.499a.98.98 0 0 0 0 1.001c.193.31.53.501.886.501h13.964c.367 0 .704-.19.877-.5a1.03 1.03 0 0 0 .01-1.002L8.893 1.5zm.133 11.497H6.987v-2.003h2.039v2.003zm0-3.004H6.987V5.987h2.039v4.006z"></path></svg></span>Memory Note</div><div class="admonitionContent_BuS1"><p>Large assemblies need memory. The standard build supports up to 2GB. For complex models, use the 64-bit version (up to 16GB).</p></div></div>
<h2 class="anchor anchorTargetStickyNavbar_Vzrq" id="tutorials">Tutorials<a href="https://learn.bitbybit.dev/blog/step-assembly-support-v1-rc1#tutorials" class="hash-link" aria-label="Direct link to Tutorials" title="Direct link to Tutorials" translate="no">​</a></h2>
<p>We have step-by-step tutorials to get you started:</p>
<ul>
<li class=""><a class="" href="https://learn.bitbybit.dev/learn/code/common/occt/assembly/intro">Introduction to Assemblies</a> - the basics</li>
<li class=""><a class="" href="https://learn.bitbybit.dev/learn/code/common/occt/assembly/step-to-gltf">Convert STEP to GLTF</a> - for web viewing</li>
<li class=""><a class="" href="https://learn.bitbybit.dev/learn/code/common/occt/assembly/assembly-structure">Parse Assembly Structure</a> - explore parts</li>
<li class=""><a class="" href="https://learn.bitbybit.dev/learn/code/common/occt/assembly/create-assembly">Build and Export Assemblies</a> - create from scratch</li>
<li class=""><a class="" href="https://learn.bitbybit.dev/learn/code/common/occt/assembly/shape-to-step-with-color-assembly">Export Shapes with Color</a> - preserve colors</li>
</ul>
<p>Each one has examples in Rete, Blockly, and TypeScript.</p>
<h2 class="anchor anchorTargetStickyNavbar_Vzrq" id="example-load-and-display-a-step-assembly">Example: Load and Display a STEP Assembly<a href="https://learn.bitbybit.dev/blog/step-assembly-support-v1-rc1#example-load-and-display-a-step-assembly" class="hash-link" aria-label="Direct link to Example: Load and Display a STEP Assembly" title="Direct link to Example: Load and Display a STEP Assembly" translate="no">​</a></h2>
<p>Here's the simplest workflow - load a STEP file and display it in the browser:</p>
<div class="language-typescript codeBlockContainer_Ckt0 theme-code-block" style="--prism-color:#F8F8F2;--prism-background-color:#282A36"><div class="codeBlockContent_QJqH"><pre tabindex="0" class="prism-code language-typescript codeBlock_bY9V thin-scrollbar" style="color:#F8F8F2;background-color:#282A36"><code class="codeBlockLines_e6Vv"><div class="token-line" style="color:#F8F8F2"><span class="token comment" style="color:rgb(98, 114, 164)">// Fetch the STEP file</span><span class="token plain"></span><br></div><div class="token-line" style="color:#F8F8F2"><span class="token plain"></span><span class="token keyword" style="color:rgb(189, 147, 249);font-style:italic">const</span><span class="token plain"> stepData </span><span class="token operator">=</span><span class="token plain"> </span><span class="token keyword" style="color:rgb(189, 147, 249);font-style:italic">await</span><span class="token plain"> bitbybit</span><span class="token punctuation" style="color:rgb(248, 248, 242)">.</span><span class="token plain">asset</span><span class="token punctuation" style="color:rgb(248, 248, 242)">.</span><span class="token function" style="color:rgb(80, 250, 123)">fetchFile</span><span class="token punctuation" style="color:rgb(248, 248, 242)">(</span><span class="token punctuation" style="color:rgb(248, 248, 242)">{</span><span class="token plain"></span><br></div><div class="token-line" style="color:#F8F8F2"><span class="token plain">    url</span><span class="token operator">:</span><span class="token plain"> </span><span class="token string" style="color:rgb(255, 121, 198)">"https://learn.bitbybit.dev/files/3d/Soil-Sensor.stpZ"</span><span class="token plain"></span><br></div><div class="token-line" style="color:#F8F8F2"><span class="token plain"></span><span class="token punctuation" style="color:rgb(248, 248, 242)">}</span><span class="token punctuation" style="color:rgb(248, 248, 242)">)</span><span class="token punctuation" style="color:rgb(248, 248, 242)">;</span><span class="token plain"></span><br></div><div class="token-line" style="color:#F8F8F2"><span class="token plain" style="display:inline-block"></span><br></div><div class="token-line" style="color:#F8F8F2"><span class="token plain"></span><span class="token comment" style="color:rgb(98, 114, 164)">// Convert to GLTF for display</span><span class="token plain"></span><br></div><div class="token-line" style="color:#F8F8F2"><span class="token plain"></span><span class="token keyword" style="color:rgb(189, 147, 249);font-style:italic">const</span><span class="token plain"> glbData </span><span class="token operator">=</span><span class="token plain"> </span><span class="token keyword" style="color:rgb(189, 147, 249);font-style:italic">await</span><span class="token plain"> bitbybit</span><span class="token punctuation" style="color:rgb(248, 248, 242)">.</span><span class="token plain">occt</span><span class="token punctuation" style="color:rgb(248, 248, 242)">.</span><span class="token plain">io</span><span class="token punctuation" style="color:rgb(248, 248, 242)">.</span><span class="token function" style="color:rgb(80, 250, 123)">convertStepToGltf</span><span class="token punctuation" style="color:rgb(248, 248, 242)">(</span><span class="token punctuation" style="color:rgb(248, 248, 242)">{</span><span class="token plain"></span><br></div><div class="token-line" style="color:#F8F8F2"><span class="token plain">    stepData</span><span class="token punctuation" style="color:rgb(248, 248, 242)">,</span><span class="token plain"></span><br></div><div class="token-line" style="color:#F8F8F2"><span class="token plain">    meshPrecision</span><span class="token operator">:</span><span class="token plain"> </span><span class="token number">0.05</span><span class="token plain"></span><br></div><div class="token-line" style="color:#F8F8F2"><span class="token plain"></span><span class="token punctuation" style="color:rgb(248, 248, 242)">}</span><span class="token punctuation" style="color:rgb(248, 248, 242)">)</span><span class="token punctuation" style="color:rgb(248, 248, 242)">;</span><span class="token plain"></span><br></div><div class="token-line" style="color:#F8F8F2"><span class="token plain" style="display:inline-block"></span><br></div><div class="token-line" style="color:#F8F8F2"><span class="token plain"></span><span class="token comment" style="color:rgb(98, 114, 164)">// Load into the 3D scene</span><span class="token plain"></span><br></div><div class="token-line" style="color:#F8F8F2"><span class="token plain"></span><span class="token keyword" style="color:rgb(189, 147, 249);font-style:italic">await</span><span class="token plain"> bitbybit</span><span class="token punctuation" style="color:rgb(248, 248, 242)">.</span><span class="token plain">babylon</span><span class="token punctuation" style="color:rgb(248, 248, 242)">.</span><span class="token plain">io</span><span class="token punctuation" style="color:rgb(248, 248, 242)">.</span><span class="token function" style="color:rgb(80, 250, 123)">loadGlbFromArrayBuffer</span><span class="token punctuation" style="color:rgb(248, 248, 242)">(</span><span class="token punctuation" style="color:rgb(248, 248, 242)">{</span><span class="token plain"></span><br></div><div class="token-line" style="color:#F8F8F2"><span class="token plain">    glbData</span><span class="token punctuation" style="color:rgb(248, 248, 242)">,</span><span class="token plain"></span><br></div><div class="token-line" style="color:#F8F8F2"><span class="token plain">    fileName</span><span class="token operator">:</span><span class="token plain"> </span><span class="token string" style="color:rgb(255, 121, 198)">"model.glb"</span><span class="token plain"></span><br></div><div class="token-line" style="color:#F8F8F2"><span class="token plain"></span><span class="token punctuation" style="color:rgb(248, 248, 242)">}</span><span class="token punctuation" style="color:rgb(248, 248, 242)">)</span><span class="token punctuation" style="color:rgb(248, 248, 242)">;</span><br></div></code></pre></div></div>
<p>That's it - three function calls to go from a STEP file to 3D model in the browser.</p>
<h2 class="anchor anchorTargetStickyNavbar_Vzrq" id="whats-next">What's Next?<a href="https://learn.bitbybit.dev/blog/step-assembly-support-v1-rc1#whats-next" class="hash-link" aria-label="Direct link to What's Next?" title="Direct link to What's Next?" translate="no">​</a></h2>
<p>This is a release candidate. We're still adding features and improving coordinate system handling for different CAD conventions. If you find issues or have ideas, let us know on <a href="https://discord.gg/GSe3VMe" target="_blank" rel="noopener noreferrer" class="">Discord</a>.</p>
<h2 class="anchor anchorTargetStickyNavbar_Vzrq" id="credits">Credits<a href="https://learn.bitbybit.dev/blog/step-assembly-support-v1-rc1#credits" class="hash-link" aria-label="Direct link to Credits" title="Direct link to Credits" translate="no">​</a></h2>
<p>The soil sensor model in our tutorials comes from <a href="https://genesis.farm.bot/v1.5/Extras/cad.html" target="_blank" rel="noopener noreferrer" class="">FarmBot</a>, an open-source CNC farming robot. Their CAD files are public domain.</p>
<hr>
<p><strong>Ready to try it?</strong> Head to the <a class="" href="https://learn.bitbybit.dev/learn/code/common/occt/assembly">assembly tutorials</a> and load your first STEP file.</p>]]></content>
        <author>
            <name>Matas Ubarevičius</name>
            <uri>https://www.linkedin.com/in/matas-ubarevicius/</uri>
        </author>
        <category label="OCCT" term="OCCT"/>
        <category label="Assembly" term="Assembly"/>
        <category label="STEP" term="STEP"/>
        <category label="GLTF" term="GLTF"/>
        <category label="CAD" term="CAD"/>
        <category label="FreeCAD" term="FreeCAD"/>
    </entry>
    <entry>
        <title type="html"><![CDATA[Bitbybit v1.0.0 Release Candidate 0 - A New Foundation for 3D CAD on the Web]]></title>
        <id>https://learn.bitbybit.dev/blog/bitbybit-v1-release-candidate-0</id>
        <link href="https://learn.bitbybit.dev/blog/bitbybit-v1-release-candidate-0"/>
        <updated>2026-01-21T00:00:00.000Z</updated>
        <summary type="html"><![CDATA[After nearly 100 releases in the 0.x.x range, version 1.0.0 Release Candidate 0 is now available. This milestone brings a completely rebuilt core on top of native OCCT, significant performance improvements, and exciting new features.]]></summary>
        <content type="html"><![CDATA[<p><img decoding="async" loading="lazy" src="https://bitbybit.dev/files/site/blog/v1-rc0/bitbybit-dev-cad-v1-rc0-banner.webp" alt="Bitbybit v1.0.0 Release Candidate" title="Bitbybit v1.0.0 Release Candidate" class="img_ev3q"></p>
<p>After nearly <strong>100 releases</strong> in the 0.x.x range, <strong>version 1.0.0 Release Candidate 0</strong> is now available. This is a huge milestone for Bitbybit and represents extensive engineering work to set the project on a solid foundation for years to come.</p>
<h2 class="anchor anchorTargetStickyNavbar_Vzrq" id="why-this-release-matters">Why This Release Matters<a href="https://learn.bitbybit.dev/blog/bitbybit-v1-release-candidate-0#why-this-release-matters" class="hash-link" aria-label="Direct link to Why This Release Matters" title="Direct link to Why This Release Matters" translate="no">​</a></h2>
<p>When Bitbybit was first built, it relied on <strong>OpenCascade.js</strong> as a bridge to access the powerful OCCT CAD kernel from JavaScript. It was an impressive project that was genuinely ahead of its time. However, its development has stalled and it's no longer actively maintained. A more sustainable path forward was needed.</p>
<p>With v1.0.0, the Bitbybit core has been completely rebuilt <strong>directly on top of the native <a href="https://github.com/Open-Cascade-SAS/OCCT" target="_blank" rel="noopener noreferrer" class="">OCCT C++</a> library</strong>. This wasn't just a dependency swap-it was a fundamental rearchitecting of how Bitbybit interfaces with one of the world's most powerful open-source CAD kernels. The good news? The existing API remains almost entirely intact, so the vast majority of existing projects should continue working with minimal changes.</p>
<h2 class="anchor anchorTargetStickyNavbar_Vzrq" id="occt-800-at-the-core">OCCT 8.0.0 at the Core<a href="https://learn.bitbybit.dev/blog/bitbybit-v1-release-candidate-0#occt-800-at-the-core" class="hash-link" aria-label="Direct link to OCCT 8.0.0 at the Core" title="Direct link to OCCT 8.0.0 at the Core" translate="no">​</a></h2>
<p>This release doesn't just migrate to native OCCT - it adopts <strong>version 8.0.0 Release Candidate 3</strong>, the latest version of OpenCascade Technology. During extensive testing, this new version has proven to be remarkably stable. All unit tests pass, both open-source examples and proprietary commercial projects built for B2B customers continue to work without any apparent loss of functionality, and noticeable improvements in both performance and reliability have been observed across the board.</p>
<p>This is a significant upgrade. OCCT 8.0.0 brings improvements to filleting, boolean operations, and many other core CAD algorithms that Bitbybit users rely on every day.</p>
<p><img decoding="async" loading="lazy" src="https://bitbybit.dev/files/site/blog/v1-rc0/occt-3d-8-release-candidate.webp" alt="OCCT v8.0.0 Release Candidate 3" title="OCCT v8.0.0 Release Candidate 3" class="img_ev3q"></p>
<h2 class="anchor anchorTargetStickyNavbar_Vzrq" id="whats-new-in-this-release">What's New in This Release<a href="https://learn.bitbybit.dev/blog/bitbybit-v1-release-candidate-0#whats-new-in-this-release" class="hash-link" aria-label="Direct link to What's New in This Release" title="Direct link to What's New in This Release" translate="no">​</a></h2>
<p>Beyond the core migration, this release is packed with new features and improvements.</p>
<p>There are now <strong>three different OCCT build architectures</strong> to match your performance needs: a 32-bit build for compatibility accross all browsers and mobile devices, a 64-bit build for handling larger models, and a 64-bit multi-threaded build for maximum performance on complex operations. You can choose between these variants when scaffolding new projects with our NPX tool.</p>
<p>Speaking of scaffolding, the <code>npx @bitbybit-dev/create-app</code> CLI now lets you select not just your preferred 3D engine (PlayCanvas, Three.js, or Babylon.js), but also which OCCT architecture variant you want to use: <code>32</code>, <code>64</code>, or <code>64-mt</code>.</p>
<p><strong>New spiral algorithms</strong> for wire creation have been added. The <code>createTaperedHelixWire</code>, <code>createHelixWireByTurns</code>, and <code>createFlatSpiralWire</code> methods open up new possibilities for springs, decorative elements, and architectural features. And for those who've been asking-yes, there's finally a proper <strong>torus solid</strong> primitive in OCCT.</p>
<p>On the infrastructure side, a <strong>new Bitbybit CDN</strong> has been launched at <code>git-cdn.bitbybit.dev</code>. The migration away from JSDelivr was done for practical and reliability reasons, providing more control over asset delivery and ensuring consistent availability for production applications.</p>
<p>The 3D engine dependencies have also been updated: <strong>BabylonJS v8.46.2</strong> and <strong>PlayCanvas v2.20.0</strong> are now included in the latest runners.</p>
<h2 class="anchor anchorTargetStickyNavbar_Vzrq" id="breaking-changes-to-be-aware-of">Breaking Changes to Be Aware Of<a href="https://learn.bitbybit.dev/blog/bitbybit-v1-release-candidate-0#breaking-changes-to-be-aware-of" class="hash-link" aria-label="Direct link to Breaking Changes to Be Aware Of" title="Direct link to Breaking Changes to Be Aware Of" translate="no">​</a></h2>
<p>While significant effort went into maintaining API compatibility, there are a few changes you'll need to address when migrating.</p>
<p>The most notable one is that <strong>edge indexing is now zero-based</strong>. Previously, edge indices started at 1, which was an early design decision that didn't align with standard programming conventions. All projects that reference edges by index will need to be updated-just subtract 1 from your existing edge indices.</p>
<p>If you're using OCCT through our high-level APIs-via <code>occt-worker</code> or the game engine-specific NPM packages like <code>@bitbybit-dev/threejs</code>, <code>@bitbybit-dev/babylonjs</code>, or <code>@bitbybit-dev/playcanvas</code>-you're unlikely to encounter any additional API changes beyond the edge indexing.</p>
<p>However, if you've been using the <code>@bitbybit-dev/occt</code> layer directly and interacting with WASM builds at a lower level, you will encounter more significant API changes. Using the official exported API functions is strongly recommended, as this is the only surface guaranteed to remain stable across future versions.</p>
<h2 class="anchor anchorTargetStickyNavbar_Vzrq" id="migration-should-be-smooth">Migration Should Be Smooth<a href="https://learn.bitbybit.dev/blog/bitbybit-v1-release-candidate-0#migration-should-be-smooth" class="hash-link" aria-label="Direct link to Migration Should Be Smooth" title="Direct link to Migration Should Be Smooth" translate="no">​</a></h2>
<p>Version 1.0.0 has been running internally across various projects and customer deployments. The transition has been remarkably smooth. Most projects require nothing more than updating package versions and adjusting edge indices where applicable.</p>
<p>If you do run into any issues during migration, please reach out on Discord or open an issue on GitHub. We are here to help make the transition as painless as possible.</p>
<h2 class="anchor anchorTargetStickyNavbar_Vzrq" id="whats-next">What's Next?<a href="https://learn.bitbybit.dev/blog/bitbybit-v1-release-candidate-0#whats-next" class="hash-link" aria-label="Direct link to What's Next?" title="Direct link to What's Next?" translate="no">​</a></h2>
<p>This is Release Candidate 0, which means the final stretch before the official 1.0.0 release has begun. This period is dedicated to gathering feedback, catching any edge cases that might have been missed, and ensuring everything is rock solid before the final release.</p>
<p>Your feedback during this phase is incredibly valuable. If you try the RC and find something that doesn't work as expected, please let us know. Every bug report helps us ship a better 1.0.0.</p>
<h2 class="anchor anchorTargetStickyNavbar_Vzrq" id="get-started">Get Started<a href="https://learn.bitbybit.dev/blog/bitbybit-v1-release-candidate-0#get-started" class="hash-link" aria-label="Direct link to Get Started" title="Direct link to Get Started" translate="no">​</a></h2>
<p>Ready to try v1.0.0 RC0? Update your dependencies to the release candidate version:</p>
<div class="language-bash codeBlockContainer_Ckt0 theme-code-block" style="--prism-color:#F8F8F2;--prism-background-color:#282A36"><div class="codeBlockContent_QJqH"><pre tabindex="0" class="prism-code language-bash codeBlock_bY9V thin-scrollbar" style="color:#F8F8F2;background-color:#282A36"><code class="codeBlockLines_e6Vv"><div class="token-line" style="color:#F8F8F2"><span class="token plain">npm install @bitbybit-dev/core@rc @bitbybit-dev/occt@rc</span><br></div></code></pre></div></div>
<p>Or scaffold a fresh project with the new architecture options using the <code>@rc</code> tag:</p>
<div class="language-bash codeBlockContainer_Ckt0 theme-code-block" style="--prism-color:#F8F8F2;--prism-background-color:#282A36"><div class="codeBlockContent_QJqH"><pre tabindex="0" class="prism-code language-bash codeBlock_bY9V thin-scrollbar" style="color:#F8F8F2;background-color:#282A36"><code class="codeBlockLines_e6Vv"><div class="token-line" style="color:#F8F8F2"><span class="token plain">npx @bitbybit-dev/create-app@rc my-v1-project</span><br></div></code></pre></div></div>
<p>Thank you to everyone who has supported Bitbybit over these nearly 100 releases. This milestone wouldn't have been possible without the community's feedback, bug reports, and enthusiasm. Here's to the next chapter!</p>
<p>Happy coding!</p>]]></content>
        <author>
            <name>Matas Ubarevičius</name>
            <uri>https://www.linkedin.com/in/matas-ubarevicius/</uri>
        </author>
        <category label="Bitbybit" term="Bitbybit"/>
        <category label="CAD" term="CAD"/>
        <category label="OCCT" term="OCCT"/>
    </entry>
    <entry>
        <title type="html"><![CDATA[AI Prompt Contexts - Teaching Your AI Assistant to Code with Bitbybit]]></title>
        <id>https://learn.bitbybit.dev/blog/ai-prompt-contexts</id>
        <link href="https://learn.bitbybit.dev/blog/ai-prompt-contexts"/>
        <updated>2026-01-15T00:00:00.000Z</updated>
        <summary type="html"><![CDATA[Download ready-made AI prompt contexts that teach ChatGPT, Claude and other coding assistants the full Bitbybit API, so they generate working 3D CAD code for the Monaco editor, BabylonJS, Three.js and PlayCanvas.]]></summary>
        <content type="html"><![CDATA[<p><img decoding="async" loading="lazy" src="https://bitbybit.dev/files/site/blog/ai-prompt-contexts/ai-prompt-contexts.webp" alt="AI Prompt Contexts for Bitbybit" title="AI Prompt Contexts for Bitbybit" class="img_ev3q"></p>
<p>Modern AI assistants like Claude, Gemini, Grok or ChatGPT or are remarkably capable at writing code. However, they can struggle with specialized libraries and APIs they weren't extensively trained on. That's where AI Prompt Contexts come in - specially crafted documentation files that give your AI assistant deep knowledge of the Bitbybit API.</p>
<h2 class="anchor anchorTargetStickyNavbar_Vzrq" id="download-context-files">Download Context Files<a href="https://learn.bitbybit.dev/blog/ai-prompt-contexts#download-context-files" class="hash-link" aria-label="Direct link to Download Context Files" title="Direct link to Download Context Files" translate="no">​</a></h2>
<p>Choose the context file that matches your 3D rendering engine. <strong>Right-click and "Save As"</strong> to download, or open and copy the content. Read on below for guidance on which format to choose.</p>
<div class="theme-tabs-container tabs-container tabList_zI5C"><ul role="tablist" aria-orientation="horizontal" class="tabs"><li role="tab" tabindex="0" aria-selected="true" class="tabs__item tabItem_yeRP tabs__item--active">Monaco Editor</li><li role="tab" tabindex="-1" aria-selected="false" class="tabs__item tabItem_yeRP">BabylonJS</li><li role="tab" tabindex="-1" aria-selected="false" class="tabs__item tabItem_yeRP">ThreeJS</li><li role="tab" tabindex="-1" aria-selected="false" class="tabs__item tabItem_yeRP">PlayCanvas</li></ul><div class="margin-top--md"><div role="tabpanel" class="tabItem_yrzq"><div style="padding:20px;background:linear-gradient(135deg, rgba(240, 206, 187, 0.1) 0%, rgba(30, 32, 36, 0.8) 100%);border-radius:12px;border:1px solid rgba(240, 206, 187, 0.3);margin-bottom:20px"><h4 style="margin-top:0;color:#F0CEBB">Monaco Editor Context (Beginner-Friendly)</h4><p style="color:var(--ifm-font-color-base);opacity:0.8;margin-bottom:20px">For users of our online TypeScript editor at <a href="https://bitbybit.dev/app?editor=typescript">bitbybit.dev/app</a></p><h5 style="margin-top:16px;margin-bottom:12px;color:var(--ifm-font-color-base)">Markdown Context (Dictionary Translation)</h5><div><a href="https://git-cdn.bitbybit.dev/v1.6.0-rc.0/ai-context/bitbybit-babylon-monaco-ai-context.md" target="_blank" rel="noopener noreferrer" style="display:inline-flex;align-items:center;gap:10px;background:linear-gradient(135deg, #F0CEBB 0%, #d6b39f 100%);color:#1a1c1f;padding:14px 24px;border-radius:8px;font-weight:600;font-size:14px;text-decoration:none;border:1px solid #d6b39f;transition:all 0.3s ease;margin-right:12px;margin-bottom:12px"><svg width="16" height="16" viewBox="0 0 24 24" fill="none" stroke="currentColor" stroke-width="2.5" style="vertical-align:middle"><path d="M21 15v4a2 2 0 0 1-2 2H5a2 2 0 0 1-2-2v-4"></path><polyline points="7 10 12 15 17 10"></polyline><line x1="12" y1="15" x2="12" y2="3"></line></svg>Monaco Context</a></div><h5 style="margin-top:16px;margin-bottom:12px;color:var(--ifm-font-color-base)">TypeScript Declarations (No Translation)</h5><div><a href="https://git-cdn.bitbybit.dev/v1.6.0-rc.0/ai-context/bitbybit-babylon-formatted.d.ts" target="_blank" rel="noopener noreferrer" style="display:inline-flex;align-items:center;gap:10px;background:linear-gradient(135deg, #F0CEBB 0%, #d6b39f 100%);color:#1a1c1f;padding:14px 24px;border-radius:8px;font-weight:600;font-size:14px;text-decoration:none;border:1px solid #d6b39f;transition:all 0.3s ease;margin-right:12px;margin-bottom:12px"><svg width="16" height="16" viewBox="0 0 24 24" fill="none" stroke="currentColor" stroke-width="2.5" style="vertical-align:middle"><path d="M21 15v4a2 2 0 0 1-2 2H5a2 2 0 0 1-2-2v-4"></path><polyline points="7 10 12 15 17 10"></polyline><line x1="12" y1="15" x2="12" y2="3"></line></svg>.d.ts with Comments</a><a href="https://git-cdn.bitbybit.dev/v1.6.0-rc.0/ai-context/bitbybit-babylon-formatted-no-comments.d.ts" target="_blank" rel="noopener noreferrer" style="display:inline-flex;align-items:center;gap:10px;background:linear-gradient(135deg, #2a2d32 0%, #1a1c1f 100%);color:#F0CEBB;padding:14px 24px;border-radius:8px;font-weight:600;font-size:14px;text-decoration:none;border:1px solid #F0CEBB;transition:all 0.3s ease;margin-right:12px;margin-bottom:12px"><svg width="16" height="16" viewBox="0 0 24 24" fill="none" stroke="currentColor" stroke-width="2.5" style="vertical-align:middle"><path d="M21 15v4a2 2 0 0 1-2 2H5a2 2 0 0 1-2-2v-4"></path><polyline points="7 10 12 15 17 10"></polyline><line x1="12" y1="15" x2="12" y2="3"></line></svg>.d.ts without Comments</a></div></div></div><div role="tabpanel" class="tabItem_yrzq" hidden=""><div style="padding:20px;background:linear-gradient(135deg, rgba(187, 70, 75, 0.1) 0%, rgba(30, 32, 36, 0.8) 100%);border-radius:12px;border:1px solid rgba(187, 70, 75, 0.3);margin-bottom:20px"><h4 style="margin-top:0;color:#BB464B">BabylonJS Context Files</h4><p style="color:var(--ifm-font-color-base);opacity:0.8;margin-bottom:20px">Full-featured 3D engine with powerful rendering capabilities</p><h5 style="margin-top:16px;margin-bottom:12px;color:var(--ifm-font-color-base)">Markdown Contexts (Dictionary Translation)</h5><div><a href="https://git-cdn.bitbybit.dev/v1.6.0-rc.0/ai-context/bitbybit-babylon-ai-context.md" target="_blank" rel="noopener noreferrer" style="display:inline-flex;align-items:center;gap:10px;background:linear-gradient(135deg, #F0CEBB 0%, #d6b39f 100%);color:#1a1c1f;padding:14px 24px;border-radius:8px;font-weight:600;font-size:14px;text-decoration:none;border:1px solid #d6b39f;transition:all 0.3s ease;margin-right:12px;margin-bottom:12px"><svg width="16" height="16" viewBox="0 0 24 24" fill="none" stroke="currentColor" stroke-width="2.5" style="vertical-align:middle"><path d="M21 15v4a2 2 0 0 1-2 2H5a2 2 0 0 1-2-2v-4"></path><polyline points="7 10 12 15 17 10"></polyline><line x1="12" y1="15" x2="12" y2="3"></line></svg>Full Context</a><a href="https://git-cdn.bitbybit.dev/v1.6.0-rc.0/ai-context/bitbybit-babylon-no-comment-min-ai.md" target="_blank" rel="noopener noreferrer" style="display:inline-flex;align-items:center;gap:10px;background:linear-gradient(135deg, #2a2d32 0%, #1a1c1f 100%);color:#F0CEBB;padding:14px 24px;border-radius:8px;font-weight:600;font-size:14px;text-decoration:none;border:1px solid #F0CEBB;transition:all 0.3s ease;margin-right:12px;margin-bottom:12px"><svg width="16" height="16" viewBox="0 0 24 24" fill="none" stroke="currentColor" stroke-width="2.5" style="vertical-align:middle"><path d="M21 15v4a2 2 0 0 1-2 2H5a2 2 0 0 1-2-2v-4"></path><polyline points="7 10 12 15 17 10"></polyline><line x1="12" y1="15" x2="12" y2="3"></line></svg>Lite Context</a></div><h5 style="margin-top:16px;margin-bottom:12px;color:var(--ifm-font-color-base)">TypeScript Declarations (No Translation)</h5><div><a href="https://git-cdn.bitbybit.dev/v1.6.0-rc.0/ai-context/bitbybit-babylon-formatted.d.ts" target="_blank" rel="noopener noreferrer" style="display:inline-flex;align-items:center;gap:10px;background:linear-gradient(135deg, #F0CEBB 0%, #d6b39f 100%);color:#1a1c1f;padding:14px 24px;border-radius:8px;font-weight:600;font-size:14px;text-decoration:none;border:1px solid #d6b39f;transition:all 0.3s ease;margin-right:12px;margin-bottom:12px"><svg width="16" height="16" viewBox="0 0 24 24" fill="none" stroke="currentColor" stroke-width="2.5" style="vertical-align:middle"><path d="M21 15v4a2 2 0 0 1-2 2H5a2 2 0 0 1-2-2v-4"></path><polyline points="7 10 12 15 17 10"></polyline><line x1="12" y1="15" x2="12" y2="3"></line></svg>.d.ts with Comments</a><a href="https://git-cdn.bitbybit.dev/v1.6.0-rc.0/ai-context/bitbybit-babylon-formatted-no-comments.d.ts" target="_blank" rel="noopener noreferrer" style="display:inline-flex;align-items:center;gap:10px;background:linear-gradient(135deg, #2a2d32 0%, #1a1c1f 100%);color:#F0CEBB;padding:14px 24px;border-radius:8px;font-weight:600;font-size:14px;text-decoration:none;border:1px solid #F0CEBB;transition:all 0.3s ease;margin-right:12px;margin-bottom:12px"><svg width="16" height="16" viewBox="0 0 24 24" fill="none" stroke="currentColor" stroke-width="2.5" style="vertical-align:middle"><path d="M21 15v4a2 2 0 0 1-2 2H5a2 2 0 0 1-2-2v-4"></path><polyline points="7 10 12 15 17 10"></polyline><line x1="12" y1="15" x2="12" y2="3"></line></svg>.d.ts without Comments</a></div></div></div><div role="tabpanel" class="tabItem_yrzq" hidden=""><div style="padding:20px;background:linear-gradient(135deg, rgba(4, 158, 244, 0.1) 0%, rgba(30, 32, 36, 0.8) 100%);border-radius:12px;border:1px solid rgba(4, 158, 244, 0.3);margin-bottom:20px"><h4 style="margin-top:0;color:#049EF4">ThreeJS Context Files</h4><p style="color:var(--ifm-font-color-base);opacity:0.8;margin-bottom:20px">Popular, lightweight 3D library for web applications</p><h5 style="margin-top:16px;margin-bottom:12px;color:var(--ifm-font-color-base)">Markdown Contexts (Dictionary Translation)</h5><div><a href="https://git-cdn.bitbybit.dev/v1.6.0-rc.0/ai-context/bitbybit-three-ai-context.md" target="_blank" rel="noopener noreferrer" style="display:inline-flex;align-items:center;gap:10px;background:linear-gradient(135deg, #F0CEBB 0%, #d6b39f 100%);color:#1a1c1f;padding:14px 24px;border-radius:8px;font-weight:600;font-size:14px;text-decoration:none;border:1px solid #d6b39f;transition:all 0.3s ease;margin-right:12px;margin-bottom:12px"><svg width="16" height="16" viewBox="0 0 24 24" fill="none" stroke="currentColor" stroke-width="2.5" style="vertical-align:middle"><path d="M21 15v4a2 2 0 0 1-2 2H5a2 2 0 0 1-2-2v-4"></path><polyline points="7 10 12 15 17 10"></polyline><line x1="12" y1="15" x2="12" y2="3"></line></svg>Full Context</a><a href="https://git-cdn.bitbybit.dev/v1.6.0-rc.0/ai-context/bitbybit-three-no-comment-min-ai.md" target="_blank" rel="noopener noreferrer" style="display:inline-flex;align-items:center;gap:10px;background:linear-gradient(135deg, #2a2d32 0%, #1a1c1f 100%);color:#F0CEBB;padding:14px 24px;border-radius:8px;font-weight:600;font-size:14px;text-decoration:none;border:1px solid #F0CEBB;transition:all 0.3s ease;margin-right:12px;margin-bottom:12px"><svg width="16" height="16" viewBox="0 0 24 24" fill="none" stroke="currentColor" stroke-width="2.5" style="vertical-align:middle"><path d="M21 15v4a2 2 0 0 1-2 2H5a2 2 0 0 1-2-2v-4"></path><polyline points="7 10 12 15 17 10"></polyline><line x1="12" y1="15" x2="12" y2="3"></line></svg>Lite Context</a></div><h5 style="margin-top:16px;margin-bottom:12px;color:var(--ifm-font-color-base)">TypeScript Declarations (No Translation)</h5><div><a href="https://git-cdn.bitbybit.dev/v1.6.0-rc.0/ai-context/bitbybit-three-formatted.d.ts" target="_blank" rel="noopener noreferrer" style="display:inline-flex;align-items:center;gap:10px;background:linear-gradient(135deg, #F0CEBB 0%, #d6b39f 100%);color:#1a1c1f;padding:14px 24px;border-radius:8px;font-weight:600;font-size:14px;text-decoration:none;border:1px solid #d6b39f;transition:all 0.3s ease;margin-right:12px;margin-bottom:12px"><svg width="16" height="16" viewBox="0 0 24 24" fill="none" stroke="currentColor" stroke-width="2.5" style="vertical-align:middle"><path d="M21 15v4a2 2 0 0 1-2 2H5a2 2 0 0 1-2-2v-4"></path><polyline points="7 10 12 15 17 10"></polyline><line x1="12" y1="15" x2="12" y2="3"></line></svg>.d.ts with Comments</a><a href="https://git-cdn.bitbybit.dev/v1.6.0-rc.0/ai-context/bitbybit-three-formatted-no-comments.d.ts" target="_blank" rel="noopener noreferrer" style="display:inline-flex;align-items:center;gap:10px;background:linear-gradient(135deg, #2a2d32 0%, #1a1c1f 100%);color:#F0CEBB;padding:14px 24px;border-radius:8px;font-weight:600;font-size:14px;text-decoration:none;border:1px solid #F0CEBB;transition:all 0.3s ease;margin-right:12px;margin-bottom:12px"><svg width="16" height="16" viewBox="0 0 24 24" fill="none" stroke="currentColor" stroke-width="2.5" style="vertical-align:middle"><path d="M21 15v4a2 2 0 0 1-2 2H5a2 2 0 0 1-2-2v-4"></path><polyline points="7 10 12 15 17 10"></polyline><line x1="12" y1="15" x2="12" y2="3"></line></svg>.d.ts without Comments</a></div></div></div><div role="tabpanel" class="tabItem_yrzq" hidden=""><div style="padding:20px;background:linear-gradient(135deg, rgba(255, 107, 53, 0.1) 0%, rgba(30, 32, 36, 0.8) 100%);border-radius:12px;border:1px solid rgba(255, 107, 53, 0.3);margin-bottom:20px"><h4 style="margin-top:0;color:#FF6B35">PlayCanvas Context Files</h4><p style="color:var(--ifm-font-color-base);opacity:0.8;margin-bottom:20px">Game engine with visual editor and runtime</p><h5 style="margin-top:16px;margin-bottom:12px;color:var(--ifm-font-color-base)">Markdown Contexts (Dictionary Translation)</h5><div><a href="https://git-cdn.bitbybit.dev/v1.6.0-rc.0/ai-context/bitbybit-playcanvas-ai-context.md" target="_blank" rel="noopener noreferrer" style="display:inline-flex;align-items:center;gap:10px;background:linear-gradient(135deg, #F0CEBB 0%, #d6b39f 100%);color:#1a1c1f;padding:14px 24px;border-radius:8px;font-weight:600;font-size:14px;text-decoration:none;border:1px solid #d6b39f;transition:all 0.3s ease;margin-right:12px;margin-bottom:12px"><svg width="16" height="16" viewBox="0 0 24 24" fill="none" stroke="currentColor" stroke-width="2.5" style="vertical-align:middle"><path d="M21 15v4a2 2 0 0 1-2 2H5a2 2 0 0 1-2-2v-4"></path><polyline points="7 10 12 15 17 10"></polyline><line x1="12" y1="15" x2="12" y2="3"></line></svg>Full Context</a><a href="https://git-cdn.bitbybit.dev/v1.6.0-rc.0/ai-context/bitbybit-playcanvas-no-comment-min-ai.md" target="_blank" rel="noopener noreferrer" style="display:inline-flex;align-items:center;gap:10px;background:linear-gradient(135deg, #2a2d32 0%, #1a1c1f 100%);color:#F0CEBB;padding:14px 24px;border-radius:8px;font-weight:600;font-size:14px;text-decoration:none;border:1px solid #F0CEBB;transition:all 0.3s ease;margin-right:12px;margin-bottom:12px"><svg width="16" height="16" viewBox="0 0 24 24" fill="none" stroke="currentColor" stroke-width="2.5" style="vertical-align:middle"><path d="M21 15v4a2 2 0 0 1-2 2H5a2 2 0 0 1-2-2v-4"></path><polyline points="7 10 12 15 17 10"></polyline><line x1="12" y1="15" x2="12" y2="3"></line></svg>Lite Context</a></div><h5 style="margin-top:16px;margin-bottom:12px;color:var(--ifm-font-color-base)">TypeScript Declarations (No Translation)</h5><div><a href="https://git-cdn.bitbybit.dev/v1.6.0-rc.0/ai-context/bitbybit-playcanvas-formatted.d.ts" target="_blank" rel="noopener noreferrer" style="display:inline-flex;align-items:center;gap:10px;background:linear-gradient(135deg, #F0CEBB 0%, #d6b39f 100%);color:#1a1c1f;padding:14px 24px;border-radius:8px;font-weight:600;font-size:14px;text-decoration:none;border:1px solid #d6b39f;transition:all 0.3s ease;margin-right:12px;margin-bottom:12px"><svg width="16" height="16" viewBox="0 0 24 24" fill="none" stroke="currentColor" stroke-width="2.5" style="vertical-align:middle"><path d="M21 15v4a2 2 0 0 1-2 2H5a2 2 0 0 1-2-2v-4"></path><polyline points="7 10 12 15 17 10"></polyline><line x1="12" y1="15" x2="12" y2="3"></line></svg>.d.ts with Comments</a><a href="https://git-cdn.bitbybit.dev/v1.6.0-rc.0/ai-context/bitbybit-playcanvas-formatted-no-comments.d.ts" target="_blank" rel="noopener noreferrer" style="display:inline-flex;align-items:center;gap:10px;background:linear-gradient(135deg, #2a2d32 0%, #1a1c1f 100%);color:#F0CEBB;padding:14px 24px;border-radius:8px;font-weight:600;font-size:14px;text-decoration:none;border:1px solid #F0CEBB;transition:all 0.3s ease;margin-right:12px;margin-bottom:12px"><svg width="16" height="16" viewBox="0 0 24 24" fill="none" stroke="currentColor" stroke-width="2.5" style="vertical-align:middle"><path d="M21 15v4a2 2 0 0 1-2 2H5a2 2 0 0 1-2-2v-4"></path><polyline points="7 10 12 15 17 10"></polyline><line x1="12" y1="15" x2="12" y2="3"></line></svg>.d.ts without Comments</a></div></div></div></div></div>
<p>We've structured these context files specifically for AI consumption. They include clear role definitions that tell the AI how to behave, complete API references with all available functions and their parameters, code examples demonstrating correct usage patterns, and decision trees that help the AI recommend the right approach based on your experience level.</p>
<h2 class="anchor anchorTargetStickyNavbar_Vzrq" id="choosing-the-right-context">Choosing the Right Context<a href="https://learn.bitbybit.dev/blog/ai-prompt-contexts#choosing-the-right-context" class="hash-link" aria-label="Direct link to Choosing the Right Context" title="Direct link to Choosing the Right Context" translate="no">​</a></h2>
<p>We offer several context variants, and understanding their differences will help you pick the right one for your needs.</p>
<h3 class="anchor anchorTargetStickyNavbar_Vzrq" id="engine-specific-contexts">Engine-Specific Contexts<a href="https://learn.bitbybit.dev/blog/ai-prompt-contexts#engine-specific-contexts" class="hash-link" aria-label="Direct link to Engine-Specific Contexts" title="Direct link to Engine-Specific Contexts" translate="no">​</a></h3>
<p>Each context file is tailored to a specific 3D rendering engine. If you're building with Babylon.js, download the BabylonJS context. Building with Three.js? Grab the ThreeJS variant. Working with PlayCanvas? There's a context file for that too. The engine-specific details matter because initialization patterns, scene management, and rendering APIs differ between engines.</p>
<h3 class="anchor anchorTargetStickyNavbar_Vzrq" id="full-vs-lite-versions">Full vs Lite Versions<a href="https://learn.bitbybit.dev/blog/ai-prompt-contexts#full-vs-lite-versions" class="hash-link" aria-label="Direct link to Full vs Lite Versions" title="Direct link to Full vs Lite Versions" translate="no">​</a></h3>
<p>This is where the real choice comes in. For each engine, we provide two versions: Full and Lite.</p>
<p><strong>Full contexts</strong> contain everything an AI needs to help you from scratch. They include extensive explanations of what Bitbybit is, how to set up projects, integration guides for both NPM packages and browser-based runners, best practices for performance, scene setup recommendations, and the complete API reference. If you're new to Bitbybit or want your AI to provide comprehensive guidance, the Full context is your friend.</p>
<p><strong>Lite contexts</strong> strip away the explanations and focus purely on API definitions. They contain the same complete API reference but without the additional guidance. This approach has a specific use case: when you already understand Bitbybit well and want to set up your own custom coding rules. You might have your own project setup preferences, your own coding style guide, or specific patterns you want the AI to follow.</p>
<p><strong>Important:</strong> Both Full and Lite contexts use a compressed notation with dictionary translation to minimize token usage. The difference is only in the explanatory content, not in how the API is represented.</p>
<h3 class="anchor anchorTargetStickyNavbar_Vzrq" id="monaco-editor-context">Monaco Editor Context<a href="https://learn.bitbybit.dev/blog/ai-prompt-contexts#monaco-editor-context" class="hash-link" aria-label="Direct link to Monaco Editor Context" title="Direct link to Monaco Editor Context" translate="no">​</a></h3>
<p>We also provide a special context for users of our online Monaco TypeScript editor at <a href="https://bitbybit.dev/app?editor=typescript" target="_blank" rel="noopener noreferrer" class="">bitbybit.dev</a>. This context is simpler because it focuses only on what you need when coding in the browser-based editor. It explains the pre-initialized global variables available in that environment and the specific patterns required for that context. If you're just getting started with Bitbybit and want to experiment in our online editor, this beginner-friendly context is the perfect starting point.</p>
<h3 class="anchor anchorTargetStickyNavbar_Vzrq" id="typescript-declaration-files-dts">TypeScript Declaration Files (.d.ts)<a href="https://learn.bitbybit.dev/blog/ai-prompt-contexts#typescript-declaration-files-dts" class="hash-link" aria-label="Direct link to TypeScript Declaration Files (.d.ts)" title="Direct link to TypeScript Declaration Files (.d.ts)" translate="no">​</a></h3>
<p>For AI agents that struggle with dictionary translations, we also provide <strong>TypeScript Declaration Files</strong>. These <code>.d.ts</code> files are standard TypeScript type definitions that describe the complete Bitbybit API schema using full, unabbreviated names.</p>
<p>The key advantage of <code>.d.ts</code> files is that <strong>no translation is required</strong>. While our markdown context files use abbreviated notation (like <code>OC</code> for <code>OCCT</code>) to save tokens, declaration files use the exact names you'll write in your code. This makes them ideal for:</p>
<ul>
<li class=""><strong>Lower-end AI models</strong> that may struggle with translation rules</li>
<li class=""><strong>Direct API reference</strong> without any transformation layer</li>
<li class=""><strong>Maximum compatibility</strong> with any AI that understands TypeScript</li>
</ul>
<p>The trade-off is size: <code>.d.ts</code> files are significantly larger than our compressed markdown contexts. A declaration file with comments can be 3-4x larger than the equivalent Lite context. If your AI has a limited context window or you're paying per token, the markdown contexts are more economical. But if translation failures are causing incorrect code, the <code>.d.ts</code> files provide a reliable fallback.</p>
<h2 class="anchor anchorTargetStickyNavbar_Vzrq" id="understanding-the-dictionary-translation-format">Understanding the Dictionary Translation Format<a href="https://learn.bitbybit.dev/blog/ai-prompt-contexts#understanding-the-dictionary-translation-format" class="hash-link" aria-label="Direct link to Understanding the Dictionary Translation Format" title="Direct link to Understanding the Dictionary Translation Format" translate="no">​</a></h2>
<p>Both Full and Lite contexts use an important technique to reduce file size: a translation dictionary. This is something your AI must understand to generate correct code.</p>
<p>At the beginning of the API section, you'll find a dictionary that maps abbreviated terms to their full names. For example, <code>OC</code> means <code>OCCT</code>, <code>sp</code> means <code>shape</code>, <code>sd</code> means <code>solid</code>, and <code>cr</code> means <code>create</code>. The API definitions throughout the document use these abbreviations to stay compact.</p>
<p>Here's the critical part: <strong>the AI must translate these abbreviations back to full names when generating code</strong>. We explicitly instruct the AI about this requirement in the context file. When the AI sees something like <code>bitbybit.oc.sh.sd.crBox(op: BoxD)</code> in the documentation, it should generate <code>bitbybit.occt.shapes.solid.createBox(boxOptions: BoxDto)</code> for you. The abbreviated forms are only for documentation - they would not compile if used directly in code.</p>
<p>This translation system allows us to provide complete API coverage while keeping token counts reasonable. The AI handles the translation transparently, so you receive clean, readable code. However, some AI agents - particularly smaller or less capable models - may fail to apply these translations consistently. If your AI produces code with abbreviated names that don't compile, consider switching to the TypeScript Declaration Files (.d.ts) which require no translation.</p>
<h2 class="anchor anchorTargetStickyNavbar_Vzrq" id="how-to-use-these-contexts">How to Use These Contexts<a href="https://learn.bitbybit.dev/blog/ai-prompt-contexts#how-to-use-these-contexts" class="hash-link" aria-label="Direct link to How to Use These Contexts" title="Direct link to How to Use These Contexts" translate="no">​</a></h2>
<p>Using a prompt context is straightforward. Download the appropriate markdown file from our homepage at bitbybit.dev, then attach it to your conversation with your AI assistant. Most modern AI interfaces support file attachments - simply drag and drop the file or use the attachment button.</p>
<p>Once attached, you can start asking questions like "Create a parametric table with adjustable legs" or "Show me how to create a filleted box and export it as STEP." The AI should reference the context to generate accurate, working code that follows our recommended patterns.</p>
<p>For the best experience, we recommend combining a Lite context with our Context7 MCP Server. The MCP server provides live access to our full documentation and stays current with the latest changes. The Lite context ensures the AI knows the precise API signatures. Together, they create a powerful coding assistant that understands both the big picture and the fine details.</p>
<h2 class="anchor anchorTargetStickyNavbar_Vzrq" id="getting-the-most-from-ai-assisted-coding">Getting the Most from AI-Assisted Coding<a href="https://learn.bitbybit.dev/blog/ai-prompt-contexts#getting-the-most-from-ai-assisted-coding" class="hash-link" aria-label="Direct link to Getting the Most from AI-Assisted Coding" title="Direct link to Getting the Most from AI-Assisted Coding" translate="no">​</a></h2>
<p>A few tips will help you work more effectively with AI and these contexts. First, be specific about what you want to build. Instead of asking for "a shape," describe "a rounded rectangular table top with four cylindrical legs." The more detail you provide, the more useful the generated code will be.</p>
<p>Second, mention your experience level. The contexts include decision trees that help the AI adapt its responses. If you're new to web development, the AI can scaffold complete applications for you. If you're an experienced developer, it can focus on just the API calls you need.</p>
<p>Third, iterate on the generated code. AI assistants are collaborative tools. If the first attempt isn't quite right, explain what you'd like changed. The AI can refine its suggestions based on your feedback while staying consistent with the Bitbybit API.</p>
<h2 class="anchor anchorTargetStickyNavbar_Vzrq" id="the-future-of-ai-assisted-cad">The Future of AI-Assisted CAD<a href="https://learn.bitbybit.dev/blog/ai-prompt-contexts#the-future-of-ai-assisted-cad" class="hash-link" aria-label="Direct link to The Future of AI-Assisted CAD" title="Direct link to The Future of AI-Assisted CAD" translate="no">​</a></h2>
<p>We believe AI assistants will become increasingly important tools for developers working with 3D and CAD applications. These prompt contexts represent our commitment to making Bitbybit as accessible as possible. Whether you're prototyping ideas quickly or building production applications, having an AI that truly understands our API makes the development process smoother and more enjoyable.</p>
<p>The contexts are updated with each Bitbybit release to match the latest API. When you see a new version available, download the updated context to ensure your AI has the most current information.</p>
<p>Happy building with AI at your side!</p>]]></content>
        <author>
            <name>Matas Ubarevičius</name>
            <uri>https://www.linkedin.com/in/matas-ubarevicius/</uri>
        </author>
        <category label="AI" term="AI"/>
        <category label="BabylonJS" term="BabylonJS"/>
        <category label="ThreeJS" term="ThreeJS"/>
        <category label="PlayCanvas" term="PlayCanvas"/>
    </entry>
    <entry>
        <title type="html"><![CDATA[Scaffold Your 3D CAD Projects in Seconds with create-app CLI]]></title>
        <id>https://learn.bitbybit.dev/blog/create-bitbybit-app-cli</id>
        <link href="https://learn.bitbybit.dev/blog/create-bitbybit-app-cli"/>
        <updated>2026-01-14T00:00:00.000Z</updated>
        <summary type="html"><![CDATA[Scaffold a working 3D CAD project in one command with the @bitbybit-dev/create-app CLI - Vite, TypeScript and the OCCT, JSCAD and Manifold kernels wired up for Three.js, BabylonJS or PlayCanvas, plus full-stack CAD Cloud templates.]]></summary>
        <content type="html"><![CDATA[<p><img decoding="async" loading="lazy" src="https://bitbybit.dev/files/site/blog/create-bitbybit-app-cli/create-bitbybit-app-cli.webp" alt="Bitbybit Create App CLI in Terminal" title="Bitbybit Create App CLI in Terminal" class="img_ev3q"></p>
<p>TLDR</p>
<div class="language-bash codeBlockContainer_Ckt0 theme-code-block" style="--prism-color:#F8F8F2;--prism-background-color:#282A36"><div class="codeBlockContent_QJqH"><pre tabindex="0" class="prism-code language-bash codeBlock_bY9V thin-scrollbar" style="color:#F8F8F2;background-color:#282A36"><code class="codeBlockLines_e6Vv"><div class="token-line" style="color:#F8F8F2"><span class="token plain">npx @bitbybit-dev/create-app my-awesome-project</span><br></div></code></pre></div></div>
<p>Bitbybit brings a brand new developer experience to the table. Say hello to <code>@bitbybit-dev/create-app</code>, a CLI tool that lets you scaffold fully-configured 3D CAD projects in just a few seconds.</p>
<h2 class="anchor anchorTargetStickyNavbar_Vzrq" id="the-problem-were-solving">The Problem We're Solving<a href="https://learn.bitbybit.dev/blog/create-bitbybit-app-cli#the-problem-were-solving" class="hash-link" aria-label="Direct link to The Problem We're Solving" title="Direct link to The Problem We're Solving" translate="no">​</a></h2>
<p>Getting started with 3D CAD development on the web has traditionally involved quite a bit of setup work. You need to configure your bundler, set up TypeScript, install the right packages for your chosen 3D engine, and make sure all the geometry kernels are properly initialized. This process can easily take 30 minutes to an hour, especially if you're new to the ecosystem.</p>
<p>We wanted to change that. With our new CLI tool, you can go from zero to a working 3D CAD application in under a minute.</p>
<h2 class="anchor anchorTargetStickyNavbar_Vzrq" id="how-it-works">How It Works<a href="https://learn.bitbybit.dev/blog/create-bitbybit-app-cli#how-it-works" class="hash-link" aria-label="Direct link to How It Works" title="Direct link to How It Works" translate="no">​</a></h2>
<p>The simplest way to create a new project is to run this command in your terminal:</p>
<div class="language-bash codeBlockContainer_Ckt0 theme-code-block" style="--prism-color:#F8F8F2;--prism-background-color:#282A36"><div class="codeBlockContent_QJqH"><pre tabindex="0" class="prism-code language-bash codeBlock_bY9V thin-scrollbar" style="color:#F8F8F2;background-color:#282A36"><code class="codeBlockLines_e6Vv"><div class="token-line" style="color:#F8F8F2"><span class="token plain">npx @bitbybit-dev/create-app my-awesome-project</span><br></div></code></pre></div></div>
<p>That's it. The CLI will guide you through a quick interactive setup where you choose your preferred 3D engine. Currently, we support three popular options: Three.js for its lightweight flexibility, Babylon.js for its powerful feature set, and PlayCanvas for its fast WebGL performance.</p>
<p>If you prefer to skip the prompts, you can also specify the engine directly:</p>
<div class="language-bash codeBlockContainer_Ckt0 theme-code-block" style="--prism-color:#F8F8F2;--prism-background-color:#282A36"><div class="codeBlockContent_QJqH"><pre tabindex="0" class="prism-code language-bash codeBlock_bY9V thin-scrollbar" style="color:#F8F8F2;background-color:#282A36"><code class="codeBlockLines_e6Vv"><div class="token-line" style="color:#F8F8F2"><span class="token plain">npx @bitbybit-dev/create-app my-project --engine babylonjs</span><br></div></code></pre></div></div>
<h2 class="anchor anchorTargetStickyNavbar_Vzrq" id="what-you-get-out-of-the-box">What You Get Out of the Box<a href="https://learn.bitbybit.dev/blog/create-bitbybit-app-cli#what-you-get-out-of-the-box" class="hash-link" aria-label="Direct link to What You Get Out of the Box" title="Direct link to What You Get Out of the Box" translate="no">​</a></h2>
<p>When the scaffolding completes, you'll have a fully functional project that includes everything you need to start building. The project uses Vite as the build tool, which means incredibly fast hot module replacement during development and optimized production builds. TypeScript is configured from the start, giving you type safety and excellent editor support.</p>
<p>Most importantly, all three of our geometry kernels come pre-configured and ready to use. OCCT (OpenCascade Technology) is there for professional-grade CAD operations like fillets, chamfers, and boolean operations on solid models. JSCAD provides programmatic solid modeling capabilities that many developers find intuitive. And Manifold handles fast mesh boolean operations when you need high-performance geometry processing.</p>
<p>The generated starter code demonstrates how to use each kernel. You'll see examples of creating rounded cubes with OCCT, performing boolean differences with Manifold, and building geodesic spheres with JSCAD. This gives you a clear starting point to understand how each kernel works and when to use which one.</p>
<h2 class="anchor anchorTargetStickyNavbar_Vzrq" id="the-development-workflow">The Development Workflow<a href="https://learn.bitbybit.dev/blog/create-bitbybit-app-cli#the-development-workflow" class="hash-link" aria-label="Direct link to The Development Workflow" title="Direct link to The Development Workflow" translate="no">​</a></h2>
<p>After scaffolding your project, the workflow is straightforward. Navigate into your project folder, install the dependencies, and start the development server:</p>
<div class="language-bash codeBlockContainer_Ckt0 theme-code-block" style="--prism-color:#F8F8F2;--prism-background-color:#282A36"><div class="codeBlockContent_QJqH"><pre tabindex="0" class="prism-code language-bash codeBlock_bY9V thin-scrollbar" style="color:#F8F8F2;background-color:#282A36"><code class="codeBlockLines_e6Vv"><div class="token-line" style="color:#F8F8F2"><span class="token plain">cd my-awesome-project</span><br></div><div class="token-line" style="color:#F8F8F2"><span class="token plain">npm install</span><br></div><div class="token-line" style="color:#F8F8F2"><span class="token plain">npm run dev</span><br></div></code></pre></div></div>
<p>Your browser will open with a live preview of your 3D scene on <code>http://localhost:5173</code>. Make changes to the code, and they appear instantly thanks to Vite's hot reload. When you're ready to deploy, a simple <code>npm run build</code> creates an optimized production bundle.</p>
<h2 class="anchor anchorTargetStickyNavbar_Vzrq" id="choose-your-engine">Choose Your Engine<a href="https://learn.bitbybit.dev/blog/create-bitbybit-app-cli#choose-your-engine" class="hash-link" aria-label="Direct link to Choose Your Engine" title="Direct link to Choose Your Engine" translate="no">​</a></h2>
<p>Each supported 3D engine has its own strengths. Three.js is an excellent choice if you want a lightweight library with a massive community and countless examples online. It's particularly good for creative coding and visualization projects.</p>
<p>Babylon.js shines when you need a complete game engine with built-in support for physics, shadows, post-processing effects, and complex scene management. If you're building something that needs to feel like a polished application or game, Babylon.js has you covered.</p>
<p>PlayCanvas offers a fast and lightweight approach to WebGL development. It's designed for performance and works well for projects where load time and runtime speed are critical concerns.</p>
<p>No matter which engine you choose, the Bitbybit geometry kernels work with all of them. You can create complex CAD geometry with OCCT and render it beautifully in any of these engines.</p>
<h2 class="anchor anchorTargetStickyNavbar_Vzrq" id="cloud-projects-server-side-cad">Cloud Projects: Server-Side CAD<a href="https://learn.bitbybit.dev/blog/create-bitbybit-app-cli#cloud-projects-server-side-cad" class="hash-link" aria-label="Direct link to Cloud Projects: Server-Side CAD" title="Direct link to Cloud Projects: Server-Side CAD" translate="no">​</a></h2>
<p>The CLI isn't just for frontend apps anymore. You can now scaffold <strong>cloud</strong> projects that pair a backend server with a React + Three.js frontend, connecting to our <a class="" href="https://learn.bitbybit.dev/api/cloud-api">CAD Cloud API</a> for server-side model generation, STEP-to-glTF conversion, and CAD pipelines.</p>
<p>Run the CLI and select the <strong>cloud</strong> app type when prompted. Then pick from five backend templates:</p>
<ul>
<li class=""><strong>Hono + SDK</strong> - TypeScript SDK on Cloudflare Workers</li>
<li class=""><strong>Hono + REST</strong> - raw <code>fetch</code> on Cloudflare Workers</li>
<li class=""><strong>Node.js + SDK</strong> - TypeScript SDK on Express 5</li>
<li class=""><strong>Node.js + REST</strong> - raw <code>fetch</code> on Express 5</li>
<li class=""><strong>.NET + REST</strong> - <code>HttpClient</code> on ASP.NET Core (.NET 10)</li>
</ul>
<p>Your API key stays on the server, and the frontend proxies all requests through your backend. Add your key, run <code>npm install</code>, and you're building a full-stack CAD application.</p>
<h2 class="anchor anchorTargetStickyNavbar_Vzrq" id="why-this-matters">Why This Matters<a href="https://learn.bitbybit.dev/blog/create-bitbybit-app-cli#why-this-matters" class="hash-link" aria-label="Direct link to Why This Matters" title="Direct link to Why This Matters" translate="no">​</a></h2>
<p>We believe that the future of CAD and 3D design is on the web. Browser-based tools are accessible to everyone, require no installation, and can run on virtually any device. But building these tools has been harder than it should be.</p>
<p>With <code>@bitbybit-dev/create-app</code>, we're lowering the barrier to entry significantly. Whether you're a seasoned developer exploring CAD programming or a designer wanting to prototype ideas in code, you can now get started in seconds rather than hours.</p>
<p>The CLI is open source and available as part of the Bitbybit monorepo on GitHub. We welcome contributions, feedback, and feature requests from the community.</p>
<h2 class="anchor anchorTargetStickyNavbar_Vzrq" id="get-started-today">Get Started Today<a href="https://learn.bitbybit.dev/blog/create-bitbybit-app-cli#get-started-today" class="hash-link" aria-label="Direct link to Get Started Today" title="Direct link to Get Started Today" translate="no">​</a></h2>
<p>Ready to try it out? Open your terminal and run:</p>
<div class="language-bash codeBlockContainer_Ckt0 theme-code-block" style="--prism-color:#F8F8F2;--prism-background-color:#282A36"><div class="codeBlockContent_QJqH"><pre tabindex="0" class="prism-code language-bash codeBlock_bY9V thin-scrollbar" style="color:#F8F8F2;background-color:#282A36"><code class="codeBlockLines_e6Vv"><div class="token-line" style="color:#F8F8F2"><span class="token plain">npm init @bitbybit-dev/app my-first-cad-app</span><br></div></code></pre></div></div>
<p>If you build something cool, we'd love to see it. Share your projects with us on Discord or tag us on social media. And if you find Bitbybit valuable for your work, consider supporting the project with a Silver or Gold subscription at <a href="https://bitbybit.dev/auth/pick-plan" target="_blank" rel="noopener noreferrer" class="">bitbybit.dev/auth/pick-plan</a>.</p>
<p>Happy coding!</p>]]></content>
        <author>
            <name>Matas Ubarevičius</name>
            <uri>https://www.linkedin.com/in/matas-ubarevicius/</uri>
        </author>
        <category label="ThreeJS" term="ThreeJS"/>
        <category label="BabylonJS" term="BabylonJS"/>
        <category label="PlayCanvas" term="PlayCanvas"/>
    </entry>
    <entry>
        <title type="html"><![CDATA[ANNOUNCING PlayCanvas Support: High-Performance 3D CAD for Game Developers]]></title>
        <id>https://learn.bitbybit.dev/blog/playcanvas-support</id>
        <link href="https://learn.bitbybit.dev/blog/playcanvas-support"/>
        <updated>2026-01-06T00:00:00.000Z</updated>
        <summary type="html"><![CDATA[Introducing @bitbybit-dev/playcanvas NPM package and PlayCanvas Runner - bringing professional CAD capabilities to one of the web's most powerful game engines.]]></summary>
        <content type="html"><![CDATA[<p><img decoding="async" loading="lazy" src="https://bitbybit.dev/files/site/blog/playcanvas-support/playcanvas-and-bitbybit-dev.webp" alt="Playcanvas and Bitbybit logos." title="Playcanvas and Bitbybit logos" class="img_ev3q"></p>
<p>We are excited to announce the release of our new open-source NPM package and runner for <strong>PlayCanvas</strong>, one of the most performant and feature-rich WebGL game engines available. The <a href="https://www.npmjs.com/package/@bitbybit-dev/playcanvas" target="_blank" rel="noopener noreferrer" class=""><strong><code>@bitbybit-dev/playcanvas</code></strong></a> package and <a class="" href="https://learn.bitbybit.dev/learn/runners/engines/playcanvas/full-runner"><strong>PlayCanvas Runner</strong></a> continue our mission to make professional 3D CAD accessible across the entire web development ecosystem, now empowering PlayCanvas developers with industrial-grade geometric modeling capabilities.</p>
<p><strong>Explore the New Package:</strong></p>
<ul>
<li class="">NPM: <strong><a href="https://www.npmjs.com/package/@bitbybit-dev/playcanvas" target="_blank" rel="noopener noreferrer" class="">@bitbybit-dev/playcanvas</a></strong></li>
<li class="">NPM (Core Layer): <strong><a href="https://www.npmjs.com/package/@bitbybit-dev/core" target="_blank" rel="noopener noreferrer" class="">@bitbybit-dev/core</a></strong></li>
<li class="">GitHub: <strong><a href="https://github.com/bitbybit-dev/bitbybit" target="_blank" rel="noopener noreferrer" class="">Bitbybit.dev Monorepo</a></strong></li>
<li class="">Documentation: <strong><a class="" href="https://learn.bitbybit.dev/learn/npm-packages/playcanvas">PlayCanvas Integration Guide</a></strong></li>
</ul>
<p>Short demo of some of the Bitbybit projects rendered via PlayCanvas:</p>
<div class="responsive-video-container"><iframe width="560" height="315" src="https://www.youtube.com/embed/z3RFu8HTkcA" title="PlayCanvas Support in Bitbybit CAD Parametric Design Platform" frameborder="0" allow="accelerometer; autoplay; clipboard-write; encrypted-media; gyroscope; picture-in-picture; web-share; fullscreen" allowfullscreen=""></iframe></div>
<h3 class="anchor anchorTargetStickyNavbar_Vzrq" id="why-playcanvas">Why PlayCanvas?<a href="https://learn.bitbybit.dev/blog/playcanvas-support#why-playcanvas" class="hash-link" aria-label="Direct link to Why PlayCanvas?" title="Direct link to Why PlayCanvas?" translate="no">​</a></h3>
<p>PlayCanvas has established itself as a leading choice for web-based game development and interactive 3D experiences. Its entity-component architecture, visual editor, and exceptional runtime performance make it ideal for creating everything from games to product configurators. However, when it comes to precise CAD operations, parametric modeling, and industrial-grade geometry processing, developers have traditionally needed to look elsewhere.</p>
<p>With Bitbybit's PlayCanvas integration, that changes. Now, PlayCanvas developers can leverage:</p>
<ul>
<li class=""><strong>Industrial CAD Kernels</strong>: Access to OpenCascade (OCCT), JSCAD, and Manifold geometry engines</li>
<li class=""><strong>Parametric Modeling</strong>: Create complex, constraint-based 3D models that update dynamically</li>
<li class=""><strong>Boolean Operations</strong>: Precise union, intersection, and difference operations on solid geometry</li>
<li class=""><strong>Advanced Surfaces</strong>: Lofting, sweeping, filleting, and chamfering operations</li>
<li class=""><strong>CAD File I/O</strong>: Import and export STEP, IGES, STL, and other industry-standard formats</li>
</ul>
<p>All of this power is now available within PlayCanvas's entity-component system, maintaining the engine's clean architecture and high performance.</p>
<h3 class="anchor anchorTargetStickyNavbar_Vzrq" id="the-playcanvas-runner-instant-cad-anywhere">The PlayCanvas Runner: Instant CAD Anywhere<a href="https://learn.bitbybit.dev/blog/playcanvas-support#the-playcanvas-runner-instant-cad-anywhere" class="hash-link" aria-label="Direct link to The PlayCanvas Runner: Instant CAD Anywhere" title="Direct link to The PlayCanvas Runner: Instant CAD Anywhere" translate="no">​</a></h3>
<p>Just like our ThreeJS and BabylonJS runners, we're releasing a <strong>PlayCanvas Runner</strong> that allows you to execute Bitbybit CAD scripts on any website using a single JavaScript file from our CDN. This means you can:</p>
<ul>
<li class="">Create 3D product configurators for e-commerce sites</li>
<li class="">Build interactive parametric design tools</li>
<li class="">Embed CAD modeling capabilities in documentation or tutorials</li>
<li class="">Prototype complex geometries without complex build setups</li>
</ul>
<p>The PlayCanvas Runner follows the same architecture as our other runners, supporting both full and lite versions:</p>
<ul>
<li class=""><strong><code>bitbybit-runner-playcanvas.js</code></strong>:<!-- -->
<ul>
<li class="">Includes everything needed to run Bitbybit scripts, including the PlayCanvas engine itself</li>
<li class="">Perfect for quick integration when PlayCanvas isn't already part of your project</li>
<li class="">Bundles CAD kernels, web workers, and all dependencies</li>
</ul>
</li>
<li class=""><strong><code>bitbybit-runner-lite-playcanvas.js</code></strong>:<!-- -->
<ul>
<li class="">Lightweight version that expects PlayCanvas to be loaded separately</li>
<li class="">Ideal for projects already using PlayCanvas</li>
<li class="">Significantly smaller bundle size</li>
<li class="">Expects <code>pc</code> (PlayCanvas) to be available as <code>window.PLAYCANVAS</code></li>
</ul>
</li>
</ul>
<h3 class="anchor anchorTargetStickyNavbar_Vzrq" id="how-to-include-the-playcanvas-runner">How to Include the PlayCanvas Runner<a href="https://learn.bitbybit.dev/blog/playcanvas-support#how-to-include-the-playcanvas-runner" class="hash-link" aria-label="Direct link to How to Include the PlayCanvas Runner" title="Direct link to How to Include the PlayCanvas Runner" translate="no">​</a></h3>
<p>The runners are served from the <strong>Bitbybit CDN</strong>. Include them in your website with these script tags (replace <code>&lt;version-number-of-bitbybit&gt;</code> with the actual version):</p>
<div class="theme-admonition theme-admonition-tip admonition_xJq3 alert alert--success"><div class="admonitionHeading_Gvgb"><span class="admonitionIcon_Rf37"><svg viewBox="0 0 12 16"><path fill-rule="evenodd" d="M6.5 0C3.48 0 1 2.19 1 5c0 .92.55 2.25 1 3 1.34 2.25 1.78 2.78 2 4v1h5v-1c.22-1.22.66-1.75 2-4 .45-.75 1-2.08 1-3 0-2.81-2.48-5-5.5-5zm3.64 7.48c-.25.44-.47.8-.67 1.11-.86 1.41-1.25 2.06-1.45 3.23-.02.05-.02.11-.02.17H5c0-.06 0-.13-.02-.17-.2-1.17-.59-1.83-1.45-3.23-.2-.31-.42-.67-.67-1.11C2.44 6.78 2 5.65 2 5c0-2.2 2.02-4 4.5-4 1.22 0 2.36.42 3.22 1.19C10.55 2.94 11 3.94 11 5c0 .66-.44 1.78-.86 2.48zM4 14h5c-.23 1.14-1.3 2-2.5 2s-2.27-.86-2.5-2z"></path></svg></span>Self-Hosting</div><div class="admonitionContent_BuS1"><p>For production applications, consider <a class="" href="https://learn.bitbybit.dev/learn/hosting-and-cdn"><strong>self-hosting the runners and assets</strong></a> for improved reliability and performance.</p></div></div>
<ul>
<li class=""><strong>PlayCanvas Runner (Full):</strong>
<div class="language-html codeBlockContainer_Ckt0 theme-code-block" style="--prism-color:#F8F8F2;--prism-background-color:#282A36"><div class="codeBlockContent_QJqH"><pre tabindex="0" class="prism-code language-html codeBlock_bY9V thin-scrollbar" style="color:#F8F8F2;background-color:#282A36"><code class="codeBlockLines_e6Vv"><div class="token-line" style="color:#F8F8F2"><span class="token tag punctuation" style="color:rgb(248, 248, 242)">&lt;</span><span class="token tag" style="color:rgb(255, 121, 198)">script</span><span class="token tag" style="color:rgb(255, 121, 198)"> </span><span class="token tag attr-name" style="color:rgb(241, 250, 140)">src</span><span class="token tag attr-value punctuation attr-equals" style="color:rgb(248, 248, 242)">=</span><span class="token tag attr-value punctuation" style="color:rgb(248, 248, 242)">"</span><span class="token tag attr-value" style="color:rgb(255, 121, 198)">https://git-cdn.bitbybit.dev/v&lt;version-number-of-bitbybit&gt;/runner/bitbybit-runner-playcanvas.js</span><span class="token tag attr-value punctuation" style="color:rgb(248, 248, 242)">"</span><span class="token tag punctuation" style="color:rgb(248, 248, 242)">&gt;</span><span class="token tag punctuation" style="color:rgb(248, 248, 242)">&lt;/</span><span class="token tag" style="color:rgb(255, 121, 198)">script</span><span class="token tag punctuation" style="color:rgb(248, 248, 242)">&gt;</span><br></div></code></pre></div></div>
</li>
<li class=""><strong>PlayCanvas Runner (Lite):</strong>
<div class="language-html codeBlockContainer_Ckt0 theme-code-block" style="--prism-color:#F8F8F2;--prism-background-color:#282A36"><div class="codeBlockContent_QJqH"><pre tabindex="0" class="prism-code language-html codeBlock_bY9V thin-scrollbar" style="color:#F8F8F2;background-color:#282A36"><code class="codeBlockLines_e6Vv"><div class="token-line" style="color:#F8F8F2"><span class="token tag punctuation" style="color:rgb(248, 248, 242)">&lt;</span><span class="token tag" style="color:rgb(255, 121, 198)">script</span><span class="token tag" style="color:rgb(255, 121, 198)"> </span><span class="token tag attr-name" style="color:rgb(241, 250, 140)">src</span><span class="token tag attr-value punctuation attr-equals" style="color:rgb(248, 248, 242)">=</span><span class="token tag attr-value punctuation" style="color:rgb(248, 248, 242)">"</span><span class="token tag attr-value" style="color:rgb(255, 121, 198)">https://git-cdn.bitbybit.dev/v&lt;version-number-of-bitbybit&gt;/runner/bitbybit-runner-lite-playcanvas.js</span><span class="token tag attr-value punctuation" style="color:rgb(248, 248, 242)">"</span><span class="token tag punctuation" style="color:rgb(248, 248, 242)">&gt;</span><span class="token tag punctuation" style="color:rgb(248, 248, 242)">&lt;/</span><span class="token tag" style="color:rgb(255, 121, 198)">script</span><span class="token tag punctuation" style="color:rgb(248, 248, 242)">&gt;</span><br></div></code></pre></div></div>
</li>
</ul>
<p>You can find all official Bitbybit versions on <a href="https://github.com/bitbybit-dev/bitbybit/releases" target="_blank" rel="noopener noreferrer" class="">GitHub Releases</a>.</p>
<h3 class="anchor anchorTargetStickyNavbar_Vzrq" id="using-the-playcanvas-runner">Using the PlayCanvas Runner<a href="https://learn.bitbybit.dev/blog/playcanvas-support#using-the-playcanvas-runner" class="hash-link" aria-label="Direct link to Using the PlayCanvas Runner" title="Direct link to Using the PlayCanvas Runner" translate="no">​</a></h3>
<p>Once included, the runner is accessible via <code>window.bitbybitRunner</code>:</p>
<div class="language-javascript codeBlockContainer_Ckt0 theme-code-block" style="--prism-color:#F8F8F2;--prism-background-color:#282A36"><div class="codeBlockContent_QJqH"><pre tabindex="0" class="prism-code language-javascript codeBlock_bY9V thin-scrollbar" style="color:#F8F8F2;background-color:#282A36"><code class="codeBlockLines_e6Vv"><div class="token-line" style="color:#F8F8F2"><span class="token comment" style="color:rgb(98, 114, 164)">// Get the runner instance</span><span class="token plain"></span><br></div><div class="token-line" style="color:#F8F8F2"><span class="token plain"></span><span class="token keyword" style="color:rgb(189, 147, 249);font-style:italic">const</span><span class="token plain"> runner </span><span class="token operator">=</span><span class="token plain"> </span><span class="token dom variable" style="color:rgb(189, 147, 249);font-style:italic">window</span><span class="token punctuation" style="color:rgb(248, 248, 242)">.</span><span class="token property-access">bitbybitRunner</span><span class="token punctuation" style="color:rgb(248, 248, 242)">.</span><span class="token method function property-access" style="color:rgb(80, 250, 123)">getRunnerInstance</span><span class="token punctuation" style="color:rgb(248, 248, 242)">(</span><span class="token punctuation" style="color:rgb(248, 248, 242)">)</span><span class="token punctuation" style="color:rgb(248, 248, 242)">;</span><span class="token plain"></span><br></div><div class="token-line" style="color:#F8F8F2"><span class="token plain" style="display:inline-block"></span><br></div><div class="token-line" style="color:#F8F8F2"><span class="token plain"></span><span class="token comment" style="color:rgb(98, 114, 164)">// Initialize the runner with your canvas</span><span class="token plain"></span><br></div><div class="token-line" style="color:#F8F8F2"><span class="token plain"></span><span class="token keyword" style="color:rgb(189, 147, 249);font-style:italic">const</span><span class="token plain"> </span><span class="token punctuation" style="color:rgb(248, 248, 242)">{</span><span class="token plain"> bitbybit</span><span class="token punctuation" style="color:rgb(248, 248, 242)">,</span><span class="token plain"> </span><span class="token maybe-class-name">Bit</span><span class="token punctuation" style="color:rgb(248, 248, 242)">,</span><span class="token plain"> camera</span><span class="token punctuation" style="color:rgb(248, 248, 242)">,</span><span class="token plain"> scene</span><span class="token punctuation" style="color:rgb(248, 248, 242)">,</span><span class="token plain"> app</span><span class="token punctuation" style="color:rgb(248, 248, 242)">,</span><span class="token plain"> pc </span><span class="token punctuation" style="color:rgb(248, 248, 242)">}</span><span class="token plain"> </span><span class="token operator">=</span><span class="token plain"> </span><span class="token keyword control-flow" style="color:rgb(189, 147, 249);font-style:italic">await</span><span class="token plain"> runner</span><span class="token punctuation" style="color:rgb(248, 248, 242)">.</span><span class="token method function property-access" style="color:rgb(80, 250, 123)">run</span><span class="token punctuation" style="color:rgb(248, 248, 242)">(</span><span class="token punctuation" style="color:rgb(248, 248, 242)">{</span><span class="token plain"></span><br></div><div class="token-line" style="color:#F8F8F2"><span class="token plain">    </span><span class="token literal-property property">canvasId</span><span class="token operator">:</span><span class="token plain"> </span><span class="token string" style="color:rgb(255, 121, 198)">'playcanvas-canvas'</span><span class="token punctuation" style="color:rgb(248, 248, 242)">,</span><span class="token plain"></span><br></div><div class="token-line" style="color:#F8F8F2"><span class="token plain">    </span><span class="token literal-property property">canvasZoneClass</span><span class="token operator">:</span><span class="token plain"> </span><span class="token string" style="color:rgb(255, 121, 198)">'myCanvasZone'</span><span class="token punctuation" style="color:rgb(248, 248, 242)">,</span><span class="token plain"></span><br></div><div class="token-line" style="color:#F8F8F2"><span class="token plain">    </span><span class="token comment" style="color:rgb(98, 114, 164)">// Configure which kernels to enable</span><span class="token plain"></span><br></div><div class="token-line" style="color:#F8F8F2"><span class="token plain">    </span><span class="token literal-property property">enableOCCT</span><span class="token operator">:</span><span class="token plain"> </span><span class="token boolean">true</span><span class="token punctuation" style="color:rgb(248, 248, 242)">,</span><span class="token plain"></span><br></div><div class="token-line" style="color:#F8F8F2"><span class="token plain">    </span><span class="token literal-property property">enableJSCAD</span><span class="token operator">:</span><span class="token plain"> </span><span class="token boolean">true</span><span class="token punctuation" style="color:rgb(248, 248, 242)">,</span><span class="token plain"></span><br></div><div class="token-line" style="color:#F8F8F2"><span class="token plain">    </span><span class="token literal-property property">enableManifold</span><span class="token operator">:</span><span class="token plain"> </span><span class="token boolean">true</span><span class="token punctuation" style="color:rgb(248, 248, 242)">,</span><span class="token plain"></span><br></div><div class="token-line" style="color:#F8F8F2"><span class="token plain">    </span><span class="token comment" style="color:rgb(98, 114, 164)">// Optional scene configuration</span><span class="token plain"></span><br></div><div class="token-line" style="color:#F8F8F2"><span class="token plain">    </span><span class="token literal-property property">cameraPosition</span><span class="token operator">:</span><span class="token plain"> </span><span class="token punctuation" style="color:rgb(248, 248, 242)">[</span><span class="token number">20</span><span class="token punctuation" style="color:rgb(248, 248, 242)">,</span><span class="token plain"> </span><span class="token number">10</span><span class="token punctuation" style="color:rgb(248, 248, 242)">,</span><span class="token plain"> </span><span class="token number">20</span><span class="token punctuation" style="color:rgb(248, 248, 242)">]</span><span class="token punctuation" style="color:rgb(248, 248, 242)">,</span><span class="token plain"></span><br></div><div class="token-line" style="color:#F8F8F2"><span class="token plain">    </span><span class="token literal-property property">cameraTarget</span><span class="token operator">:</span><span class="token plain"> </span><span class="token punctuation" style="color:rgb(248, 248, 242)">[</span><span class="token number">0</span><span class="token punctuation" style="color:rgb(248, 248, 242)">,</span><span class="token plain"> </span><span class="token number">0</span><span class="token punctuation" style="color:rgb(248, 248, 242)">,</span><span class="token plain"> </span><span class="token number">0</span><span class="token punctuation" style="color:rgb(248, 248, 242)">]</span><span class="token punctuation" style="color:rgb(248, 248, 242)">,</span><span class="token plain"></span><br></div><div class="token-line" style="color:#F8F8F2"><span class="token plain">    </span><span class="token literal-property property">backgroundColor</span><span class="token operator">:</span><span class="token plain"> </span><span class="token string" style="color:rgb(255, 121, 198)">'#1a1c1f'</span><span class="token punctuation" style="color:rgb(248, 248, 242)">,</span><span class="token plain"></span><br></div><div class="token-line" style="color:#F8F8F2"><span class="token plain"></span><span class="token punctuation" style="color:rgb(248, 248, 242)">}</span><span class="token punctuation" style="color:rgb(248, 248, 242)">)</span><span class="token punctuation" style="color:rgb(248, 248, 242)">;</span><span class="token plain"></span><br></div><div class="token-line" style="color:#F8F8F2"><span class="token plain" style="display:inline-block"></span><br></div><div class="token-line" style="color:#F8F8F2"><span class="token plain"></span><span class="token comment" style="color:rgb(98, 114, 164)">// Now you can use bitbybit directly for CAD operations</span><span class="token plain"></span><br></div><div class="token-line" style="color:#F8F8F2"><span class="token plain"></span><span class="token keyword" style="color:rgb(189, 147, 249);font-style:italic">const</span><span class="token plain"> cube </span><span class="token operator">=</span><span class="token plain"> </span><span class="token keyword control-flow" style="color:rgb(189, 147, 249);font-style:italic">await</span><span class="token plain"> bitbybit</span><span class="token punctuation" style="color:rgb(248, 248, 242)">.</span><span class="token property-access">occt</span><span class="token punctuation" style="color:rgb(248, 248, 242)">.</span><span class="token property-access">shapes</span><span class="token punctuation" style="color:rgb(248, 248, 242)">.</span><span class="token property-access">solid</span><span class="token punctuation" style="color:rgb(248, 248, 242)">.</span><span class="token method function property-access" style="color:rgb(80, 250, 123)">createCube</span><span class="token punctuation" style="color:rgb(248, 248, 242)">(</span><span class="token punctuation" style="color:rgb(248, 248, 242)">{</span><span class="token plain"> </span><span class="token literal-property property">size</span><span class="token operator">:</span><span class="token plain"> </span><span class="token number">10</span><span class="token punctuation" style="color:rgb(248, 248, 242)">,</span><span class="token plain"> </span><span class="token literal-property property">center</span><span class="token operator">:</span><span class="token plain"> </span><span class="token punctuation" style="color:rgb(248, 248, 242)">[</span><span class="token number">0</span><span class="token punctuation" style="color:rgb(248, 248, 242)">,</span><span class="token plain"> </span><span class="token number">0</span><span class="token punctuation" style="color:rgb(248, 248, 242)">,</span><span class="token plain"> </span><span class="token number">0</span><span class="token punctuation" style="color:rgb(248, 248, 242)">]</span><span class="token plain"> </span><span class="token punctuation" style="color:rgb(248, 248, 242)">}</span><span class="token punctuation" style="color:rgb(248, 248, 242)">)</span><span class="token punctuation" style="color:rgb(248, 248, 242)">;</span><span class="token plain"></span><br></div><div class="token-line" style="color:#F8F8F2"><span class="token plain"></span><span class="token keyword control-flow" style="color:rgb(189, 147, 249);font-style:italic">await</span><span class="token plain"> bitbybit</span><span class="token punctuation" style="color:rgb(248, 248, 242)">.</span><span class="token property-access">draw</span><span class="token punctuation" style="color:rgb(248, 248, 242)">.</span><span class="token method function property-access" style="color:rgb(80, 250, 123)">drawAnyAsync</span><span class="token punctuation" style="color:rgb(248, 248, 242)">(</span><span class="token punctuation" style="color:rgb(248, 248, 242)">{</span><span class="token plain"> </span><span class="token literal-property property">entity</span><span class="token operator">:</span><span class="token plain"> cube </span><span class="token punctuation" style="color:rgb(248, 248, 242)">}</span><span class="token punctuation" style="color:rgb(248, 248, 242)">)</span><span class="token punctuation" style="color:rgb(248, 248, 242)">;</span><span class="token plain"></span><br></div><div class="token-line" style="color:#F8F8F2"><span class="token plain" style="display:inline-block"></span><br></div><div class="token-line" style="color:#F8F8F2"><span class="token plain"></span><span class="token comment" style="color:rgb(98, 114, 164)">// Or execute an exported script with inputs</span><span class="token plain"></span><br></div><div class="token-line" style="color:#F8F8F2"><span class="token plain"></span><span class="token keyword" style="color:rgb(189, 147, 249);font-style:italic">const</span><span class="token plain"> results </span><span class="token operator">=</span><span class="token plain"> </span><span class="token keyword control-flow" style="color:rgb(189, 147, 249);font-style:italic">await</span><span class="token plain"> runner</span><span class="token punctuation" style="color:rgb(248, 248, 242)">.</span><span class="token method function property-access" style="color:rgb(80, 250, 123)">executeScript</span><span class="token punctuation" style="color:rgb(248, 248, 242)">(</span><span class="token plain"></span><br></div><div class="token-line" style="color:#F8F8F2"><span class="token plain">    yourExportedScript</span><span class="token punctuation" style="color:rgb(248, 248, 242)">,</span><span class="token plain"></span><br></div><div class="token-line" style="color:#F8F8F2"><span class="token plain">    </span><span class="token punctuation" style="color:rgb(248, 248, 242)">{</span><span class="token plain"> </span><br></div><div class="token-line" style="color:#F8F8F2"><span class="token plain">        </span><span class="token comment" style="color:rgb(98, 114, 164)">// Pass inputs to your script</span><span class="token plain"></span><br></div><div class="token-line" style="color:#F8F8F2"><span class="token plain">        </span><span class="token literal-property property">width</span><span class="token operator">:</span><span class="token plain"> </span><span class="token number">10</span><span class="token punctuation" style="color:rgb(248, 248, 242)">,</span><span class="token plain"></span><br></div><div class="token-line" style="color:#F8F8F2"><span class="token plain">        </span><span class="token literal-property property">height</span><span class="token operator">:</span><span class="token plain"> </span><span class="token number">5</span><span class="token punctuation" style="color:rgb(248, 248, 242)">,</span><span class="token plain"></span><br></div><div class="token-line" style="color:#F8F8F2"><span class="token plain">        </span><span class="token literal-property property">depth</span><span class="token operator">:</span><span class="token plain"> </span><span class="token number">3</span><span class="token plain"></span><br></div><div class="token-line" style="color:#F8F8F2"><span class="token plain">    </span><span class="token punctuation" style="color:rgb(248, 248, 242)">}</span><span class="token plain"></span><br></div><div class="token-line" style="color:#F8F8F2"><span class="token plain"></span><span class="token punctuation" style="color:rgb(248, 248, 242)">)</span><span class="token punctuation" style="color:rgb(248, 248, 242)">;</span><span class="token plain"></span><br></div><div class="token-line" style="color:#F8F8F2"><span class="token plain" style="display:inline-block"></span><br></div><div class="token-line" style="color:#F8F8F2"><span class="token plain"></span><span class="token comment" style="color:rgb(98, 114, 164)">// Access outputs from your script</span><span class="token plain"></span><br></div><div class="token-line" style="color:#F8F8F2"><span class="token plain"></span><span class="token console class-name">console</span><span class="token punctuation" style="color:rgb(248, 248, 242)">.</span><span class="token method function property-access" style="color:rgb(80, 250, 123)">log</span><span class="token punctuation" style="color:rgb(248, 248, 242)">(</span><span class="token plain">results</span><span class="token punctuation" style="color:rgb(248, 248, 242)">)</span><span class="token punctuation" style="color:rgb(248, 248, 242)">;</span><br></div></code></pre></div></div>
<h3 class="anchor anchorTargetStickyNavbar_Vzrq" id="exporting-scripts-for-the-playcanvas-runner">Exporting Scripts for the PlayCanvas Runner<a href="https://learn.bitbybit.dev/blog/playcanvas-support#exporting-scripts-for-the-playcanvas-runner" class="hash-link" aria-label="Direct link to Exporting Scripts for the PlayCanvas Runner" title="Direct link to Exporting Scripts for the PlayCanvas Runner" translate="no">​</a></h3>
<p>All Bitbybit visual programming editors (Rete, Blockly, TypeScript) support exporting scripts compatible with the PlayCanvas Runner. The export process is identical to other engines:</p>
<ol>
<li class="">Open your script in any Bitbybit editor</li>
<li class="">Click the "More Actions" menu</li>
<li class="">Select "Export to Runner"</li>
<li class="">Choose "PlayCanvas" as your target engine</li>
<li class="">Copy or download the generated JavaScript code</li>
</ol>
<p>Your exported script can then be executed by the PlayCanvas Runner on any website, in any coding environment (StackBlitz, CodePen, JSFiddle), or embedded in your own applications.</p>
<h3 class="anchor anchorTargetStickyNavbar_Vzrq" id="comparing-runners-babylonjs-threejs-and-playcanvas">Comparing Runners: BabylonJS, ThreeJS, and PlayCanvas<a href="https://learn.bitbybit.dev/blog/playcanvas-support#comparing-runners-babylonjs-threejs-and-playcanvas" class="hash-link" aria-label="Direct link to Comparing Runners: BabylonJS, ThreeJS, and PlayCanvas" title="Direct link to Comparing Runners: BabylonJS, ThreeJS, and PlayCanvas" translate="no">​</a></h3>
<p>All three runner families share the same core CAD capabilities:</p>
<ul>
<li class="">Full access to OCCT, JSCAD, and Manifold kernels</li>
<li class="">Identical parametric modeling operations</li>
<li class="">Same file import/export capabilities</li>
<li class="">Compatible with visual scripts from Bitbybit editors (with some engine-specific considerations)</li>
</ul>
<p>The primary differences relate to the game engines themselves:</p>
<p><strong>BabylonJS Runner:</strong></p>
<ul>
<li class="">Best compatibility with visual scripts from Bitbybit.dev editors (natively BabylonJS-based)</li>
<li class="">Includes physics (Havok), GUI elements, and advanced materials out of the box</li>
<li class="">Largest bundle size</li>
<li class="">Ideal for projects requiring BabylonJS-specific features</li>
</ul>
<p><strong>ThreeJS Runner:</strong></p>
<ul>
<li class="">Vast ecosystem and community</li>
<li class="">Smaller bundle size than BabylonJS</li>
<li class="">Excellent for projects already using ThreeJS</li>
<li class="">Good compatibility with visual scripts (unless they use BabylonJS-specific features)</li>
</ul>
<p><strong>PlayCanvas Runner:</strong></p>
<ul>
<li class="">Exceptional performance and mobile optimization</li>
<li class="">Entity-component architecture familiar to game developers</li>
<li class="">Cloud-based visual editor available</li>
<li class="">Professional game development features</li>
<li class="">Excellent for real-time applications and games requiring CAD precision</li>
</ul>
<h3 class="anchor anchorTargetStickyNavbar_Vzrq" id="architecture-engine-agnostic-core">Architecture: Engine-Agnostic Core<a href="https://learn.bitbybit.dev/blog/playcanvas-support#architecture-engine-agnostic-core" class="hash-link" aria-label="Direct link to Architecture: Engine-Agnostic Core" title="Direct link to Architecture: Engine-Agnostic Core" translate="no">​</a></h3>
<p>Our PlayCanvas integration maintains the same modular, engine-agnostic architecture we established with ThreeJS and BabylonJS support:</p>
<p><img decoding="async" loading="lazy" src="https://bitbybit.dev/files/site/npm-package-architecture.jpeg" alt="Bitbybit platform architecture showing the engine-agnostic core with PlayCanvas, ThreeJS, and BabylonJS integration layers" title="Bitbybit architecture with PlayCanvas support" class="img_ev3q"></p>
<p>The <strong><code>@bitbybit-dev/core</code></strong> package contains all fundamental CAD logic, data structures, and interfaces. Each game engine-specific package (<code>@bitbybit-dev/playcanvas</code>, <code>@bitbybit-dev/threejs</code>, <code>@bitbybit-dev/babylonjs</code>) provides a thin integration layer that translates between Bitbybit's CAD operations and the respective engine's rendering system.</p>
<p>This architecture means:</p>
<ul>
<li class=""><strong>Consistent API</strong>: Learn once, use everywhere</li>
<li class=""><strong>Easy Migration</strong>: Switch engines if project requirements change</li>
<li class=""><strong>Future-Proof</strong>: New engine integrations can be added without disrupting existing code</li>
<li class=""><strong>Optimal Performance</strong>: Each integration is specifically optimized for its target engine</li>
</ul>
<h3 class="anchor anchorTargetStickyNavbar_Vzrq" id="real-world-use-cases-with-playcanvas">Real-World Use Cases with PlayCanvas<a href="https://learn.bitbybit.dev/blog/playcanvas-support#real-world-use-cases-with-playcanvas" class="hash-link" aria-label="Direct link to Real-World Use Cases with PlayCanvas" title="Direct link to Real-World Use Cases with PlayCanvas" translate="no">​</a></h3>
<p>PlayCanvas's performance characteristics make it particularly well-suited for certain applications:</p>
<p><strong>3D Product Configurators:</strong>
PlayCanvas's mobile-first optimization is perfect for e-commerce product configurators that need to run smoothly on smartphones and tablets. Combined with Bitbybit's parametric modeling, you can create configurators for furniture, jewelry, mechanical parts, and more.</p>
<p><strong>Architectural Visualizations:</strong>
Create interactive architectural presentations with parametric building components. Users can adjust dimensions, materials, and layouts in real-time while maintaining structural precision.</p>
<p><strong>Engineering Applications:</strong>
Build web-based CAD tools for mechanical engineering, allowing engineers to design, test, and share components directly in the browser without specialized software.</p>
<p><strong>Educational Tools:</strong>
Develop interactive geometry and mathematics education tools that demonstrate CAD concepts with high performance even on limited hardware.</p>
<p><strong>Game Integration:</strong>
Generate procedural game assets with CAD precision, create customizable in-game items, or build level editors that use industrial-grade geometry operations.</p>
<h3 class="anchor anchorTargetStickyNavbar_Vzrq" id="getting-started">Getting Started<a href="https://learn.bitbybit.dev/blog/playcanvas-support#getting-started" class="hash-link" aria-label="Direct link to Getting Started" title="Direct link to Getting Started" translate="no">​</a></h3>
<p>To start using Bitbybit with PlayCanvas:</p>
<ol>
<li class="">
<p><strong>Via NPM</strong> (for build-based projects):</p>
<div class="language-bash codeBlockContainer_Ckt0 theme-code-block" style="--prism-color:#F8F8F2;--prism-background-color:#282A36"><div class="codeBlockContent_QJqH"><pre tabindex="0" class="prism-code language-bash codeBlock_bY9V thin-scrollbar" style="color:#F8F8F2;background-color:#282A36"><code class="codeBlockLines_e6Vv"><div class="token-line" style="color:#F8F8F2"><span class="token plain">npm install @bitbybit-dev/playcanvas</span><br></div></code></pre></div></div>
<p>Then follow our <a class="" href="https://learn.bitbybit.dev/learn/npm-packages/playcanvas/start-with-playcanvas">PlayCanvas Integration Guide</a></p>
</li>
<li class="">
<p><strong>Via Runner</strong> (for quick integration):
Include the runner script tag and start executing your CAD scripts immediately. Check our <a class="" href="https://learn.bitbybit.dev/learn/runners/engines/playcanvas/full-runner">Runner documentation</a> and <a href="https://github.com/bitbybit-dev/bitbybit/tree/master/examples/runner/playcanvas" target="_blank" rel="noopener noreferrer" class="">examples on GitHub</a></p>
</li>
<li class="">
<p><strong>Visual Programming</strong>:
Create your geometry in Bitbybit's visual editors, export to the PlayCanvas Runner, and integrate with your own UI</p>
</li>
</ol>
<h3 class="anchor anchorTargetStickyNavbar_Vzrq" id="examples-and-resources">Examples and Resources<a href="https://learn.bitbybit.dev/blog/playcanvas-support#examples-and-resources" class="hash-link" aria-label="Direct link to Examples and Resources" title="Direct link to Examples and Resources" translate="no">​</a></h3>
<p>We've prepared comprehensive documentation and examples:</p>
<ul>
<li class=""><strong><a class="" href="https://learn.bitbybit.dev/learn/npm-packages/playcanvas/start-with-playcanvas">PlayCanvas Starter Template</a></strong>: Complete setup guide with Vite</li>
<li class=""><strong><a class="" href="https://learn.bitbybit.dev/learn/npm-packages/playcanvas/advanced-parametric-3d-model">Advanced Parametric Model</a></strong>: Complex parametric modeling with GUI</li>
<li class=""><strong><a class="" href="https://learn.bitbybit.dev/learn/npm-packages/playcanvas/hex-house-concept">Hex House Concept</a></strong>: Architectural parametric design showcase</li>
<li class=""><strong><a href="https://github.com/bitbybit-dev/bitbybit/tree/master/examples/vite/playcanvas" target="_blank" rel="noopener noreferrer" class="">GitHub Examples</a></strong>: Working code samples</li>
</ul>
<h3 class="anchor anchorTargetStickyNavbar_Vzrq" id="playcanvas-is-here-to-stay">PlayCanvas is Here to Stay<a href="https://learn.bitbybit.dev/blog/playcanvas-support#playcanvas-is-here-to-stay" class="hash-link" aria-label="Direct link to PlayCanvas is Here to Stay" title="Direct link to PlayCanvas is Here to Stay" translate="no">​</a></h3>
<p>Just like BabylonJS and ThreeJS, PlayCanvas is now a first-class citizen in the Bitbybit ecosystem. We're committed to maintaining and improving this integration, ensuring PlayCanvas developers have access to the same powerful CAD capabilities available on other platforms.</p>
<p>This expansion continues our vision of making professional 3D CAD truly accessible and adaptable for the entire web development community. Whether you're a game developer, product designer, engineer, or educator, you now have more choices than ever for bringing precise, parametric 3D modeling to your web projects.</p>
<h3 class="anchor anchorTargetStickyNavbar_Vzrq" id="whats-next">What's Next?<a href="https://learn.bitbybit.dev/blog/playcanvas-support#whats-next" class="hash-link" aria-label="Direct link to What's Next?" title="Direct link to What's Next?" translate="no">​</a></h3>
<p>We're actively working on:</p>
<ul>
<li class="">More PlayCanvas-specific examples and tutorials</li>
<li class="">Additional integration with PlayCanvas's visual editor</li>
<li class="">Enhanced support for PlayCanvas-specific features in visual scripts</li>
</ul>
<p>We're excited to see what the PlayCanvas community will create with these new CAD capabilities. Share your projects with us on <a href="https://discord.gg/GSe3VMe" target="_blank" rel="noopener noreferrer" class="">Discord</a>, tag us on social media, or contribute examples to our GitHub repository!</p>
<hr>
<p><strong>Ready to get started?</strong></p>
<ul>
<li class="">📦 <strong><a href="https://www.npmjs.com/package/@bitbybit-dev/playcanvas" target="_blank" rel="noopener noreferrer" class="">Install @bitbybit-dev/playcanvas</a></strong></li>
<li class="">📚 <strong><a class="" href="https://learn.bitbybit.dev/learn/npm-packages/playcanvas">Read the Documentation</a></strong></li>
<li class="">🎮 <strong><a class="" href="https://learn.bitbybit.dev/learn/runners/engines/playcanvas/full-runner">Try the PlayCanvas Runner</a></strong></li>
<li class="">💬 <strong><a href="https://discord.gg/GSe3VMe" target="_blank" rel="noopener noreferrer" class="">Join our Discord Community</a></strong></li>
</ul>
<p>Happy coding, and welcome to the PlayCanvas community in Bitbybit! 🎮✨</p>]]></content>
        <author>
            <name>Matas Ubarevičius</name>
            <uri>https://www.linkedin.com/in/matas-ubarevicius/</uri>
        </author>
        <category label="Bitbybit" term="Bitbybit"/>
        <category label="CAD" term="CAD"/>
        <category label="PlayCanvas" term="PlayCanvas"/>
    </entry>
    <entry>
        <title type="html"><![CDATA[How Ironside Armour Built Complex 60-Part Gym Configurators Without Writing Code]]></title>
        <id>https://learn.bitbybit.dev/blog/3d-bits-app-use-case-ironside-armour-gym-configurators-on-shopify</id>
        <link href="https://learn.bitbybit.dev/blog/3d-bits-app-use-case-ironside-armour-gym-configurators-on-shopify"/>
        <updated>2026-01-02T00:00:00.000Z</updated>
        <summary type="html"><![CDATA[Discover how Ironside Armour transformed their Shopify store with interactive 3D gym rack configurators using 3D Bits - no coding required. A real-world case study.]]></summary>
        <content type="html"><![CDATA[<p><img decoding="async" loading="lazy" src="https://bitbybit.dev/files/site/blog/3d-bits-app-use-case-ironside-armour-gym-configurators-on-shopify/ironside-armour-gym-configurators-3d-bits-app-for-shopify.webp" alt="Ironside Armour configurators driven by 3D Bits app for Shopify" title="Ironside Armour Rack and landing page with link to configurators." class="img_ev3q"></p>
<p>How do you sell a modular gym rack with over 60+ customizable parts online? Static images don't cut it. Videos can only show so much. And asking customers to imagine how different components fit together? That's a recipe for confusion and abandoned carts.</p>
<p><a href="https://ironsidearmour.com/" target="_blank" rel="noopener noreferrer" class="">Ironside Armour</a>, a global fitness equipment company, faced exactly this challenge. Through close collaboration with our team, they developed interactive 3D configurators powered by 3D Bits - a rewarding journey that transformed how their customers shop.</p>
<h2 class="anchor anchorTargetStickyNavbar_Vzrq" id="the-challenge-selling-complex-modular-products-online">The Challenge: Selling Complex Modular Products Online<a href="https://learn.bitbybit.dev/blog/3d-bits-app-use-case-ironside-armour-gym-configurators-on-shopify#the-challenge-selling-complex-modular-products-online" class="hash-link" aria-label="Direct link to The Challenge: Selling Complex Modular Products Online" title="Direct link to The Challenge: Selling Complex Modular Products Online" translate="no">​</a></h2>
<p>Ironside Armour designs and sells premium gym racks that customers can customize to their exact needs. We're talking about products with <strong>60+ individual parts</strong> that can be combined in countless configurations. Try explaining that with a product gallery.</p>
<p>When customers shop for modular gym equipment, they need to:</p>
<ul>
<li class="">Visualize exactly what they're buying</li>
<li class="">Understand how parts connect and interact</li>
<li class="">Feel confident their configuration will work</li>
<li class="">Know the total price before checkout</li>
</ul>
<p>Traditional e-commerce approaches simply couldn't deliver this experience. That's where 3D configurators became the obvious solution.</p>
<div class="responsive-video-container"><iframe width="560" height="315" src="https://www.youtube.com/embed/Bn74Amk2UJc" title="Ironside Armour Pro Power Rack configurator in action" frameborder="0" allow="accelerometer; autoplay; clipboard-write; encrypted-media; gyroscope; picture-in-picture; web-share; fullscreen" allowfullscreen=""></iframe></div>
<p>Today, Ironside Armour offers three fully interactive 3D configurators on their Shopify store:</p>
<ul>
<li class=""><a href="https://ironsidearmour.com/en/products/pro-power-rack" target="_blank" rel="noopener noreferrer" class="">Pro Power Rack</a></li>
<li class=""><a href="https://ironsidearmour.com/en/products/pro-half-rack" target="_blank" rel="noopener noreferrer" class="">Pro Half Rack</a></li>
<li class=""><a href="https://ironsidearmour.com/en/products/pro-foldable-rack" target="_blank" rel="noopener noreferrer" class="">Pro Foldable Rack</a></li>
</ul>
<p>Each configurator lets customers build their perfect rack, see it from every angle, and add it to cart with accurate pricing - all in real time.</p>
<h2 class="anchor anchorTargetStickyNavbar_Vzrq" id="why-3d-bits-was-the-right-choice">Why 3D Bits Was the Right Choice<a href="https://learn.bitbybit.dev/blog/3d-bits-app-use-case-ironside-armour-gym-configurators-on-shopify#why-3d-bits-was-the-right-choice" class="hash-link" aria-label="Direct link to Why 3D Bits Was the Right Choice" title="Direct link to Why 3D Bits Was the Right Choice" translate="no">​</a></h2>
<h3 class="anchor anchorTargetStickyNavbar_Vzrq" id="a-collaborative-approach-to-complex-configurators">A Collaborative Approach to Complex Configurators<a href="https://learn.bitbybit.dev/blog/3d-bits-app-use-case-ironside-armour-gym-configurators-on-shopify#a-collaborative-approach-to-complex-configurators" class="hash-link" aria-label="Direct link to A Collaborative Approach to Complex Configurators" title="Direct link to A Collaborative Approach to Complex Configurators" translate="no">​</a></h3>
<p>These aren't simple "pick a color" configurators. Each gym rack includes <strong>60+ parts</strong> with various attachment points, accessories, and configuration options. Building something this sophisticated required close collaboration between Ironside Armour and our team.</p>
<p>Using our visual <a class="" href="https://learn.bitbybit.dev/learn/3d-bits/composer/intro"><strong>Composer</strong></a>, we worked together to define parts, set up the configuration logic, and connect everything to their Shopify products. Composer provides a powerful interface for building sophisticated product configurators without writing code - but that doesn't mean the process is trivial. Complex products require thoughtful planning, proper 3D model preparation, and attention to detail.</p>
<p><img decoding="async" loading="lazy" src="https://bitbybit.dev/files/site/blog/3d-bits-app-use-case-ironside-armour-gym-configurators-on-shopify/ironside-armour-3d-bits-viewer-editor-no-code-configurators-gltf.webp" alt="No-Code Composer For 3D Product Configurators" title="Ironside Armour Rack configurator inside Composer, included inside 3D Bits app for Shopify" class="img_ev3q"></p>
<h3 class="anchor anchorTargetStickyNavbar_Vzrq" id="seamless-third-party-integration">Seamless Third-Party Integration<a href="https://learn.bitbybit.dev/blog/3d-bits-app-use-case-ironside-armour-gym-configurators-on-shopify#seamless-third-party-integration" class="hash-link" aria-label="Direct link to Seamless Third-Party Integration" title="Direct link to Seamless Third-Party Integration" translate="no">​</a></h3>
<p>One of 3D Bits' core strengths is flexibility. Rather than forcing merchants into a rigid ecosystem, we built the app to integrate with the tools you already use.</p>
<p>Ironside Armour chose to pair 3D Bits with <a href="https://apps.shopify.com/ymq-options" target="_blank" rel="noopener noreferrer" class="">YMQ Options</a>, a popular product options app they were already familiar with. This combination gave them:</p>
<ul>
<li class="">Complex pricing logic for modular products</li>
<li class="">Custom option handling beyond Shopify's variant limits</li>
<li class="">A familiar workflow for managing product options</li>
</ul>
<p>This modular approach - where you combine specialized apps like puzzle pieces - is quite unique in the industry. Want to use a different pricing app? Go ahead. Need to code a custom solution? We support that too. 3D Bits focuses on what it does best (high-performance 3D rendering) while integrating seamlessly with your existing stack. <a class="" href="https://learn.bitbybit.dev/learn/3d-bits/integrations/when-you-need-another-app">Learn more about compatible apps</a>.</p>
<h2 class="anchor anchorTargetStickyNavbar_Vzrq" id="from-cad-to-web-optimizing-3d-models">From CAD to Web: Optimizing 3D Models<a href="https://learn.bitbybit.dev/blog/3d-bits-app-use-case-ironside-armour-gym-configurators-on-shopify#from-cad-to-web-optimizing-3d-models" class="hash-link" aria-label="Direct link to From CAD to Web: Optimizing 3D Models" title="Direct link to From CAD to Web: Optimizing 3D Models" translate="no">​</a></h2>
<p>Like many manufacturers, Ironside Armour's 3D models originated as STEP files - the industry standard for professional CAD. But CAD models aren't built for web performance. They're built for engineering precision.</p>
<p>We worked closely with Ironside Armour to transform their production models into web-optimized GLTF files. This process involved:</p>
<ul>
<li class=""><strong>Mesh optimization</strong> - Reducing polygon counts while maintaining visual quality</li>
<li class=""><strong>Texture compression</strong> - Balancing file size with crisp, realistic materials</li>
<li class=""><strong>Instanced loading</strong> - A key 3D Bits feature where duplicate parts load only once and render in multiple positions at the GPU level, dramatically improving performance</li>
</ul>
<p>We provided hands-on support and consulting during the initial setup. Ironside Armour also generously allowed us to use their actual production models in our tutorials, helping other merchants learn the optimization process.</p>
<div class="responsive-video-container"><iframe width="560" height="315" src="https://www.youtube.com/embed/7mqd2FLlpcU" title="From STEP to GLTF - Convert PRO CAD 3D Models For 3D Bits Shopify App" frameborder="0" allow="accelerometer; autoplay; clipboard-write; encrypted-media; gyroscope; picture-in-picture; web-share; fullscreen" allowfullscreen=""></iframe></div>
<h2 class="anchor anchorTargetStickyNavbar_Vzrq" id="long-term-success-growing-capabilities">Long-Term Success: Growing Capabilities<a href="https://learn.bitbybit.dev/blog/3d-bits-app-use-case-ironside-armour-gym-configurators-on-shopify#long-term-success-growing-capabilities" class="hash-link" aria-label="Direct link to Long-Term Success: Growing Capabilities" title="Direct link to Long-Term Success: Growing Capabilities" translate="no">​</a></h2>
<p>Our collaboration with Ironside Armour didn't end after the initial setup - it evolved. We provided extensive support during the learning curve, and over time, they developed the expertise to manage and extend their configurators independently.</p>
<p>Since our initial work together, Ironside Armour has:</p>
<ul>
<li class="">Switched Shopify themes (3D Bits kept working seamlessly)</li>
<li class="">Made multiple updates to their option app configuration</li>
<li class="">Added new configurable parts to their configurators</li>
</ul>
<p>Today, they confidently optimize their own 3D models, extend their configurators with new components, and maintain complex product catalogs. <strong>This is the outcome we aim for with every client: building your capabilities through partnership, so you can grow with confidence.</strong></p>
<h2 class="anchor anchorTargetStickyNavbar_Vzrq" id="what-ironside-armour-says">What Ironside Armour Says<a href="https://learn.bitbybit.dev/blog/3d-bits-app-use-case-ironside-armour-gym-configurators-on-shopify#what-ironside-armour-says" class="hash-link" aria-label="Direct link to What Ironside Armour Says" title="Direct link to What Ironside Armour Says" translate="no">​</a></h2>
<div class="testimonial-item"><div class="testimonial-quote"><p>"I wasn't expecting to be this impressed. This guy delivers real value with authenticity, quality, and professionalism. Every interaction we've had has been smooth, straightforward, and reliable. What you see is exactly what you get - just solid, well-executed work with no unnecessary noise. This is the kind of service I'd recommend without hesitation. I'll definitely continue working with Matas."</p></div><p><strong>Francesco, Founder &amp; CEO</strong><br>
<!-- -->🇮🇹 Italy<br>
<a href="https://ironsidearmour.com/" target="_blank" rel="noopener noreferrer" class=""><img decoding="async" loading="lazy" src="https://bitbybit.dev/files/site/start/shopify/ironside-armour.webp" alt="Ironside Armour" class="img_ev3q"></a></p></div>
<h2 class="anchor anchorTargetStickyNavbar_Vzrq" id="key-takeaways">Key Takeaways<a href="https://learn.bitbybit.dev/blog/3d-bits-app-use-case-ironside-armour-gym-configurators-on-shopify#key-takeaways" class="hash-link" aria-label="Direct link to Key Takeaways" title="Direct link to Key Takeaways" translate="no">​</a></h2>
<p>If you're selling complex, modular, or customizable products on Shopify, here's what Ironside Armour's experience demonstrates:</p>
<ol>
<li class=""><strong>Collaboration is key</strong> - Complex configurators benefit from working closely with experienced partners who understand both the technology and the challenges</li>
<li class=""><strong>Flexibility matters</strong> - Choose apps that work with your existing stack, not against it</li>
<li class=""><strong>Invest in optimization</strong> - Properly converted 3D models make all the difference in performance</li>
<li class=""><strong>The journey is rewarding</strong> - While building sophisticated 3D configurators requires effort and planning, the results transform how customers experience your products</li>
</ol>
<h2 class="anchor anchorTargetStickyNavbar_Vzrq" id="ready-to-start-your-journey">Ready to Start Your Journey?<a href="https://learn.bitbybit.dev/blog/3d-bits-app-use-case-ironside-armour-gym-configurators-on-shopify#ready-to-start-your-journey" class="hash-link" aria-label="Direct link to Ready to Start Your Journey?" title="Direct link to Ready to Start Your Journey?" translate="no">​</a></h2>
<p>As we continue developing 3D Bits, every improvement benefits all our merchants. Performance enhancements, new features, and expanded capabilities automatically become available to stores like Ironside Armour.</p>
<p>Building a 3D configurator for complex products is a rewarding path - but you don't have to figure it out alone. Our <strong>Pro plan</strong> includes premium support with direct access to our team, helping you overcome challenges and make the most of the platform. <a class="" href="https://learn.bitbybit.dev/learn/3d-bits/plans/subscription-plans">Learn more about our plans</a>.</p>
<p>Depending on your project's needs, we may also offer additional services - from 3D model optimization to hands-on configurator setup - to ensure your journey is a success. Every client is different, and we're committed to finding the right level of support for your situation.</p>
<p><strong>If you're considering 3D configurators for your Shopify store and don't know where to start, <a href="mailto:info@bitbybit.dev" target="_blank" rel="noopener noreferrer" class="">reach out to us</a>.</strong> We're here to help you navigate this journey, just as we did with Ironside Armour.</p>
<p><a href="https://apps.shopify.com/3d-bits-1" target="_blank" rel="noopener noreferrer" class="">Get started with 3D Bits</a></p>]]></content>
        <author>
            <name>Matas Ubarevičius</name>
            <uri>https://www.linkedin.com/in/matas-ubarevicius/</uri>
        </author>
        <category label="Bitbybit" term="Bitbybit"/>
        <category label="3D Bits" term="3D Bits"/>
        <category label="Client" term="Client"/>
        <category label="Customer" term="Customer"/>
        <category label="B2B" term="B2B"/>
        <category label="Shopify" term="Shopify"/>
        <category label="Case Study" term="Case Study"/>
        <category label="Fitness Equipment" term="Fitness Equipment"/>
        <category label="Italy" term="Italy"/>
    </entry>
    <entry>
        <title type="html"><![CDATA[BREAKING LANGUAGE BARRIERS: Bitbybit.dev Opens 3D Design to a Global Audience]]></title>
        <id>https://learn.bitbybit.dev/blog/editors-translated-to-multiple-languages</id>
        <link href="https://learn.bitbybit.dev/blog/editors-translated-to-multiple-languages"/>
        <updated>2025-04-08T00:00:00.000Z</updated>
        <summary type="html"><![CDATA[We are excited to announce that all components of Bitbybit.dev's Rete & Blockly visual programming editors are now translated into Spanish, Hindi, Arabic, Chinese, French, and Lithuanian, making 3D design more accessible worldwide.]]></summary>
        <content type="html"><![CDATA[<p><img decoding="async" loading="lazy" src="https://bitbybit.dev/files/site/blog/translated-editors/translated-editors.jpeg" alt="An image symbolizing the translation of Bitbybit.dev editors, perhaps like a Rosetta Stone for 3D design with various scripts." title="Image showing a script stone symbolizing the translation of the editors." class="img_ev3q"></p>
<p>In our ongoing mission to make powerful 3D design tools accessible to everyone, we're thrilled to announce a significant milestone: <strong>all components of Bitbybit.dev's Rete and Blockly visual programming editors are now translated into multiple new languages!</strong></p>
<p>Alongside English, we now proudly support:</p>
<ul>
<li class=""><strong>Spanish (Español)</strong></li>
<li class=""><strong>Hindi (हिन्दी)</strong></li>
<li class=""><strong>Arabic (العربية)</strong></li>
<li class=""><strong>Chinese (中文)</strong></li>
<li class=""><strong>French (Français)</strong></li>
<li class=""><strong>Lithuanian (Lietuvių)</strong></li>
</ul>
<p>You'll also find a new language selection button within the platform, allowing you to easily switch to your preferred language.</p>
<p>Imagine a world where the language you speak doesn’t limit your ability to create, design, and innovate. A world where children from Buenos Aires to Beijing can explore the wonders of 3D design in their own tongue. Bitbybit.dev is making this a reality. This exciting development is more than just a technical update - it’s a transformative step toward making technology and education truly accessible to millions worldwide.</p>
<p>To select your preferred language, look for the new language switcher button in our editors:
<img decoding="async" loading="lazy" src="https://bitbybit.dev/files/site/blog/translated-editors/select-language.jpeg" alt="Screenshot showing the location of the new language selection button within the Bitbybit.dev interface." title="This picture shows where to find the button which can switch to your language." class="img_ev3q"></p>
<h3 class="anchor anchorTargetStickyNavbar_Vzrq" id="why-language-matters-in-stem">Why Language Matters in STEM<a href="https://learn.bitbybit.dev/blog/editors-translated-to-multiple-languages#why-language-matters-in-stem" class="hash-link" aria-label="Direct link to Why Language Matters in STEM" title="Direct link to Why Language Matters in STEM" translate="no">​</a></h3>
<p>Language is a powerful tool. It’s how we connect, learn, and express ourselves. But when educational resources are locked behind a language barrier, they become unreachable for many. In STEM (Science, Technology, Engineering, and Mathematics) fields, where innovation drives progress, this issue is especially pressing.</p>
<p>Complex concepts like coding and 3D design can already feel daunting-add the challenge of navigating them in a foreign language, and they can seem insurmountable. By translating its visual programming tools into multiple languages, Bitbybit.dev is tearing down these walls, inviting a global audience to engage with STEM on their own terms.</p>
<h3 class="anchor anchorTargetStickyNavbar_Vzrq" id="empowering-kids-with-intuitive-learning">Empowering Kids with Intuitive Learning<a href="https://learn.bitbybit.dev/blog/editors-translated-to-multiple-languages#empowering-kids-with-intuitive-learning" class="hash-link" aria-label="Direct link to Empowering Kids with Intuitive Learning" title="Direct link to Empowering Kids with Intuitive Learning" translate="no">​</a></h3>
<p>For kids, learning to program can be like building with digital bricks. Visual programming editors like Rete and Blockly make this process intuitive by replacing complex lines of code with simple drag-and-drop blocks. This approach lets young learners focus on logic and creativity rather than wrestling with syntax.</p>
<p>Now, with these tools available in languages like Spanish, Hindi, Arabic, Chinese, French, and Lithuanian, the learning experience becomes even more seamless and engaging. A child in Cairo can experiment with 3D geometry in Arabic, while a peer in Paris does the same in French. This not only boosts confidence but also sparks curiosity, making STEM approachable and exciting for kids who might otherwise feel excluded.</p>
<p>Take, for example, a young student in rural India. Hindi is her first language, and English feels distant and unfamiliar. Before this translation effort, exploring 3D CAD might have been a struggle, an additional layer of difficulty on top of learning new concepts. Now, with Bitbybit.dev’s Hindi interface, she can dive into the world of 3D design, creating shapes and structures in a language she knows best. This isn’t just about convenience-it’s about empowerment, giving kids everywhere the chance to see themselves as future innovators, regardless of their linguistic background.</p>
<h3 class="anchor anchorTargetStickyNavbar_Vzrq" id="unlocking-parametric-design-for-all">Unlocking Parametric Design for All<a href="https://learn.bitbybit.dev/blog/editors-translated-to-multiple-languages#unlocking-parametric-design-for-all" class="hash-link" aria-label="Direct link to Unlocking Parametric Design for All" title="Direct link to Unlocking Parametric Design for All" translate="no">​</a></h3>
<p>Parametric design-a method of defining objects using variables, parameters, and relationships-is a cornerstone of modern 3D CAD. It’s a powerful skill used extensively in engineering, architecture, and product design, but it’s also inherently abstract and can be challenging to learn.</p>
<p>Visual programming simplifies this by letting users manipulate parameters and see results through a graphical interface. When that interface speaks your language, the learning curve flattens even more dramatically. By making parametric design accessible in native languages, Bitbybit.dev is equipping users worldwide with the tools to tackle advanced concepts without the added cognitive load of translation.</p>
<p>In a world that’s increasingly connected yet wonderfully diverse, access to technology shouldn’t hinge on the language you speak. Bitbybit.dev is dedicated to creating accessible design tools for everyone. We believe that the future of STEM is multilingual, and with these new translations, it’s brighter than ever.</p>
<p>We plan to add support for even more languages to Bitbybit.dev in the near future. Community feedback plays a crucial role in shaping these translations and helping us prioritize. You can also contribute your suggestions or improvements directly via pull requests to our GitHub repository:</p>
<p>➡️ <strong><a href="https://github.com/bitbybit-dev/bitbybit/tree/master/languages" target="_blank" rel="noopener noreferrer" class="">Contribute to Language Translations on GitHub</a></strong></p>
<p>We are incredibly excited to see how these new language options will empower more creators, educators, and learners around the globe!</p>]]></content>
        <author>
            <name>Matas Ubarevičius</name>
            <uri>https://www.linkedin.com/in/matas-ubarevicius/</uri>
        </author>
        <category label="Bitbybit" term="Bitbybit"/>
        <category label="CAD" term="CAD"/>
    </entry>
    <entry>
        <title type="html"><![CDATA[UPDATED: 3D Bits App for Shopify - Simpler Static 3D Models & Project Embedding!]]></title>
        <id>https://learn.bitbybit.dev/blog/updated-3d-bits-app-for-shopify</id>
        <link href="https://learn.bitbybit.dev/blog/updated-3d-bits-app-for-shopify"/>
        <updated>2025-01-01T00:00:00.000Z</updated>
        <summary type="html"><![CDATA[Exciting updates for the 3D Bits app for Shopify! Introducing new capabilities for simpler use cases, including easier static 3D model display and direct embedding of public Bitbybit.dev projects.]]></summary>
        <content type="html"><![CDATA[<p><img decoding="async" loading="lazy" src="https://bitbybit.dev/files/site/start/shopify/bitbybit-embed-towel-bucket.jpeg" alt="3D Bits app for Shopify was updated to embed preview links to public bitbybit.dev scripts, showcasing a 3D towel and bucket model." title="3D Bits app for Shopify was updated to embed preview links to public bitbybit.dev scripts" class="img_ev3q"></p>
<p>We are happy to announce that the <strong>3D Bits app for Shopify</strong> has been updated with some powerful new capabilities designed to simplify common use cases! While parametric 3D models offer incredible flexibility, we understand that the learning curve associated with programming them can be steep.</p>
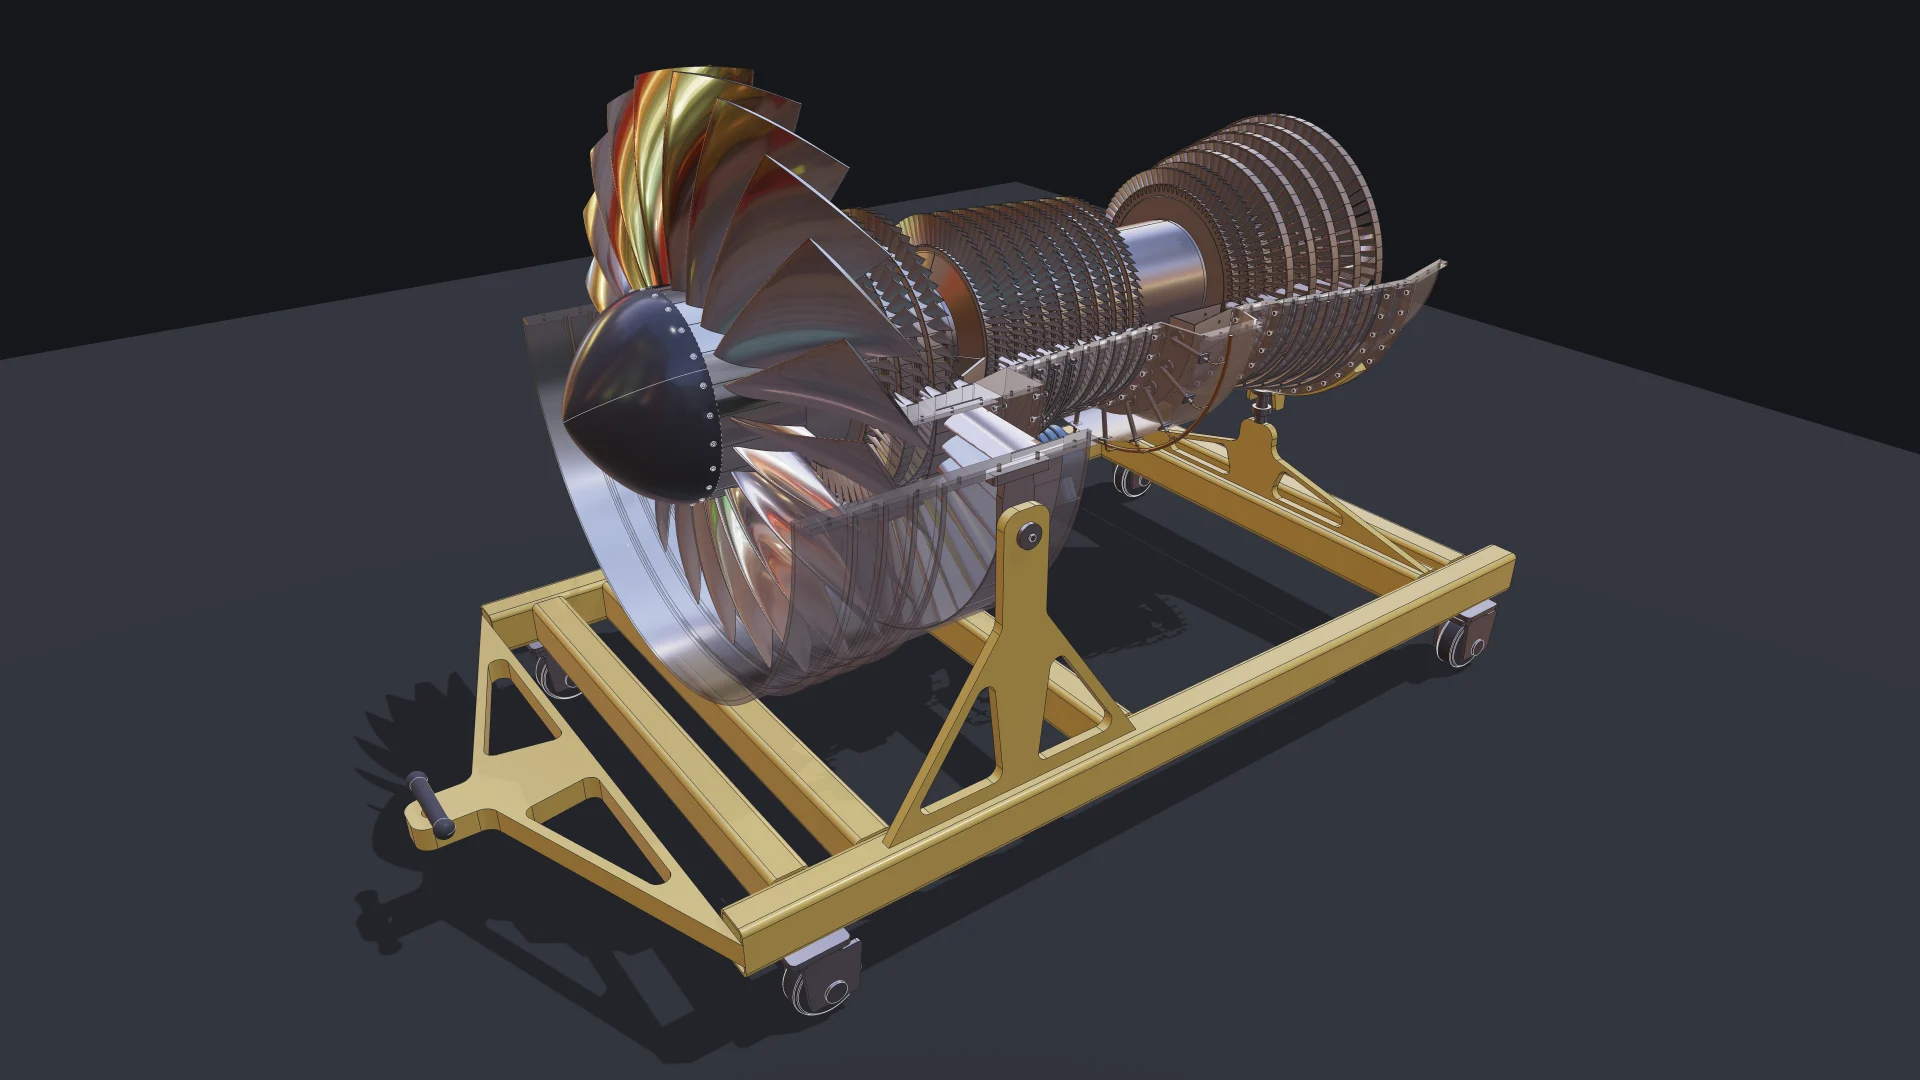
<p>To address this, we've introduced <strong>two new theme app extension blocks</strong>:</p>
<ol>
<li class=""><strong>BITBYBIT VIEWER:</strong> Simplifies the display of static 3D models (like GLTF files or 3D scans).</li>
<li class=""><strong>BITBYBIT PREVIEW:</strong> Offers a straightforward way to embed public Bitbybit.dev projects that don't need to react to Shopify product variant changes.</li>
</ol>
<p>These updates make it easier than ever to bring stunning 3D experiences to your Shopify store.</p>
<h3 class="anchor anchorTargetStickyNavbar_Vzrq" id="3d-bits-on-the-shopify-app-store">3D Bits on the Shopify App Store<a href="https://learn.bitbybit.dev/blog/updated-3d-bits-app-for-shopify#3d-bits-on-the-shopify-app-store" class="hash-link" aria-label="Direct link to 3D Bits on the Shopify App Store" title="Direct link to 3D Bits on the Shopify App Store" translate="no">​</a></h3>
<p>If you'd like to install or update the app for your Shopify store, just click the link below:</p>
<p>➡️ <strong><a href="https://apps.shopify.com/3d-bits-1" target="_blank" rel="noopener noreferrer" class="">3D Bits App for Shopify</a></strong></p>
<h3 class="anchor anchorTargetStickyNavbar_Vzrq" id="so-what-are-the-updates">So, What Are The Updates?<a href="https://learn.bitbybit.dev/blog/updated-3d-bits-app-for-shopify#so-what-are-the-updates" class="hash-link" aria-label="Direct link to So, What Are The Updates?" title="Direct link to So, What Are The Updates?" translate="no">​</a></h3>
<p>Many of our users simply need to display static 3D models on their product pages – think 3D scans of their products or pre-made GLTF assets. Previously, even for these simpler cases, it often required creating a small script on our Bitbybit.dev platform, exporting it to Shopify, and following several integration steps.</p>
<p>To make this process significantly easier, we’ve introduced the <strong>BITBYBIT VIEWER</strong> theme app extension block.</p>
<ul>
<li class=""><strong>Simplified Static Model Display:</strong> This new block lets you display 3D models on your product pages using just a URL (e.g., from Shopify’s CDN or any public URL) – often with no need to use the Bitbybit.dev editor at all. It’s perfect for users who want to showcase a 3D model that doesn't need to dynamically respond to product variant changes.</li>
<li class=""><strong>Advanced Scene Configuration (JSON):</strong> For those looking to customize more advanced 3D experiences with static models, the BITBYBIT VIEWER also supports Scene Configuration in JSON format. This feature lets you load multiple files, precisely adjust model rotation, position, and scale. You can also customize camera speeds, initial positions, lighting, skyboxes, and more, giving you fine-grained control over the 3D presentation.</li>
</ul>
<p>Additionally, for experienced users already familiar with the Bitbybit.dev ecosystem, we’ve added the <strong>BITBYBIT PREVIEW</strong> theme app extension block.</p>
<ul>
<li class=""><strong>Direct Project Embedding:</strong> With a single preview URL from a public Bitbybit.dev project, you can now link and embed that project directly onto your Shopify product pages. This is great for showcasing more complex or interactive scenes that you've already built on Bitbybit.dev, as long as they don't require dynamic updates based on Shopify product variants.</li>
</ul>
<h3 class="anchor anchorTargetStickyNavbar_Vzrq" id="bitbybit-viewer-block">BITBYBIT VIEWER Block<a href="https://learn.bitbybit.dev/blog/updated-3d-bits-app-for-shopify#bitbybit-viewer-block" class="hash-link" aria-label="Direct link to BITBYBIT VIEWER Block" title="Direct link to BITBYBIT VIEWER Block" translate="no">​</a></h3>
<p>The <strong>BITBYBIT VIEWER</strong> block sets up the 3D scene and loads the 3D models you provide via URL or JSON configuration. It currently supports popular file formats like:</p>
<ul>
<li class=""><code>gltf</code>, <code>glb</code> (standard 3D model format)</li>
<li class=""><code>splat</code>, <code>ply</code> (for Gaussian Splatting 3D scans)</li>
<li class=""><code>obj</code>, <code>stl</code> (common 3D model/printing formats)</li>
</ul>
<p>For the best results with assets you own, we recommend uploading them to Shopify’s "Content" section (under Settings), then copying their CDN URLs and using those with the Viewer block. You can also customize settings such as the background color and other scene details directly within the Shopify theme editor to match your preferences.</p>
<p>➡️ <strong><a class="" href="https://learn.bitbybit.dev/learn/3d-bits/theme-blocks/bitbybit-viewer">Learn more about the BITBYBIT VIEWER block</a></strong></p>
<p><img decoding="async" loading="lazy" src="https://bitbybit.dev/files/site/start/shopify/3d-bits-bitbybit-viewer-theme-app-extension-configuration-dynamic-links.jpeg" alt="Shopify theme editor showing the configuration options for the BITBYBIT VIEWER theme app extension block, including dynamic links for 3D model URLs." title="This is how VIEWER theme app extension block looks like on admin panel of Shopify product template" class="img_ev3q"></p>
<p>Here's a short tutorial that will walk you through all the steps involved to set up and use the BITBYBIT VIEWER block:</p>
<div class="responsive-video-container"><iframe width="560" height="315" src="https://www.youtube.com/embed/FcvQAVE1tDc" title="3D Bits App For Shopify - Tutorial Explains How To Use 3D Bits App For Shopify With BITBYBIT VIEWER Theme App Extension Block" frameborder="0" allow="accelerometer; clipboard-write; encrypted-media; gyroscope; picture-in-picture; web-share; fullscreen" allowfullscreen=""></iframe></div>
<h3 class="anchor anchorTargetStickyNavbar_Vzrq" id="bitbybit-preview-block">BITBYBIT PREVIEW Block<a href="https://learn.bitbybit.dev/blog/updated-3d-bits-app-for-shopify#bitbybit-preview-block" class="hash-link" aria-label="Direct link to BITBYBIT PREVIEW Block" title="Direct link to BITBYBIT PREVIEW Block" translate="no">​</a></h3>
<p>The <strong>BITBYBIT PREVIEW</strong> block works with a single metafield where you can paste a public project URL from Bitbybit.dev. This will create an embedding on your Shopify product page that simply loads whatever is in that public Bitbybit.dev project. It can even contain physics simulations, animations, and other interactive elements.</p>
<p><strong>Important Note:</strong> Scenes embedded with the PREVIEW block are self-contained and <strong>cannot</strong> be dynamically changed by Shopify product variant inputs or other UI elements on the Shopify product page. It's a direct window to your Bitbybit.dev project.</p>
<p>➡️ <strong><a class="" href="https://learn.bitbybit.dev/learn/3d-bits/theme-blocks/bitbybit-preview">Learn more about the BITBYBIT PREVIEW block</a></strong></p>
<p><img decoding="async" loading="lazy" src="https://bitbybit.dev/files/site/start/shopify/bitbybit-preview-block.jpeg" alt="Shopify theme editor showing the configuration options for the BITBYBIT PREVIEW theme app extension block, typically requiring a single URL to a public Bitbybit.dev project." title="This is how PREVIEW theme app extension block looks like on admin panel of Shopify product template" class="img_ev3q"></p>
<p>Here's a short tutorial that will walk you through all the steps involved to set up and use the BITBYBIT PREVIEW block:</p>
<div class="responsive-video-container"><iframe width="560" height="315" src="https://www.youtube.com/embed/xU5seV1NQ5o" title="3D Bits App For Shopify - Tutorial Explains How To Use 3D Bits App For Shopify With BITBYBIT PREVIEW Theme App Extension Block" frameborder="0" allow="accelerometer; clipboard-write; encrypted-media; gyroscope; picture-in-picture; web-share; fullscreen" allowfullscreen=""></iframe></div>
<h3 class="anchor anchorTargetStickyNavbar_Vzrq" id="showcasing-3d-gaussian-splats">Showcasing 3D Gaussian Splats<a href="https://learn.bitbybit.dev/blog/updated-3d-bits-app-for-shopify#showcasing-3d-gaussian-splats" class="hash-link" aria-label="Direct link to Showcasing 3D Gaussian Splats" title="Direct link to Showcasing 3D Gaussian Splats" translate="no">​</a></h3>
<p>If you want to scan your physical 3D products and sell them online using the revolutionary Gaussian Splatting technique, the 3D Bits app is your go-to solution.</p>
<ul>
<li class=""><strong>Scanning:</strong> To create scans, we recommend using apps like <strong>Scaniverse</strong> on iPhone or Android devices.</li>
<li class=""><strong>File Format:</strong> Save your scans in the <code>.splat</code> file format for best compatibility and size.</li>
<li class=""><strong>Upload:</strong> Upload these <code>.splat</code> files to Shopify as "Content" (under Settings &gt; Content &gt; Files).</li>
<li class=""><strong>Editing (Optional):</strong> While Scaniverse offers basic editing tools, you can refine your scans further (e.g., remove noise, crop unnecessary details) with the web-based <strong>SuperSplat editor</strong>.</li>
<li class=""><strong>Display on Shopify:</strong> For displaying 3D Gaussian Splats on your Shopify product pages, we suggest using the new <strong>BITBYBIT VIEWER</strong> theme app extension block. It’s the easiest and most direct way we offer to configure and showcase these types of 3D models.</li>
</ul>
<p><strong>Helpful Links:</strong></p>
<ul>
<li class=""><a href="https://scaniverse.com/" target="_blank" rel="noopener noreferrer" class="">Scaniverse App</a></li>
<li class=""><a href="https://playcanvas.com/supersplat/editor/" target="_blank" rel="noopener noreferrer" class="">SuperSplat Editor by PlayCanvas</a></li>
</ul>
<p>Also, make sure to check out our tutorials to learn how this can be done step-by-step:
➡️ <strong><a class="" href="https://learn.bitbybit.dev/learn/3d-bits/intro">Video tutorials on how to use the 3D Bits app</a></strong></p>
<h3 class="anchor anchorTargetStickyNavbar_Vzrq" id="have-a-great-time-with-3d-bits">Have a Great Time with 3D Bits!<a href="https://learn.bitbybit.dev/blog/updated-3d-bits-app-for-shopify#have-a-great-time-with-3d-bits" class="hash-link" aria-label="Direct link to Have a Great Time with 3D Bits!" title="Direct link to Have a Great Time with 3D Bits!" translate="no">​</a></h3>
<p>We hope that these updates will be highly beneficial to you and that your Shopify webshops will look even more stunning with these enhanced 3D capabilities. These new features are available to all users of the 3D Bits app for Shopify.</p>
<p>If you have any questions, need help with anything, or have feedback, please feel free to contact us at any time.</p>
<p>Want to learn more about the original capabilities of 3D Bits for parametric and interactive configurators?
➡️ <strong><a class="" href="https://learn.bitbybit.dev/blog/3d-bits-app-for-shopify">Read about the original release of 3D Bits and what it can do here</a></strong></p>
<p><img decoding="async" loading="lazy" src="https://bitbybit.dev/files/site/blog/3d-bits-app-for-shopify/3d-bits-app-for-shopify-demo-store-picture.jpeg" alt="Screenshot of the 3D Bits app for Shopify demo store, showcasing interactive 3D products." title="3D Bits app for Shopify demo store" class="img_ev3q"></p>]]></content>
        <author>
            <name>Matas Ubarevičius</name>
            <uri>https://www.linkedin.com/in/matas-ubarevicius/</uri>
        </author>
        <category label="Bitbybit" term="Bitbybit"/>
        <category label="CAD" term="CAD"/>
    </entry>
    <entry>
        <title type="html"><![CDATA[UPDATED BITBYBIT RUNNERS: Now with ThreeJS Support & New Lite Versions!]]></title>
        <id>https://learn.bitbybit.dev/blog/updated-bitbybit-runners</id>
        <link href="https://learn.bitbybit.dev/blog/updated-bitbybit-runners"/>
        <updated>2024-11-08T00:00:00.000Z</updated>
        <summary type="html"><![CDATA[Run your Bitbybit.dev scripts wherever you are on the internet! Announcing updated runners with support for both ThreeJS & BabylonJS game engines, plus new lightweight 'Lite' versions.]]></summary>
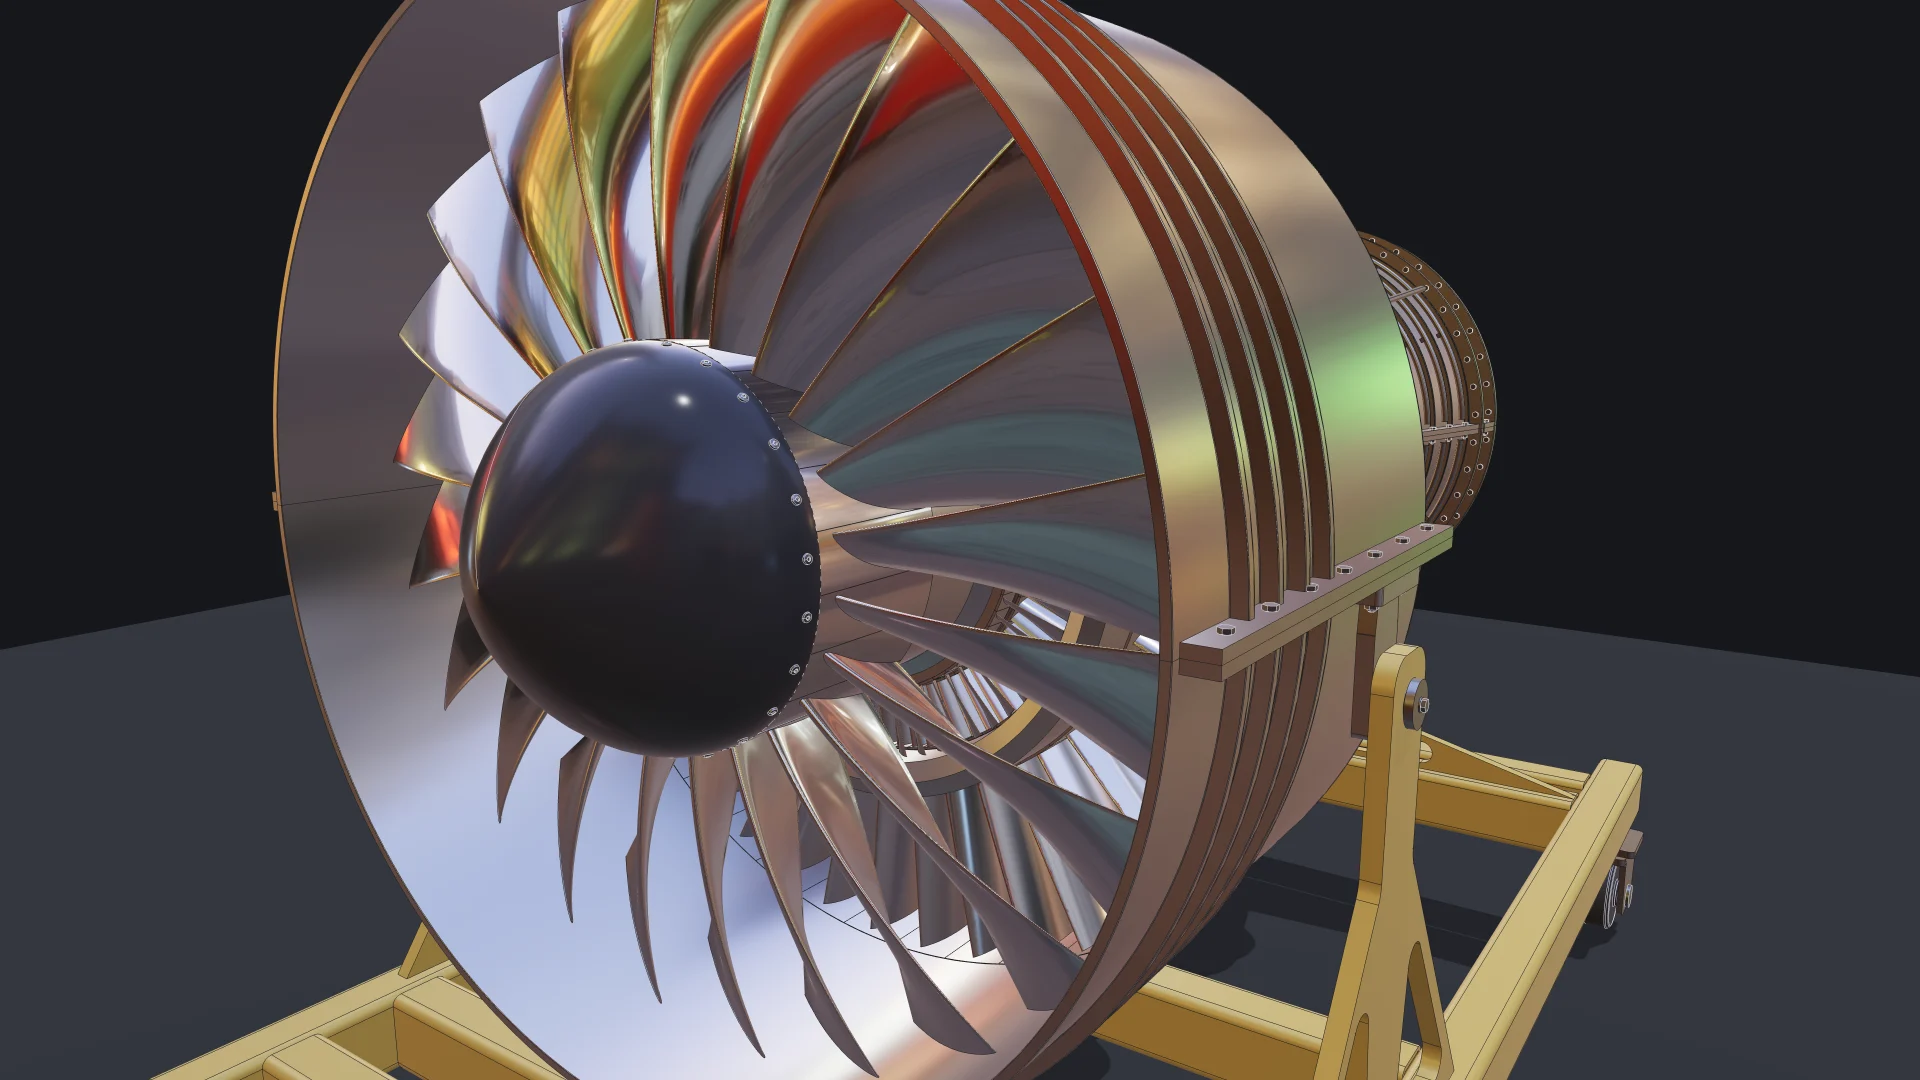
        <content type="html"><![CDATA[<p><img decoding="async" loading="lazy" src="https://bitbybit.dev/files/site/blog/updated-bitbybit-runners/updated-bitbybit-runners.jpeg" alt="A dynamic image of a robot running with lightning splashing around it, symbolizing the power and speed of the Bitbybit Runners." title="Runners are powerful, fast, and amazing" class="img_ev3q"></p>
<p>Our <strong>Bitbybit Runners</strong> allow you to easily include Bitbybit.dev's powerful 3D CAD and computational geometry capabilities into your own websites via a single UMD JavaScript file. In our latest release, we're excited to introduce a completely new runner specifically for the <strong>ThreeJS</strong> game engine!</p>
<div class="theme-admonition theme-admonition-info admonition_xJq3 alert alert--info"><div class="admonitionHeading_Gvgb"><span class="admonitionIcon_Rf37"><svg viewBox="0 0 14 16"><path fill-rule="evenodd" d="M7 2.3c3.14 0 5.7 2.56 5.7 5.7s-2.56 5.7-5.7 5.7A5.71 5.71 0 0 1 1.3 8c0-3.14 2.56-5.7 5.7-5.7zM7 1C3.14 1 0 4.14 0 8s3.14 7 7 7 7-3.14 7-7-3.14-7-7-7zm1 3H6v5h2V4zm0 6H6v2h2v-2z"></path></svg></span>Update: January 6, 2026</div><div class="admonitionContent_BuS1"><p>This article has been updated to include information about our new <strong>PlayCanvas Runner</strong>! PlayCanvas is now the third officially supported game engine for Bitbybit Runners, joining BabylonJS and ThreeJS. All the concepts about Lite versions and runner architecture described below now apply to PlayCanvas as well. <a class="" href="https://learn.bitbybit.dev/blog/playcanvas-support">Read the full PlayCanvas announcement here</a>.</p></div></div>
<p>Furthermore, we've developed new <strong>Lite versions</strong> of the runners for both ThreeJS and BabylonJS (and now PlayCanvas!). These Lite versions allow you to load the respective game engines separately if you're already including them in your project, significantly reducing bundle sizes. Learn more about these exciting updates in this blog post.</p>
<h3 class="anchor anchorTargetStickyNavbar_Vzrq" id="brief-history-of-the-runner">Brief History of the Runner<a href="https://learn.bitbybit.dev/blog/updated-bitbybit-runners#brief-history-of-the-runner" class="hash-link" aria-label="Direct link to Brief History of the Runner" title="Direct link to Brief History of the Runner" translate="no">​</a></h3>
<p>The Bitbybit Runner is a single JavaScript file you can include in your website. It bundles all the open-source components of the Bitbybit.dev platform, such as our CAD kernels (OCCT, JSCAD) and various 3D algorithms. These tools are designed to simplify the development of parametric 3D experiences, model configurators, and other geometry-intensive web applications.</p>
<p>About six months ago, we introduced the first version of the <code>bitbybit-runner</code>, which was fully based on the BabylonJS game engine. This version remains incredibly powerful and popular. The runner can execute Bitbybit.dev algorithms directly through JavaScript. Additionally, we added a feature that allows users to export scripts created in our visual editors (Rete, Blockly) and run them seamlessly on any browser-based coding environment (like StackBlitz, CodePen, or JSFiddle) as well as on their own websites.</p>
<p>If you're unfamiliar with how the runner works or want a refresher, be sure to check out our original introduction article:
➡️ <strong><a class="" href="https://learn.bitbybit.dev/blog/introducing-bitbybit-runner">Introducing BITBYBIT-RUNNER.JS</a></strong></p>
<h3 class="anchor anchorTargetStickyNavbar_Vzrq" id="new-and-improved-runners-enter-threejs-and-later-playcanvas">New and Improved Runners: Enter ThreeJS! (And Later, PlayCanvas!)<a href="https://learn.bitbybit.dev/blog/updated-bitbybit-runners#new-and-improved-runners-enter-threejs-and-later-playcanvas" class="hash-link" aria-label="Direct link to New and Improved Runners: Enter ThreeJS! (And Later, PlayCanvas!)" title="Direct link to New and Improved Runners: Enter ThreeJS! (And Later, PlayCanvas!)" translate="no">​</a></h3>
<p>Recently, we <a class="" href="https://learn.bitbybit.dev/blog/threejs-support">announced official support for the ThreeJS game engine</a> via new NPM packages. Shortly after, we received requests from the community for a dedicated runner specifically for ThreeJS. Based on your valuable feedback, we are thrilled to announce the release of a <strong>new Bitbybit Runner for ThreeJS</strong>!</p>
<p><strong>Update 2026:</strong> Following the same principles, we've now also released a <a class="" href="https://learn.bitbybit.dev/blog/playcanvas-support">PlayCanvas Runner</a>, bringing the total number of supported game engines to three!</p>
<p>This new runner follows the same core principles as the BabylonJS version but is specifically designed and optimized to work with ThreeJS. Like the original, it’s a single JavaScript file you can add to your website. The runner automatically loads all necessary resources, including web workers, CAD kernels, and other dependencies required to run your Bitbybit.dev scripts within a ThreeJS environment.</p>
<p>While developing the ThreeJS runner, we also realized that many projects already include ThreeJS (or BabylonJS) as a dependency in their existing build setups. To avoid the redundancy of loading the entire game engine again from the runner’s bundled JavaScript file, we addressed this with a new, more flexible solution.</p>
<h3 class="anchor anchorTargetStickyNavbar_Vzrq" id="introducing-lite-versions-of-the-runners">Introducing "Lite" Versions of the Runners<a href="https://learn.bitbybit.dev/blog/updated-bitbybit-runners#introducing-lite-versions-of-the-runners" class="hash-link" aria-label="Direct link to Introducing &quot;Lite&quot; Versions of the Runners" title="Direct link to Introducing &quot;Lite&quot; Versions of the Runners" translate="no">​</a></h3>
<p>We've created <strong>Lite versions</strong> of our runners for BabylonJS, ThreeJS, and PlayCanvas. These versions allow you to load the respective game engines <em>separately</em> if they are already part of your project, thus reducing redundancy and improving load times.</p>
<p>The Lite bundles are significantly smaller because they <strong>do not include the game engine dependencies</strong> themselves. Instead, they expect the game engine (BabylonJS, ThreeJS, or PlayCanvas) to be available in the global scope (e.g., on the <code>window</code> object).</p>
<p>If your project already loads one of these game engines via a script tag, NPM import, or another method, using the Lite version of the corresponding Bitbybit Runner will prevent duplicate loading of the engine, making your website faster and more efficient.</p>
<h3 class="anchor anchorTargetStickyNavbar_Vzrq" id="threejs-runners-examples-in-action">ThreeJS Runners: Examples in Action<a href="https://learn.bitbybit.dev/blog/updated-bitbybit-runners#threejs-runners-examples-in-action" class="hash-link" aria-label="Direct link to ThreeJS Runners: Examples in Action" title="Direct link to ThreeJS Runners: Examples in Action" translate="no">​</a></h3>
<p><img decoding="async" loading="lazy" src="https://bitbybit.dev/files/site/blog/updated-bitbybit-runners/threejs-logo-3d-print-bitbybit-dev-runner.jpeg" alt="Lite ThreeJS runner in action: A 3D model configurator allows users to create a 3D printable ThreeJS logo with custom triangle definitions, ready for a Christmas tree!" title="Lite ThreeJS runner in action - configurable 3D printable ThreeJS logo" class="img_ev3q"></p>
<p>The project accessible through the links below introduces the core functionality of the ThreeJS runner. It's a 3D model configurator designed to create a customizable ThreeJS logo with user-defined triangular configurations, perfectly suited for 3D printing. You could even print it to decorate your Christmas tree!</p>
<p>We offer the code on various third-party coding platforms, all of which support the execution of Bitbybit.dev code via the runner:</p>
<ul>
<li class=""><strong>Live Demo:</strong> <a href="https://app-store.bitbybit.dev/threejs-logo-3d-print/" target="_blank" rel="noopener noreferrer" class="">3D Printable ThreeJS Logo Configurator</a></li>
<li class=""><strong>StackBlitz Example:</strong> <a href="https://stackblitz.com/edit/stackblitz-starters-fhck8j?file=script.js" target="_blank" rel="noopener noreferrer" class="">ThreeJS Runner on StackBlitz</a></li>
<li class=""><strong>CodePen Example:</strong> <a href="https://codepen.io/matas-bitbybit-dev/pen/yyBebgr" target="_blank" rel="noopener noreferrer" class="">ThreeJS Runner on CodePen</a></li>
<li class=""><strong>JSFiddle Example:</strong> <a href="https://jsfiddle.net/matas_bitbybitdev/qmyLhre3/5/" target="_blank" rel="noopener noreferrer" class="">ThreeJS Runner on JSFiddle</a></li>
<li class=""><strong>GitHub Source Code:</strong> <a href="https://github.com/bitbybit-dev/app-examples/blob/main/runner/threejs/lite/threejs-logo/index.html" target="_blank" rel="noopener noreferrer" class="">View Source on GitHub</a></li>
</ul>
<p><strong>More Screenshots of the ThreeJS Runner Demo:</strong></p>
<p><img decoding="async" loading="lazy" src="https://bitbybit.dev/files/site/blog/updated-bitbybit-runners/stackblitz-threejs-demo-3d-print-logo.jpeg" alt="Example of the ThreeJS runner demo running on StackBlitz." title="Example of ThreeJS runner in action on StackBlitz" class="img_ev3q">
<em>ThreeJS Runner on StackBlitz</em></p>
<p><img decoding="async" loading="lazy" src="https://bitbybit.dev/files/site/blog/updated-bitbybit-runners/codepen-threejs-logo-3d-print.jpeg" alt="Example of the ThreeJS runner demo running on CodePen." title="Example of ThreeJS runner in action on CodePen" class="img_ev3q">
<em>ThreeJS Runner on CodePen</em></p>
<p><img decoding="async" loading="lazy" src="https://bitbybit.dev/files/site/blog/updated-bitbybit-runners/jsfiddle-threejs-3d-logo-bitbybit-dev.jpeg" alt="Example of the ThreeJS runner demo running on JSFiddle." title="Example of ThreeJS runner in action on JSFiddle" class="img_ev3q">
<em>ThreeJS Runner on JSFiddle</em></p>
<p>Another key feature of this configurator is its ability to save STL and STEP files, enabling you to manufacture a physical 3D model from your design. Tangible results bring the project to life! Check out this screenshot of the ThreeJS logo model loaded into Cura software-it's sliced and ready for 3D printing.</p>
<p><img decoding="async" loading="lazy" src="https://bitbybit.dev/files/site/blog/updated-bitbybit-runners/three-js-logo-3d-print-cura.jpeg" alt="The 3D printable ThreeJS logo model loaded and sliced in Cura 3D printing software." title="ThreeJS logo model ready for 3D printing" class="img_ev3q"></p>
<h3 class="anchor anchorTargetStickyNavbar_Vzrq" id="overview-of-all-available-runners">Overview of All Available Runners<a href="https://learn.bitbybit.dev/blog/updated-bitbybit-runners#overview-of-all-available-runners" class="hash-link" aria-label="Direct link to Overview of All Available Runners" title="Direct link to Overview of All Available Runners" translate="no">​</a></h3>
<p>Here's a summary of the Bitbybit Runners now available:</p>
<ul>
<li class=""><strong><code>bitbybit-runner-babylonjs.js</code></strong>
<ul>
<li class="">This is our most powerful and feature-rich runner. It includes all necessary resources to run Bitbybit.dev scripts <em>and</em> the BabylonJS engine itself.</li>
<li class="">If you don’t already have BabylonJS in your project, this is the recommended runner for BabylonJS-based experiences.</li>
<li class="">It has the best support for scripts exported from our visual programming editors (Rete, Blockly) as these editors are natively built with BabylonJS.</li>
<li class="">Among countless 3D algorithms, it's also capable of running Havok physics and other BabylonJS-specific features like GUI elements and advanced materials.</li>
</ul>
</li>
<li class=""><strong><code>bitbybit-runner-lite-babylonjs.js</code></strong>
<ul>
<li class="">A smaller, lightweight version of the BabylonJS runner that <strong>does not include</strong> the BabylonJS engine.</li>
<li class="">It expects the <code>window</code> object to contain these global BabylonJS dependencies before initialization: <code>BABYLON</code>, <code>GUI</code>, <code>LOADERS</code>, <code>MATERIALS</code>, <code>SERIALIZERS</code>. Only then can this Lite runner initialize successfully.</li>
<li class="">Use this if BabylonJS is already loaded in your project.</li>
</ul>
</li>
<li class=""><strong><code>bitbybit-runner-threejs.js</code></strong>
<ul>
<li class="">This runner is capable of executing all open-source Bitbybit.dev CAD algorithms within a ThreeJS environment. It bundles the ThreeJS game engine and OrbitControls in a single file.</li>
<li class="">It can also execute visual scripts exported from our editors, as long as they do not contain any BabylonJS-specific logic.</li>
</ul>
</li>
<li class=""><strong><code>bitbybit-runner-lite-threejs.js</code></strong>
<ul>
<li class="">A lightweight version of the ThreeJS runner that <strong>does not include</strong> the ThreeJS engine.</li>
<li class="">It expects the <code>window</code> object to contain these global ThreeJS dependencies before initialization: <code>THREE</code> (for ThreeJS itself) and <code>OrbitControls</code> (if you plan to use them via the runner's setup). Only then can this Lite runner initialize successfully.</li>
<li class="">Use this if ThreeJS is already loaded in your project.</li>
</ul>
</li>
<li class=""><strong><code>bitbybit-runner-playcanvas.js</code></strong> <em>(Added 2026)</em>
<ul>
<li class="">This runner executes all open-source Bitbybit.dev CAD algorithms within a PlayCanvas environment. It bundles the PlayCanvas engine in a single file.</li>
<li class="">Optimized for high performance and mobile devices.</li>
<li class="">Can also execute visual scripts exported from our editors, as long as they do not contain BabylonJS-specific logic.</li>
</ul>
</li>
<li class=""><strong><code>bitbybit-runner-lite-playcanvas.js</code></strong> <em>(Added 2026)</em>
<ul>
<li class="">A lightweight version of the PlayCanvas runner that <strong>does not include</strong> the PlayCanvas engine.</li>
<li class="">It expects the <code>window</code> object to contain the <code>pc</code> (PlayCanvas) global before initialization.</li>
<li class="">Use this if PlayCanvas is already loaded in your project.</li>
</ul>
</li>
</ul>
<h3 class="anchor anchorTargetStickyNavbar_Vzrq" id="how-babylonjs-threejs-and-playcanvas-runners-differ">How BabylonJS, ThreeJS, and PlayCanvas Runners Differ<a href="https://learn.bitbybit.dev/blog/updated-bitbybit-runners#how-babylonjs-threejs-and-playcanvas-runners-differ" class="hash-link" aria-label="Direct link to How BabylonJS, ThreeJS, and PlayCanvas Runners Differ" title="Direct link to How BabylonJS, ThreeJS, and PlayCanvas Runners Differ" translate="no">​</a></h3>
<p>All three runner families (BabylonJS, ThreeJS, and PlayCanvas) can execute all of our open-source 3D modeling algorithms and interact with our CAD kernels (OCCT, JSCAD, Manifold). The primary differences are related to the game engines themselves and their specific features:</p>
<ul>
<li class=""><strong>Visual Script Compatibility:</strong> If you are looking to export and run scripts created with our visual programming editors (Rete, Blockly) on the Bitbybit.dev website, you will generally have more success and feature parity with the <strong>BabylonJS runner</strong>. Our visual editors are natively based on BabylonJS. Thus, if your scripts use specific BabylonJS features (like our built-in skyboxes, GUI elements, Havok physics integrations, specific BabylonJS materials, etc.), you should use a BabylonJS runner.</li>
<li class=""><strong>Error Handling for Visual Scripts in ThreeJS and PlayCanvas Runners:</strong> The ThreeJS and PlayCanvas runners will also attempt to run visual scripts exported from Bitbybit.dev. However, if they encounter BabylonJS-specific logic, they will throw an error as those features are not available in their contexts. That said, if you limit your visual coding to <em>only</em> contain 3D modeling-related features (CAD operations, basic geometry, etc.) without engine-specific rendering features, then your scripts <em>should</em> execute just fine with any of the three runners.</li>
<li class=""><strong>Direct JavaScript Coding:</strong> If you are simply writing Bitbybit.dev logic directly in JavaScript (not exporting from visual editors), then any of these runners (BabylonJS, ThreeJS, or PlayCanvas, full or Lite) will work well for you for the core CAD functionalities.</li>
<li class=""><strong>Bundle Size &amp; Performance:</strong>
<ul>
<li class="">The BabylonJS runner is generally the largest due to its comprehensive feature set.</li>
<li class="">The ThreeJS runner offers a good balance of features and size.</li>
<li class="">The PlayCanvas runner is optimized for performance and smaller bundle sizes, making it ideal for mobile-first applications.</li>
<li class="">The Lite versions are much smaller for all three engines.</li>
</ul>
</li>
<li class=""><strong>Engine-Specific Strengths:</strong>
<ul>
<li class=""><strong>BabylonJS:</strong> Best for projects requiring physics (Havok), GUI elements, and maximum compatibility with visual scripts.</li>
<li class=""><strong>ThreeJS:</strong> Excellent for projects already using ThreeJS or needing its vast ecosystem.</li>
<li class=""><strong>PlayCanvas:</strong> Perfect for high-performance applications, mobile optimization, and game development.</li>
</ul>
</li>
</ul>
<p>No matter your preference, we love all three of these incredible game engines, and we are excited to see what you will create with them using Bitbybit.dev!</p>
<h3 class="anchor anchorTargetStickyNavbar_Vzrq" id="where-to-find-the-runners">Where to Find the Runners<a href="https://learn.bitbybit.dev/blog/updated-bitbybit-runners#where-to-find-the-runners" class="hash-link" aria-label="Direct link to Where to Find the Runners" title="Direct link to Where to Find the Runners" translate="no">​</a></h3>
<p>We are serving the Bitbybit Runners from the <strong>Bitbybit CDN</strong>. You can include them in your website with the following script tags. Remember to replace <code>&lt;version-number-of-bitbybit&gt;</code> with the actual version you intend to use.</p>
<div class="theme-admonition theme-admonition-tip admonition_xJq3 alert alert--success"><div class="admonitionHeading_Gvgb"><span class="admonitionIcon_Rf37"><svg viewBox="0 0 12 16"><path fill-rule="evenodd" d="M6.5 0C3.48 0 1 2.19 1 5c0 .92.55 2.25 1 3 1.34 2.25 1.78 2.78 2 4v1h5v-1c.22-1.22.66-1.75 2-4 .45-.75 1-2.08 1-3 0-2.81-2.48-5-5.5-5zm3.64 7.48c-.25.44-.47.8-.67 1.11-.86 1.41-1.25 2.06-1.45 3.23-.02.05-.02.11-.02.17H5c0-.06 0-.13-.02-.17-.2-1.17-.59-1.83-1.45-3.23-.2-.31-.42-.67-.67-1.11C2.44 6.78 2 5.65 2 5c0-2.2 2.02-4 4.5-4 1.22 0 2.36.42 3.22 1.19C10.55 2.94 11 3.94 11 5c0 .66-.44 1.78-.86 2.48zM4 14h5c-.23 1.14-1.3 2-2.5 2s-2.27-.86-2.5-2z"></path></svg></span>Self-Hosting for Production</div><div class="admonitionContent_BuS1"><p>For production applications requiring maximum reliability and control, consider <a class="" href="https://learn.bitbybit.dev/learn/hosting-and-cdn"><strong>self-hosting the runners and assets</strong></a> on your own infrastructure.</p></div></div>
<ul>
<li class=""><strong><code>bitbybit-runner-babylonjs.js</code></strong> (Full BabylonJS runner)<!-- -->
<div class="language-html codeBlockContainer_Ckt0 theme-code-block" style="--prism-color:#F8F8F2;--prism-background-color:#282A36"><div class="codeBlockContent_QJqH"><pre tabindex="0" class="prism-code language-html codeBlock_bY9V thin-scrollbar" style="color:#F8F8F2;background-color:#282A36"><code class="codeBlockLines_e6Vv"><div class="token-line" style="color:#F8F8F2"><span class="token tag punctuation" style="color:rgb(248, 248, 242)">&lt;</span><span class="token tag" style="color:rgb(255, 121, 198)">script</span><span class="token tag" style="color:rgb(255, 121, 198)"> </span><span class="token tag attr-name" style="color:rgb(241, 250, 140)">src</span><span class="token tag attr-value punctuation attr-equals" style="color:rgb(248, 248, 242)">=</span><span class="token tag attr-value punctuation" style="color:rgb(248, 248, 242)">"</span><span class="token tag attr-value" style="color:rgb(255, 121, 198)">https://git-cdn.bitbybit.dev/v&lt;version-number-of-bitbybit&gt;/runner/bitbybit-runner-babylonjs.js</span><span class="token tag attr-value punctuation" style="color:rgb(248, 248, 242)">"</span><span class="token tag punctuation" style="color:rgb(248, 248, 242)">&gt;</span><span class="token tag punctuation" style="color:rgb(248, 248, 242)">&lt;/</span><span class="token tag" style="color:rgb(255, 121, 198)">script</span><span class="token tag punctuation" style="color:rgb(248, 248, 242)">&gt;</span><br></div></code></pre></div></div>
</li>
<li class=""><strong><code>bitbybit-runner-lite-babylonjs.js</code></strong> (Lite BabylonJS runner - BabylonJS must be loaded separately)<!-- -->
<div class="language-html codeBlockContainer_Ckt0 theme-code-block" style="--prism-color:#F8F8F2;--prism-background-color:#282A36"><div class="codeBlockContent_QJqH"><pre tabindex="0" class="prism-code language-html codeBlock_bY9V thin-scrollbar" style="color:#F8F8F2;background-color:#282A36"><code class="codeBlockLines_e6Vv"><div class="token-line" style="color:#F8F8F2"><span class="token tag punctuation" style="color:rgb(248, 248, 242)">&lt;</span><span class="token tag" style="color:rgb(255, 121, 198)">script</span><span class="token tag" style="color:rgb(255, 121, 198)"> </span><span class="token tag attr-name" style="color:rgb(241, 250, 140)">src</span><span class="token tag attr-value punctuation attr-equals" style="color:rgb(248, 248, 242)">=</span><span class="token tag attr-value punctuation" style="color:rgb(248, 248, 242)">"</span><span class="token tag attr-value" style="color:rgb(255, 121, 198)">https://git-cdn.bitbybit.dev/v&lt;version-number-of-bitbybit&gt;/runner/bitbybit-runner-lite-babylonjs.js</span><span class="token tag attr-value punctuation" style="color:rgb(248, 248, 242)">"</span><span class="token tag punctuation" style="color:rgb(248, 248, 242)">&gt;</span><span class="token tag punctuation" style="color:rgb(248, 248, 242)">&lt;/</span><span class="token tag" style="color:rgb(255, 121, 198)">script</span><span class="token tag punctuation" style="color:rgb(248, 248, 242)">&gt;</span><br></div></code></pre></div></div>
</li>
<li class=""><strong><code>bitbybit-runner-threejs.js</code></strong> (Full ThreeJS runner)<!-- -->
<div class="language-html codeBlockContainer_Ckt0 theme-code-block" style="--prism-color:#F8F8F2;--prism-background-color:#282A36"><div class="codeBlockContent_QJqH"><pre tabindex="0" class="prism-code language-html codeBlock_bY9V thin-scrollbar" style="color:#F8F8F2;background-color:#282A36"><code class="codeBlockLines_e6Vv"><div class="token-line" style="color:#F8F8F2"><span class="token tag punctuation" style="color:rgb(248, 248, 242)">&lt;</span><span class="token tag" style="color:rgb(255, 121, 198)">script</span><span class="token tag" style="color:rgb(255, 121, 198)"> </span><span class="token tag attr-name" style="color:rgb(241, 250, 140)">src</span><span class="token tag attr-value punctuation attr-equals" style="color:rgb(248, 248, 242)">=</span><span class="token tag attr-value punctuation" style="color:rgb(248, 248, 242)">"</span><span class="token tag attr-value" style="color:rgb(255, 121, 198)">https://git-cdn.bitbybit.dev/v&lt;version-number-of-bitbybit&gt;/runner/bitbybit-runner-threejs.js</span><span class="token tag attr-value punctuation" style="color:rgb(248, 248, 242)">"</span><span class="token tag punctuation" style="color:rgb(248, 248, 242)">&gt;</span><span class="token tag punctuation" style="color:rgb(248, 248, 242)">&lt;/</span><span class="token tag" style="color:rgb(255, 121, 198)">script</span><span class="token tag punctuation" style="color:rgb(248, 248, 242)">&gt;</span><br></div></code></pre></div></div>
</li>
<li class=""><strong><code>bitbybit-runner-lite-threejs.js</code></strong> (Lite ThreeJS runner - ThreeJS must be loaded separately)<!-- -->
<div class="language-html codeBlockContainer_Ckt0 theme-code-block" style="--prism-color:#F8F8F2;--prism-background-color:#282A36"><div class="codeBlockContent_QJqH"><pre tabindex="0" class="prism-code language-html codeBlock_bY9V thin-scrollbar" style="color:#F8F8F2;background-color:#282A36"><code class="codeBlockLines_e6Vv"><div class="token-line" style="color:#F8F8F2"><span class="token tag punctuation" style="color:rgb(248, 248, 242)">&lt;</span><span class="token tag" style="color:rgb(255, 121, 198)">script</span><span class="token tag" style="color:rgb(255, 121, 198)"> </span><span class="token tag attr-name" style="color:rgb(241, 250, 140)">src</span><span class="token tag attr-value punctuation attr-equals" style="color:rgb(248, 248, 242)">=</span><span class="token tag attr-value punctuation" style="color:rgb(248, 248, 242)">"</span><span class="token tag attr-value" style="color:rgb(255, 121, 198)">https://git-cdn.bitbybit.dev/v&lt;version-number-of-bitbybit&gt;/runner/bitbybit-runner-lite-threejs.js</span><span class="token tag attr-value punctuation" style="color:rgb(248, 248, 242)">"</span><span class="token tag punctuation" style="color:rgb(248, 248, 242)">&gt;</span><span class="token tag punctuation" style="color:rgb(248, 248, 242)">&lt;/</span><span class="token tag" style="color:rgb(255, 121, 198)">script</span><span class="token tag punctuation" style="color:rgb(248, 248, 242)">&gt;</span><br></div></code></pre></div></div>
</li>
<li class=""><strong><code>bitbybit-runner-playcanvas.js</code></strong> (Full PlayCanvas runner) <em>(Added 2026)</em>
<div class="language-html codeBlockContainer_Ckt0 theme-code-block" style="--prism-color:#F8F8F2;--prism-background-color:#282A36"><div class="codeBlockContent_QJqH"><pre tabindex="0" class="prism-code language-html codeBlock_bY9V thin-scrollbar" style="color:#F8F8F2;background-color:#282A36"><code class="codeBlockLines_e6Vv"><div class="token-line" style="color:#F8F8F2"><span class="token tag punctuation" style="color:rgb(248, 248, 242)">&lt;</span><span class="token tag" style="color:rgb(255, 121, 198)">script</span><span class="token tag" style="color:rgb(255, 121, 198)"> </span><span class="token tag attr-name" style="color:rgb(241, 250, 140)">src</span><span class="token tag attr-value punctuation attr-equals" style="color:rgb(248, 248, 242)">=</span><span class="token tag attr-value punctuation" style="color:rgb(248, 248, 242)">"</span><span class="token tag attr-value" style="color:rgb(255, 121, 198)">https://git-cdn.bitbybit.dev/v&lt;version-number-of-bitbybit&gt;/runner/bitbybit-runner-playcanvas.js</span><span class="token tag attr-value punctuation" style="color:rgb(248, 248, 242)">"</span><span class="token tag punctuation" style="color:rgb(248, 248, 242)">&gt;</span><span class="token tag punctuation" style="color:rgb(248, 248, 242)">&lt;/</span><span class="token tag" style="color:rgb(255, 121, 198)">script</span><span class="token tag punctuation" style="color:rgb(248, 248, 242)">&gt;</span><br></div></code></pre></div></div>
</li>
<li class=""><strong><code>bitbybit-runner-lite-playcanvas.js</code></strong> (Lite PlayCanvas runner - PlayCanvas must be loaded separately) <em>(Added 2026)</em>
<div class="language-html codeBlockContainer_Ckt0 theme-code-block" style="--prism-color:#F8F8F2;--prism-background-color:#282A36"><div class="codeBlockContent_QJqH"><pre tabindex="0" class="prism-code language-html codeBlock_bY9V thin-scrollbar" style="color:#F8F8F2;background-color:#282A36"><code class="codeBlockLines_e6Vv"><div class="token-line" style="color:#F8F8F2"><span class="token tag punctuation" style="color:rgb(248, 248, 242)">&lt;</span><span class="token tag" style="color:rgb(255, 121, 198)">script</span><span class="token tag" style="color:rgb(255, 121, 198)"> </span><span class="token tag attr-name" style="color:rgb(241, 250, 140)">src</span><span class="token tag attr-value punctuation attr-equals" style="color:rgb(248, 248, 242)">=</span><span class="token tag attr-value punctuation" style="color:rgb(248, 248, 242)">"</span><span class="token tag attr-value" style="color:rgb(255, 121, 198)">https://git-cdn.bitbybit.dev/v&lt;version-number-of-bitbybit&gt;/runner/bitbybit-runner-lite-playcanvas.js</span><span class="token tag attr-value punctuation" style="color:rgb(248, 248, 242)">"</span><span class="token tag punctuation" style="color:rgb(248, 248, 242)">&gt;</span><span class="token tag punctuation" style="color:rgb(248, 248, 242)">&lt;/</span><span class="token tag" style="color:rgb(255, 121, 198)">script</span><span class="token tag punctuation" style="color:rgb(248, 248, 242)">&gt;</span><br></div></code></pre></div></div>
</li>
</ul>
<p><strong>Note:</strong> You should replace <code>&lt;version-number-of-bitbybit&gt;</code> with an actual version number (e.g., <code>&lt;Version /&gt;</code>). You can find all the official versions of Bitbybit.dev here:
➡️ <strong><a href="https://github.com/bitbybit-dev/bitbybit/releases" target="_blank" rel="noopener noreferrer" class="">Bitbybit.dev GitHub Releases</a></strong></p>
<h3 class="anchor anchorTargetStickyNavbar_Vzrq" id="examples-of-the-runners">Examples of the Runners<a href="https://learn.bitbybit.dev/blog/updated-bitbybit-runners#examples-of-the-runners" class="hash-link" aria-label="Direct link to Examples of the Runners" title="Direct link to Examples of the Runners" translate="no">​</a></h3>
<p>It can be hard to guess how runners can be used in practice, which is why we provide you with actual, working examples. We create projects that fit within a single <code>index.html</code> file, which you can simply open in your browser directly from your file system. This approach doesn't even require you to run a local server on your computer. That’s the true power of the web!</p>
<p>➡️ <strong><a href="https://github.com/bitbybit-dev/bitbybit/tree/master/examples/runner" target="_blank" rel="noopener noreferrer" class="">Explore Example Use Cases of BabylonJS, ThreeJS &amp; PlayCanvas Runners on GitHub</a></strong></p>
<p>This GitHub repository contains examples that use both the full and Lite runners for all three game engines. We also provide examples on how to initialize BabylonJS, ThreeJS, or PlayCanvas scene objects <em>outside</em> the context of the runner. This approach allows Bitbybit Runners to work more harmoniously with third-party tools or existing projects that already manage their own game engine instances (e.g., integrating with A-Frame, custom ThreeJS setups, or PlayCanvas Editor projects).</p>
<p>Initiating scene objects <em>inside</em> the runner (letting the runner create the default scene) is also possible and is often simpler, though it offers less fine-grained control if you have a complex existing setup.</p>
<p>We hope these updated runners provide even more flexibility and power for your 3D web projects!</p>]]></content>
        <author>
            <name>Matas Ubarevičius</name>
            <uri>https://www.linkedin.com/in/matas-ubarevicius/</uri>
        </author>
        <category label="Bitbybit" term="Bitbybit"/>
        <category label="CAD" term="CAD"/>
    </entry>
</feed>